请注意!!!
本系列的文章是断断续续写的,本文大部分内容最早写于2023年1月,可能有些信息已经过时!
别问,问就是写了一半然后放草稿箱里长草了。

0x00 引言
HomeLab 系列回顾:
HomeLab | 1 Proxmox Virtual Environment(PVE) 安装及配置
HomeLab | 2 OpenMediaVault 安装 & 硬盘直通 & 相关配置
HomeLab | 3 下载观影一条龙:NASTool/JellyFin/qBittorrent 半自动化家庭影院搭建指北
上一篇博客中,我们介绍了 JellyFin,这是一个免费开源的媒体中心软件,可以用来管理和播放您的个人媒体库,实现方便快捷灵活的观影体验。
其中,JellyFin 串流播放如果编码不适配等情况的话可能涉及转码,需要吃 CPU 的资源,而 GPU 硬件加速可以显着提高 JellyFin 的性能,这对于播放高分辨率视频或转码媒体文件尤其有用。
你说你没有独显,核显行不行?说得对,喵喵 没钱买独显 也这么想,这就来试试呗!
那为什么要使用 LXC 安装 JellyFin 呢?
LXC 是一种轻量级的虚拟化技术,可以让我们在同一台物理服务器上运行多个虚拟机,从而隔离不同的应用程序和服务,便于资源控制和管理。另外,直接使用 LXC 不涉及复杂的显卡直通操作,直接将显卡共享到 LXC 里使用,对于系统的兼容性较好。
这篇博客就来填一下之前挖的坑,介绍一下如何在 PVE 环境中使用 LXC 安装 JellyFin,并实现 GPU 核显硬件加速。
顺便还提了一下 PVE 中 openvswitch 的配置方法。
(头图由 AI 参与创作
0x01 宿主机上的配置
升级内核
首先升级下宿主机的内核和 PVE 版本!
apt update
apt upgrade
比如咱把内核和 PVE 管理器升级到了目前最新的版本。
手动装了下 pve-kernel 和 pve-headers
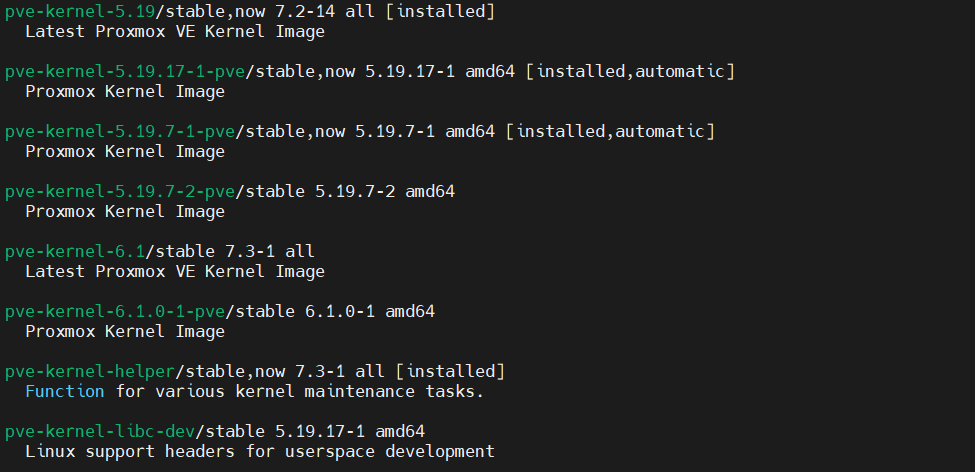
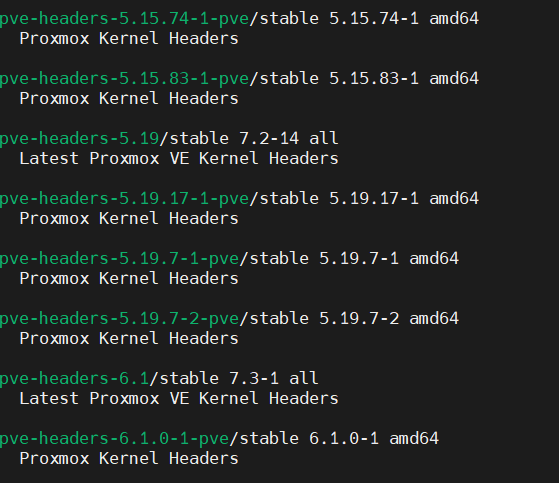
(这些文字写的比较早但是放在草稿箱里吃灰了, 你看到文章的时候已经不是最新的了,建议还是装你这时候最新的
apt install pve-kernel-6.1.0-1-pve pve-headers-6.1.0-1-pve然后保存好你的配置,重启 PVE
内核版本 Linux 6.1.0-1-pve #1 SMP PREEMPT_DYNAMIC PVE 6.1.0-1 (Tue, 13 Dec 2022 15:08:53 +0
PVE管理器版本 pve-manager/7.3-4/d69b70d4
开启 GuC 和 HuC
然后配下显卡的内核选项,开启 i915 GuC 和 HuC
根据 JellyFin 文档,Intel Gen9 and Gen11+ iGPUs 必须开启 Guc/Huc firmware
GuC and HuC 固件是由 linux-firmware 提供的。
submission and power management is enabled by setting the kernel module parameter: i915.enable_guc=1
HuC authentication only is enabled by setting the kernel module parameter: i915.enable_guc=2
Combine for both features together: i915.enable_guc=3
Please note that prior to kernel 4.16, HuC authentication was enabled by setting: i915.enable_guc_loading=1
Please see kernel documentation at https://www.kernel.org/doc/html/latest/gpu/i915.html#guc for more details.
nano /etc/modprobe.d/i915.conf写入
options i915 enable_guc=3然后更新内核模块,重启
update-initramfs -u -k all
reboot请注意保存好工作,尽量先把 VM 手动关闭了,不然此处会等待所有 VM 和 LXC 都关了 PVE 才会真正重启,默认的 VM 关闭超时为 180s,超时才会强制关机。
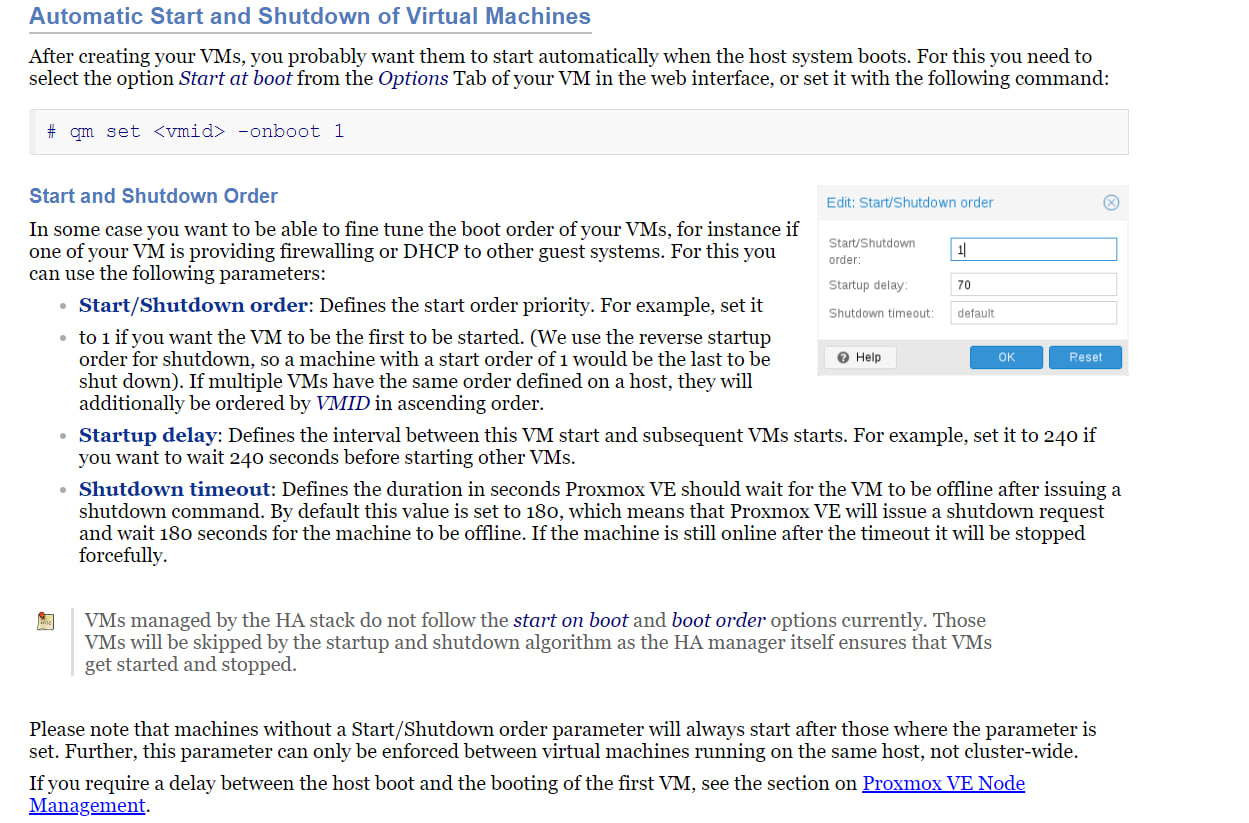
重启后验证低功耗编码 HuC 和 GuC 是否开启
journalctl -b -o short-monotonic -k | egrep -i "i915|dmr|dmc|guc|huc"
0x02 配置 PVE 中的内网(openvswitch)
这是一个可选步骤,只是懒得单独写一篇博客了,就顺便放在这里了吧
(以后群友问到的话,直接甩一个链接好了,多好
基于 Open vSwitch (openvswitch, OVS),可以在 PVE 中构建一个虚拟化万兆网卡,从而实现 PVE 上的 VM / LXC 之间高速互联。
apt update
apt install openvswitch-switch
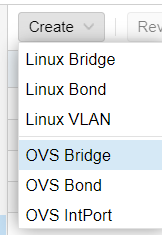
依次点击
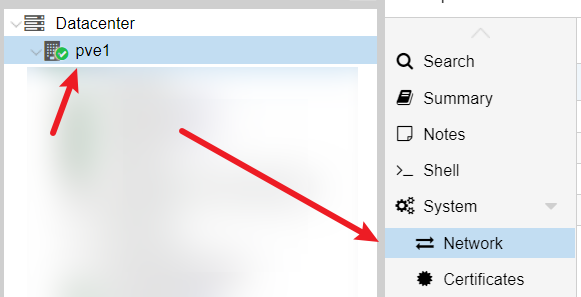
创建 OVS Bridge,可以直接默认配置然后点击 Create
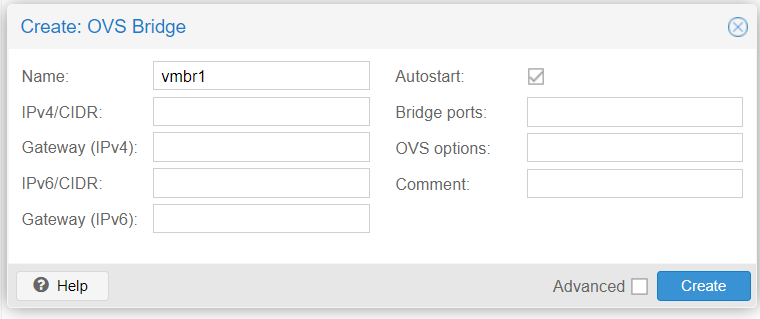
然后创建 OVS IntPort,名字比如 internal,IPv4/CIDR 填个你喜欢的私网网段,比如 192.168.200.1/24,OVS Bridge 选择刚刚创建的 vmbr1,其他没有需要的话可以不填
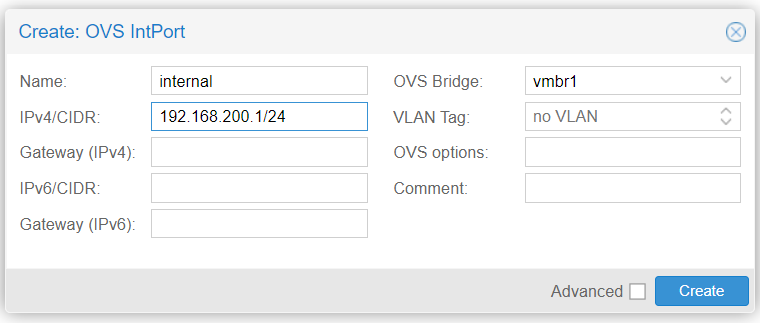
然后 PVE 宿主机端的配置就完成了,如果有需要就另外给 VM / LXC 添加网卡,指定 Bridge: vmbr1 即可

下面的 LXC 配置里还会提到的。
0x03 挂载 NAS NFS
喵喵这里的存储是在 VM 的 omv 里的,通过 NFS 共享出来给 JellyFin 用,你的情景很有可能是挂载另一台机器(比如专门一台存储设备 / NAS)的存储,也是一个道理的。
噢对了,如果你是直接 PVE host 上的文件系统,那这一步就不用配置了,直接往下面一节看。
咱这里先挂载到 PVE 宿主机上,进而在后续步骤 map 到 LXC 里。
这么做是因为 NFS 是内核相关的行为,如果要在 LXC 里安装 NFS 并挂载的话,需要开启特权容器并在选项里勾选 NFS 才行。
按图添加 NFS 存储
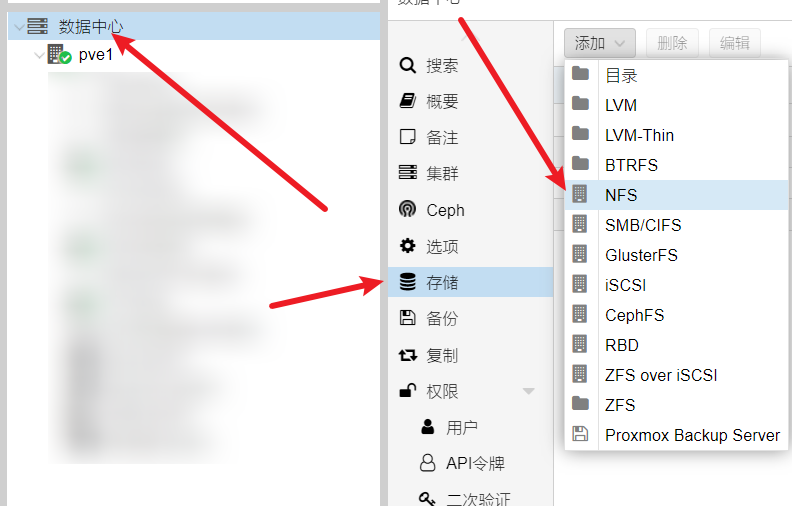
Export 是 omv 上 NFS server 配置的,正常来说填了服务器 IP 就会自动出来下拉框可以选了。
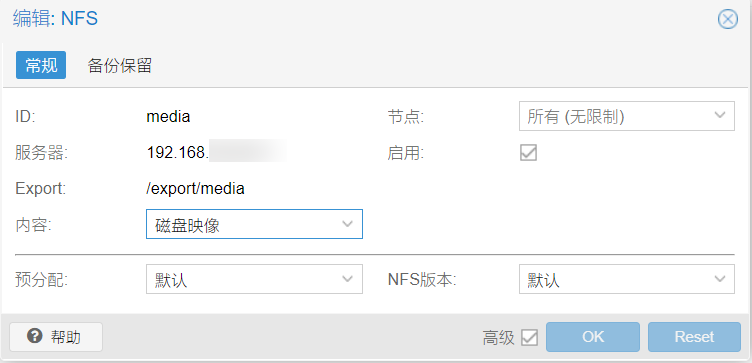
配置好了之后会挂载到 /mnt/pve/media 目录下

0x04 LXC 配置
下载 Debian 11 的 CT 模板
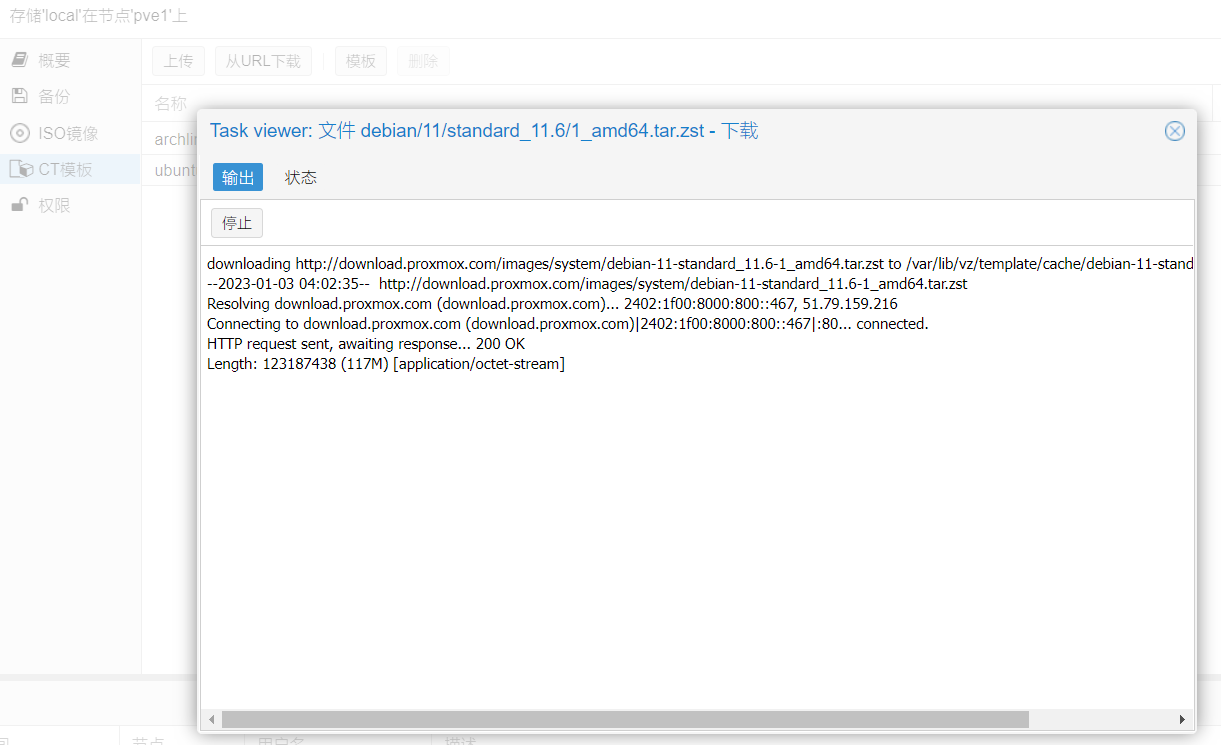
如果这里半天下载不下来,可以手动下载到目录下,喵喵这里直接用 USTC 的镜像加速下载
cd /var/lib/vz/template/cache
wget https://mirrors.ustc.edu.cn/proxmox/images/system/debian-11-standard_11.6-1_amd64.tar.zst
新建 LXC 容器
为了后续安装 docker,这里勾选 嵌套
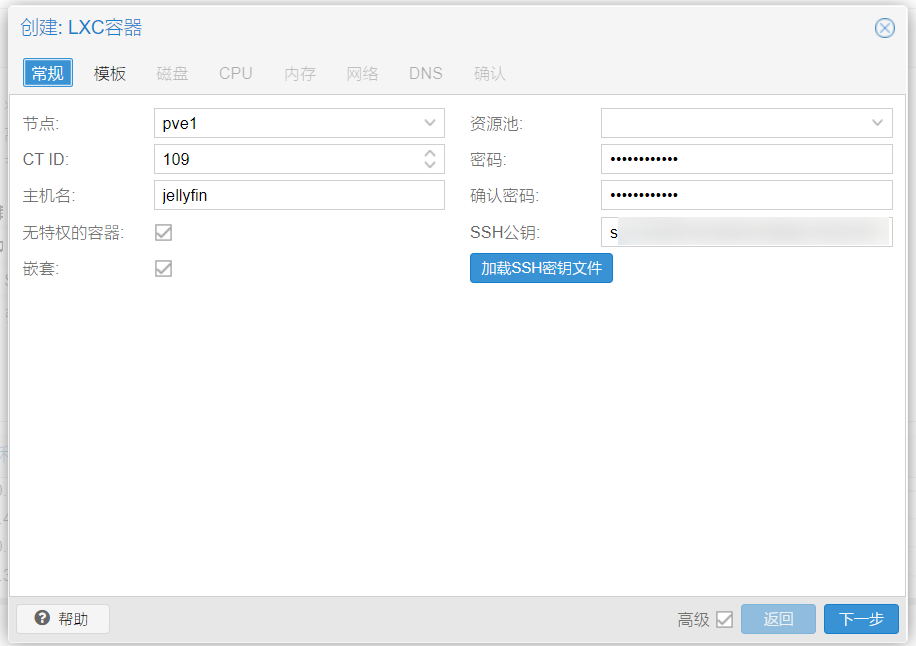
这里咱还是试试勾选 无特权的容器,不想给他那么高的权限,但可能需要多点 idmap 的麻烦事(
如果你不想折腾的话这里就把 无特权的容器 这个勾给去掉
注意这里有点坑,如果你是配好了系统了再到 PVE 的配置文件里去改这个 unprivileged 参数的值,比如把勾去掉(当然界面上改不了)也就是把 1 改成 0,那么重新起来之后 /root 等目录的所属者就会变成 100000 而不是 root 所对应的 0。意思就是这个 unprivileged 为了和宿主机做隔离,有个 id mapping 的玩意在里面的
这样的话需要先备份再还原
It is possible to convert an existing CT into an unprivileged CT by doing a backup, then a restore on console:
pct restore 1234 /var/lib/vz/dump/vzdump-lxc-1234-2016_03_02-02_31_03.tar.gz -ignore-unpack-errors 1 -unprivileged如果没啥数据不想折腾的话,干脆直接删掉 LXC 再重新建个新的就完事了。
选择下载好的 Debian 11 CT template
(你想用其他的系统自己玩自己摸索也行
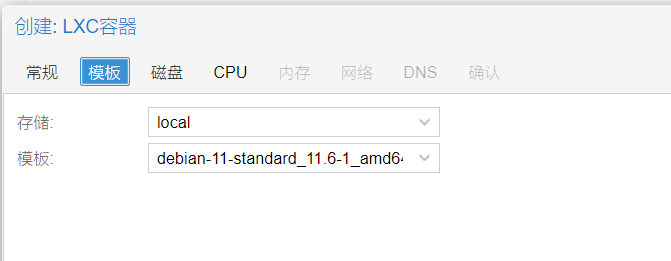
其他的硬盘啥的自己按心情来就好了。
CPU 可以分2核,内存稍微大点。
网络这里先配个静态的 IP,方便后续访问和连接 JellyFin
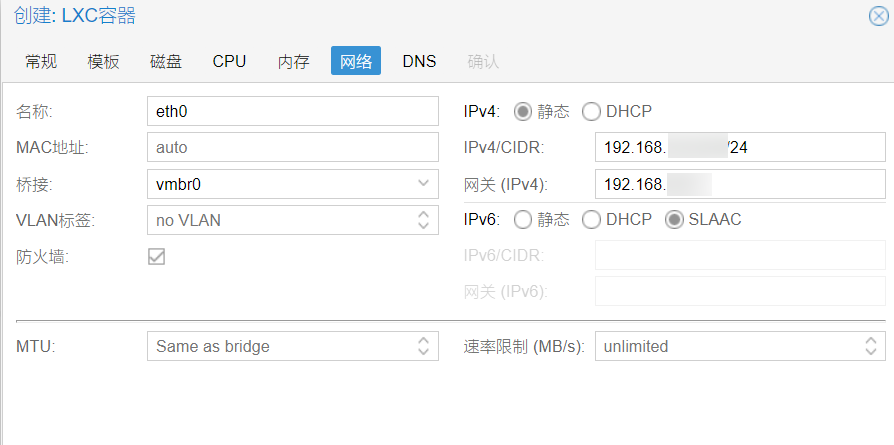
创建好之后,来到网络这里,添加咱 PVE 内部的网络。
添加网络设备,桥接 vmbr1,这个看你之前咋配的吧,喵喵这里整了个虚拟路由器(在 0x02 步骤中配置的),在 PVE 里的 VM / LXC 之间可以通过这个网络高速互联。
这里的网关不用填。
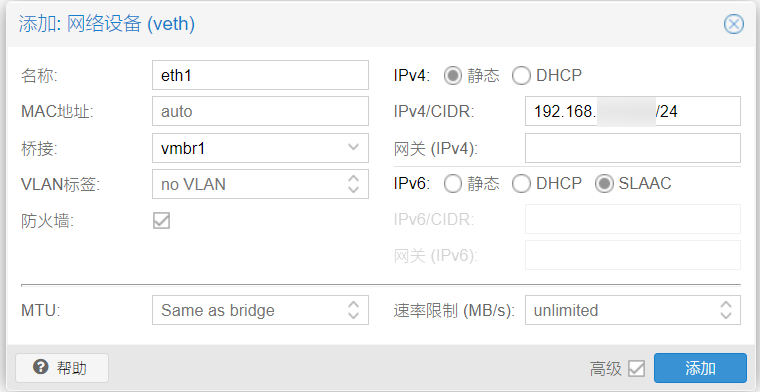
注意,创建完先不要启动!
挂载存储
参考官方文档 https://pve.proxmox.com/wiki/Linux_Container#_bind_mount_points ,将 PVE 宿主机上的 NFS 存储给挂载到 LXC 里。
如果你是宿主机上的存储的话,这里也可以照样着配置。
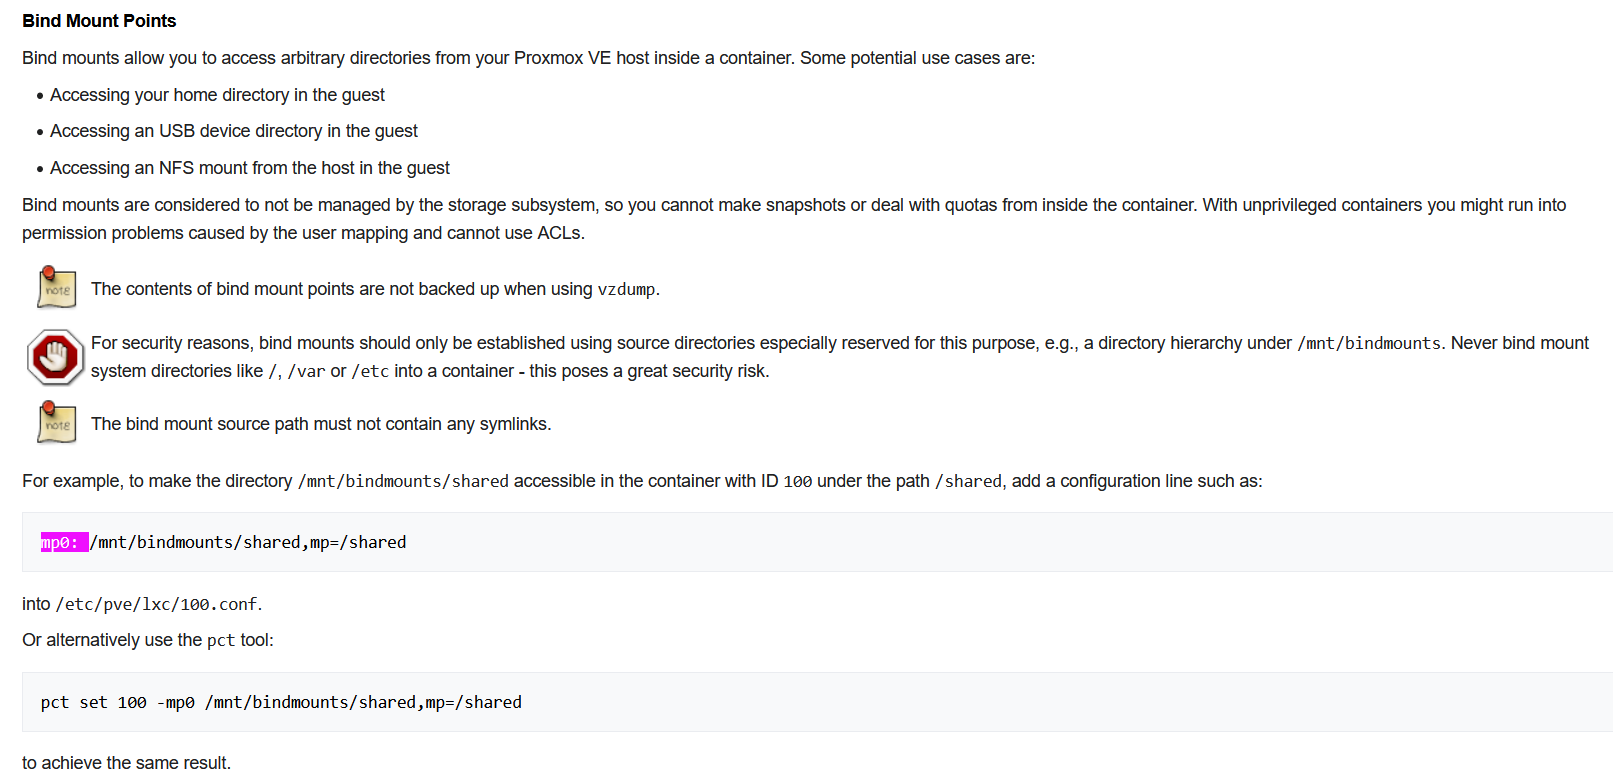
nano /etc/pve/lxc/109.conf109 是 LXC 的编号,记得改成你自己的。在最下面加入
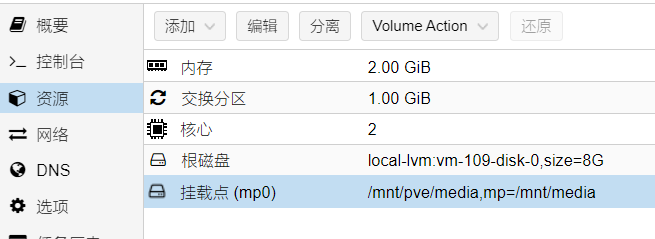
mp0: /mnt/pve/media,mp=/mnt/mediamp0 是第一个挂载点,如果需要挂载多个的话,按照顺序就是 mp1,mp2,mp3
/mnt/pve/media 就是宿主机上的存储路径,mp=/mnt/media 就是映射到 LXC 里的路径,后续 JellyFin 就是从这个路径去读文件了。
保存文件,在资源这里就能看到挂载点了。
这样挂载的话,在 LXC 里看到的文件和目录所属都被映射到 nobody (uid 65534),如果日常用还是可以的,前提是没有设置目录权限(也就是所有人都能读/写),以及不在乎用特定的 uid/gid 写入文件,因为所有文件都将使用高映射 (100000+) uid 来创建。
有需要的话,可以参考官方文档 Unprivileged LXC containers,配置一下 idmap 来让 LXC 里的用户拥有特定的 uid
咱这里摸了,大不了共享的时候直接
chmod -R 777 .就行了(((
没想到后面还是要配 id mapping
然后启动 LXC,用户名 root,密码你自己设的,登录控制台,当然也可以直接 ssh 上去
看一下就能发现存储已经挂载上去了。
df -h
ls -al /mnt/media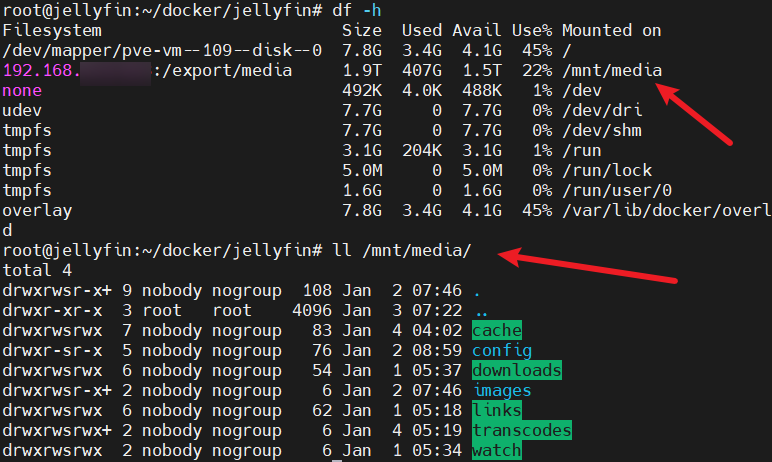
共享核显
首先继续 在 LXC 里 看看 /etc/group 里的 video 和 render 组 id
# egrep 'video|render' /etc/group
video:x:44:
render:x:105:
然后 在宿主机上看看显卡、group
注意这里权限是 0660 的, 咱就是想办法在不改成 0666 也不开特权容器的情况下让 LXC 里的 docker 里的 JellyFin 能调用咱的 GPU。
(可把喵喵折腾坏了,咱就不信 unprivileged 容器不能用!!!
root@pve1:/etc/pve# lspci | grep -i vga
00:02.0 VGA compatible controller: Intel Corporation Device 4692 (rev 0c)
root@pve1:/etc/pve# ll /dev/dri
total 0
drwxr-xr-x   3 root root        100 Sep 19 05:49 .
drwxr-xr-x  19 root root       4.8K Sep 19 05:49 ..
drwxr-xr-x   2 root root         80 Sep 19 05:49 by-path
crw-rw----+  1 root video  226,   0 Sep 19 05:49 card0
crw-rw----+  1 root render 226, 128 Sep 19 05:49 renderD128
root@pve1:/etc/pve# ll /dev/dri/by-path/
total 0
drwxr-xr-x 2 root root  80 Sep 19 05:49 .
drwxr-xr-x 3 root root 100 Sep 19 05:49 ..
lrwxrwxrwx 1 root root   8 Sep 19 05:49 pci-0000:00:02.0-card -> ../card0
lrwxrwxrwx 1 root root  13 Sep 19 05:49 pci-0000:00:02.0-render -> ../renderD128
root@pve1:/etc/pve# egrep 'video|render' /etc/group
video:x:44:
render:x:103:
找到 card0,可以看到设备号 226,0,再找到 renderD128,可以看到设备号为 226,128。
不同设备可能会不同,记下你的设备号。
然后继续编辑 host 上的 LXC 配置文件
nano /etc/pve/lxc/109.conf这里为了实现咱的目标,需要配置好 idmap
参考 Unprivileged LXC containers 文档,他这个例子是把 LXC 里的 uid 1005 映射到外面 host 的 1005。他这里的 u 0 100000 1005 是说把 LXC 容器里的 uid 0-1004 这 1005 个 uids 映射到 host 上的 100000-101004,格式也就是 LXC起始uid host起始uid 数量。
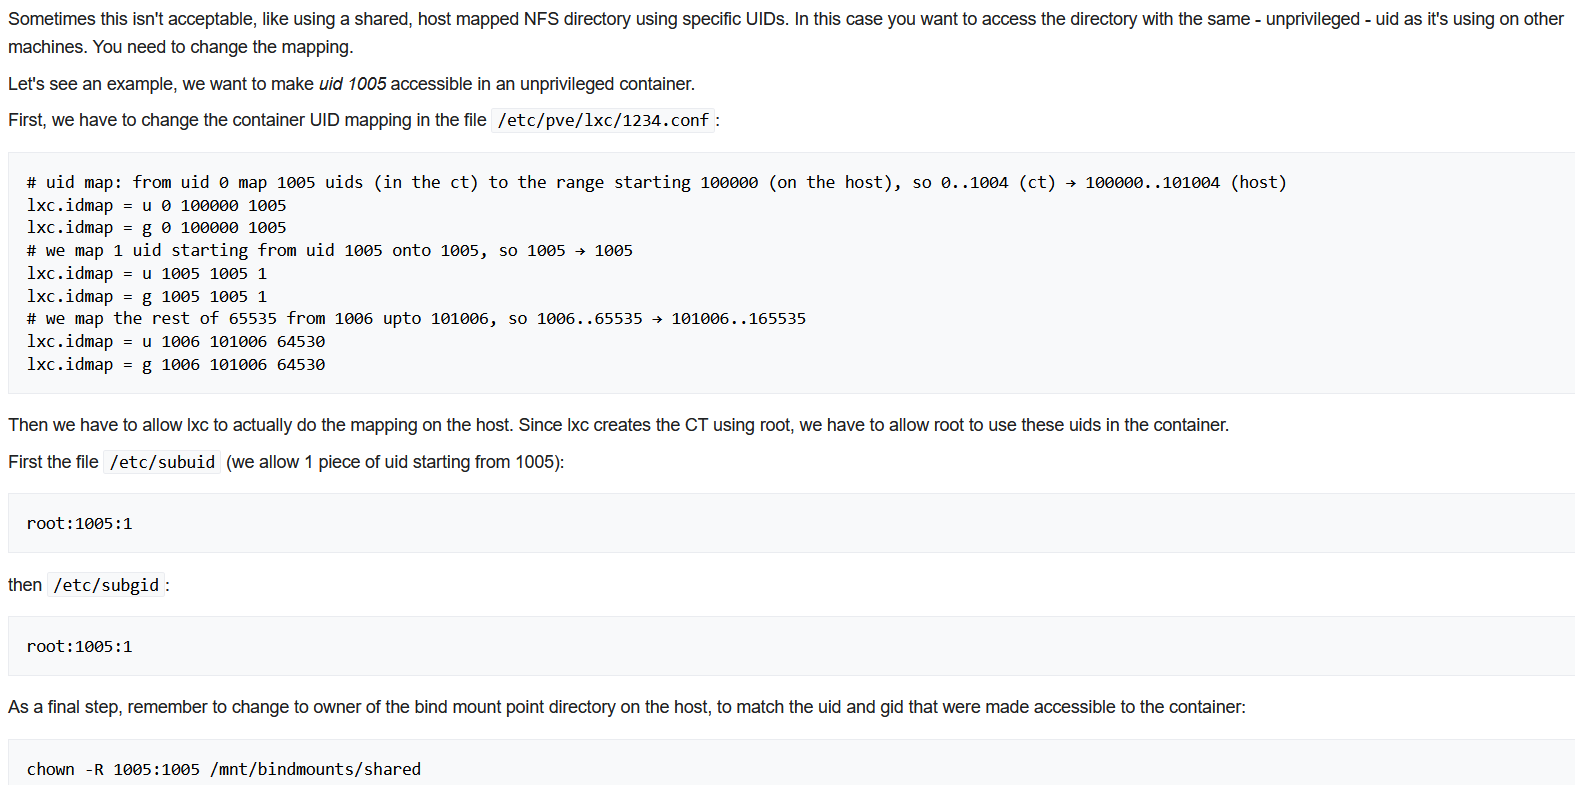
结合我们需要改一下,顺便把文件共享的 1000:1000 给映射到 host 上了。
这里特地把核显所需的 group 给 id map 了
LXC video 44 -> host video 44
LXC render 105 -> host render 103
这个不同系统可能不同,自己算一下就行了(最终要覆盖 0-65535 范围
在文件最后加入如下内容,注意这里的设备号也要对应上(Intel 核显一般是这个)。
lxc.cgroup2.devices.allow: c 226:0 rwm
lxc.cgroup2.devices.allow: c 226:128 rwm
lxc.mount.entry: /dev/dri dev/dri none bind,optional,create=dir
lxc.idmap: u 0 100000 1000
lxc.idmap: u 1000 1000 1
lxc.idmap: u 1001 101001 64535
lxc.idmap: g 0 100000 44
lxc.idmap: g 44 44 1
lxc.idmap: g 45 100045 60
lxc.idmap: g 105 103 1
lxc.idmap: g 106 100106 894
lxc.idmap: g 1000 1000 1
lxc.idmap: g 1001 101001 64535
然后 在 host 上配置 subuid 和 subgid
1000:1 表示允许从 1000 开始的 1 个,注意这里的 id 是 host 上的!(所以是103而不是105)
echo 'root:1000:1' >> /etc/subuid
cat >> /etc/subgid <<EOF
root:44:1
root:103:1
root:1000:1
EOF
如果不配的话,LXC 是启动不来的,会有类似这样的提示
lxc_map_ids: 3672 newuidmap failed to write mapping "newuidmap: uid range [1000-1001) -> [1000-1001) not allowed": xxx另外,如果 idmap 里的范围没覆盖全的话,有可能出现 ssh 连不上,但控制台能登录的情况,检查并修正 idmap 之后就好了。
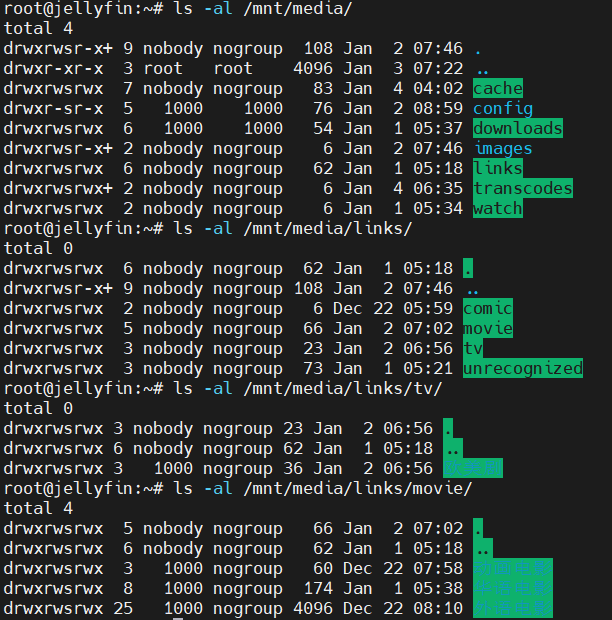
如果没问题的话,启动容器,ls -al /dev/dri 看到的对应组就正确了,而且是 0660 权限!

再看文件目录,这里的默认权限也变成 1000:1000 了
下面是一些其他的尝试,就放这参考,不保证可行。
如果你在前面设的是 有特权的容器(把无特权容器的勾去掉了),那这里就很方便了,理论上直接下面这样就行了,不用管这些复杂的 id mapping。
lxc.cgroup2.devices.allow: c 226:0 rwm
lxc.cgroup2.devices.allow: c 226:128 rwm
lxc.mount.entry: /dev/dri dev/dri none bind,optional,create=dir
如果还是 unprivileged 的情况下,你不在乎权限大小,可以 直接给 0666 权限
lxc.cgroup2.devices.allow: c 226:0 rwm
lxc.cgroup2.devices.allow: c 226:128 rwm
lxc.mount.entry: /dev/dri/card0 dev/dri/card0 none bind,optional,create=file
lxc.mount.entry: /dev/dri/renderD128 dev/dri/renderD128 none bind,optional,create=file
lxc.hook.pre-start: sh -c "chmod 0666 /dev/dri/renderD128 /dev/dri/card0"
这个
pre-start命令可以进一步改一改,把外面的 gid 改成映射到里面的,但如果有多个容器同时在用的话不确定会不会有影响,或者对 host 上的正常使用不知道有何影响(lxc.hook.pre-start: sh -c "chown 0:100105 /dev/dri/renderD128 && chown 0:100044 /dev/dri/card0 && chmod 0666 /dev/dri/renderD128 /dev/dri/card0"
还可以用
lxc.hook.autodev加载脚本lxc.cgroup2.devices.allow: c 226:0 rwm lxc.cgroup2.devices.allow: c 226:128 rwm lxc.autodev: 1 lxc.hook.autodev: /var/lib/lxc/109/mount_hook.sh编辑 hook 脚本
nano /var/lib/lxc/109/mount_hook.shmkdir -p ${LXC_ROOTFS_MOUNT}/dev/dri mknod -m 666 ${LXC_ROOTFS_MOUNT}/dev/dri/card0 c 226 0 mknod -m 666 ${LXC_ROOTFS_MOUNT}/dev/dri/renderD128 c 226 128给个可执行权限
chmod +x /var/lib/lxc/109/mount_hook.sh
当然,如果你不需要把 1000:1000 映射进去,可以改一改 idmap
lxc.cgroup2.devices.allow: c 226:0 rwm
lxc.cgroup2.devices.allow: c 226:128 rwm
lxc.mount.entry: /dev/dri dev/dri none bind,optional,create=dir
lxc.idmap = u 0 100000 65536
lxc.idmap = g 0 100000 44
lxc.idmap = g 44 44 1
lxc.idmap = g 45 100045 60
lxc.idmap = g 105 103 1
lxc.idmap = g 106 100106 65430
并且
cat >> /etc/subgid <<EOF
root:44:1
root:103:1
EOF
/etc/subuid就不用加了。
另外,提一句 NVidia GPU 的配置,这个是 privileged 容器的情况,来自 JellyFin 文档
lxc.cgroup2.devices.allow: c 195:* rwm
lxc.cgroup2.devices.allow: c 243:* rwm
lxc.mount.entry: /dev/nvidia0 dev/nvidia0 none bind,optional,create=file
lxc.mount.entry: /dev/nvidiactl dev/nvidiactl none bind,optional,create=file
lxc.mount.entry: /dev/nvidia-uvm dev/nvidia-uvm none bind,optional,create=file
lxc.mount.entry: /dev/nvidia-modeset dev/nvidia-modeset none bind,optional,create=file
lxc.mount.entry: /dev/nvidia-uvm-tools dev/nvidia-uvm-tools none bind,optional,create=file这里可能有亿点点乱,希望你多读几遍能理解(反正喵喵重新配的时候又翻出来看了几遍
安装 vainfo
在 LXC 里安装
apt-get install -y intel-gpu-tools vainfo测试下驱动是否正常,输出类似于以下的内容则正常
root@jellyfin:~# vainfo
error: can't connect to X server!
libva info: VA-API version 1.15.0
libva info: Trying to open /usr/lib/x86_64-linux-gnu/dri/iHD_drv_video.so
libva info: Found init function __vaDriverInit_1_10
libva info: va_openDriver() returns 0
vainfo: VA-API version: 1.15 (libva 2.10.0)
vainfo: Driver version: Intel iHD driver for Intel(R) Gen Graphics - 21.1.1 ()
vainfo: Supported profile and entrypoints
      VAProfileNone                   : VAEntrypointVideoProc
      VAProfileNone                   : VAEntrypointStats
      VAProfileMPEG2Simple            : VAEntrypointVLD
      VAProfileMPEG2Main              : VAEntrypointVLD
      VAProfileH264Main               : VAEntrypointVLD
      VAProfileH264Main               : VAEntrypointEncSliceLP
      VAProfileH264High               : VAEntrypointVLD
      VAProfileH264High               : VAEntrypointEncSliceLP
      VAProfileJPEGBaseline           : VAEntrypointVLD
      VAProfileJPEGBaseline           : VAEntrypointEncPicture
      VAProfileH264ConstrainedBaseline: VAEntrypointVLD
      VAProfileH264ConstrainedBaseline: VAEntrypointEncSliceLP
      VAProfileHEVCMain               : VAEntrypointVLD
      VAProfileHEVCMain               : VAEntrypointEncSliceLP
      VAProfileHEVCMain10             : VAEntrypointVLD
      VAProfileHEVCMain10             : VAEntrypointEncSliceLP
      VAProfileVP9Profile0            : VAEntrypointVLD
      VAProfileVP9Profile0            : VAEntrypointEncSliceLP
      VAProfileVP9Profile1            : VAEntrypointVLD
      VAProfileVP9Profile1            : VAEntrypointEncSliceLP
      VAProfileVP9Profile2            : VAEntrypointVLD
      VAProfileVP9Profile2            : VAEntrypointEncSliceLP
      VAProfileVP9Profile3            : VAEntrypointVLD
      VAProfileVP9Profile3            : VAEntrypointEncSliceLP
      VAProfileHEVCMain12             : VAEntrypointVLD
      VAProfileHEVCMain422_10         : VAEntrypointVLD
      VAProfileHEVCMain422_12         : VAEntrypointVLD
      VAProfileHEVCMain444            : VAEntrypointVLD
      VAProfileHEVCMain444            : VAEntrypointEncSliceLP
      VAProfileHEVCMain444_10         : VAEntrypointVLD
      VAProfileHEVCMain444_10         : VAEntrypointEncSliceLP
      VAProfileHEVCMain444_12         : VAEntrypointVLD
      VAProfileHEVCSccMain            : VAEntrypointVLD
      VAProfileHEVCSccMain            : VAEntrypointEncSliceLP
      VAProfileHEVCSccMain10          : VAEntrypointVLD
      VAProfileHEVCSccMain10          : VAEntrypointEncSliceLP
      VAProfileHEVCSccMain444         : VAEntrypointVLD
      VAProfileHEVCSccMain444         : VAEntrypointEncSliceLP
      VAProfileAV1Profile0            : VAEntrypointVLD
      VAProfileHEVCSccMain444_10      : VAEntrypointVLD
      VAProfileHEVCSccMain444_10      : VAEntrypointEncSliceLP
jellyfin-ffmpeg version 4.4.1-2 及以上版本已经包含了 iHD 驱动,所以不用再安装 intel-media-va-driver-non-free 了。
0x05 JellyFin 安装及配置
进入 LXC 控制台,登录,或者 ssh 上去也行
换源
apt 源
sed -i 's/deb.debian.org/mirrors.ustc.edu.cn/g' /etc/apt/sources.list
sed -i 's|security.debian.org|mirrors.ustc.edu.cn/debian-security|g' /etc/apt/sources.list
apt update
apt upgrade -y
修改语言和时区
nano /etc/default/locale修改为以下内容
LANG="en_US.UTF-8"
LANGUAGE="en_US:en"localectl设置时区为上海时区 / CST,并开启 NTP 时钟同步
timedatectl set-timezone Asia/Shanghai
timedatectl set-ntp true
timedatectl
安装 docker 及 docker compose
哈哈,喵喵就是喜欢再套一层 docker,而且 JellyFin 拿 docker 镜像来装感觉更方便
apt-get update
apt-get install -y ca-certificates curl gnupg lsb-release
mkdir -p /etc/apt/keyrings
curl -fsSL https://mirrors.ustc.edu.cn/docker-ce/linux/debian/gpg | gpg --dearmor -o /etc/apt/keyrings/docker.gpg

echo \
  "deb [arch=$(dpkg --print-architecture) signed-by=/etc/apt/keyrings/docker.gpg] https://mirrors.ustc.edu.cn/docker-ce/linux/debian \
  $(lsb_release -cs) stable" | tee /etc/apt/sources.list.d/docker.list > /dev/null

apt-get update
apt-get install docker-ce docker-ce-cli containerd.io docker-compose-plugin -y
systemctl start docker
拉取 JellyFin docker 镜像
咱这里根据自己需要改了下,供参考。
据说 nyanmisaka/jellyfin 这个镜像对驱动、硬解码等做了不少优化,这里试一试。用官方的 jellyfin/jellyfin 镜像也是可行的,咱都试过了。
VA-API 需要把 render 组加到 docker 权限中,记得改成你系统里对应的 gid
version: '3.5'
services:
  jellyfin:
    image: nyanmisaka/jellyfin:latest
    # image: jellyfin/jellyfin
    container_name: jellyfin
    user: 1000:1000
    group_add:
      - "105"  # render group id can be discovered in /etc/group
    network_mode: 'host'
    volumes:
      - /mnt/media/config/jellyfin:/config
      - /mnt/media/cache:/cache
      - /mnt/media/transcodes:/config/transcodes  # ffmpeg转码的缓存目录
      - /mnt/media/links:/media
      # - /path/to/media2:/media2:ro
    restart: 'unless-stopped'
    # Optional - alternative address used for autodiscovery
    environment:
      - TZ=Asia/Shanghai
      # - JELLYFIN_PublishedServerUrl=http://example.com
    # Optional - may be necessary for docker healthcheck to pass if running in host network mode
    extra_hosts:
      - "host.docker.internal:host-gateway"
    devices:
      - /dev/dri:/dev/dri
注意这里记得加上 devices,不然调用不了 GPU 的,别问了,问就是喵喵调了老半天才发现……
然后,JellyFin,启动!
docker compose up -d转码相关配置
访问 http://ip:8096/ ,登录
控制台-播放-转码,这里可以选择 Intel QuickSync (QSV) 或者 Video Acceleration API (VAAPI),然后把下面的启用硬件解码都勾上
再把 启用低电压模式的 Intel H.264 硬件编码器、启用低电压模式的 Intel HEVC 硬件编码器 勾上,这个就是在宿主机上配的内核参数起作用的地方了(
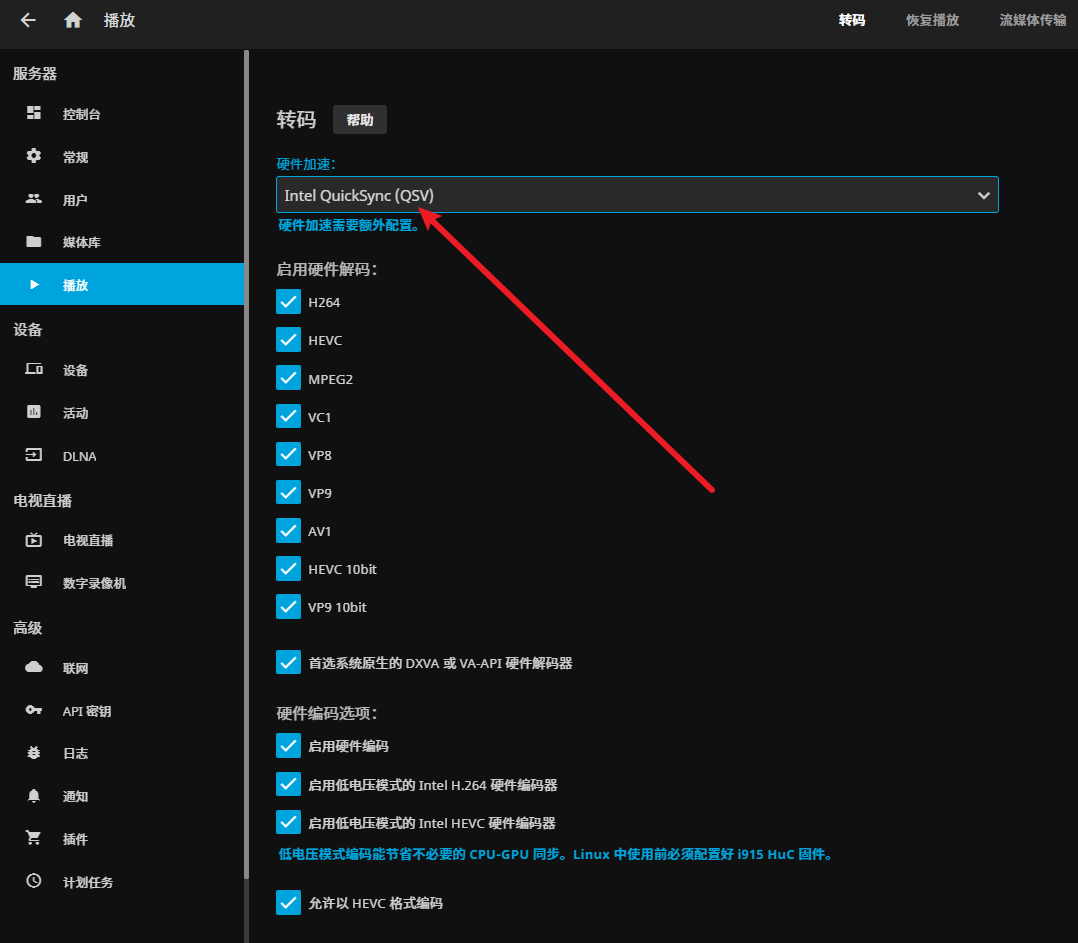
建议还是用 QSV,网友 测试如下

另外,参考网上的建议,不要开启 VPP 色调映射,否则 HDR 转 SDR 后颜色会比较暗淡。
拉到最下面,保存。
然后找个电影放一放,看一下播放信息,如果需要转码的话,播放方式这里就会显示出来了。
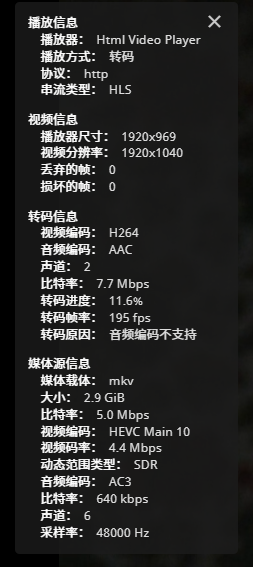
可以看下 jellyfin 日志,如果用 QSV:

如果用 VAAPI:

另外在宿主机上可以看到已经调用了 igpu 进行解码,如果渲染字幕的话这里的 Render 也会有占用。

现在拖进度条就舒服多了呀!
喵呜,好耶!!!
当然还有一些其他问题顺便解决一下。
解决中文显示框框的问题
封面图里的中文、ASS 中文字幕显示方框


这里下载个字体文件:微软雅黑
当然如果你不喜欢的话还可以用别的字体,最好是 woff2 网页字体格式,比如 Noto Subset Font(简体中文应该是 NotoSansCJKsc-hinted,或者 得意黑 Smiley Sans (如果你喜欢的话
如果您的网站公开使用,请注意字体的版权问题。
mkdir -p /mnt/media/config/jellyfin/fonts把字体文件上传到这个文件夹
进入控制台进行设置,控制台 - 播放 - 备用字体文件路径,设置为 /config/fonts,勾选 启用备用字体

最下面,保存
然后重启 JellyFin docker,在媒体库右键 修改图片 - 删除图片,重新刷新元数据
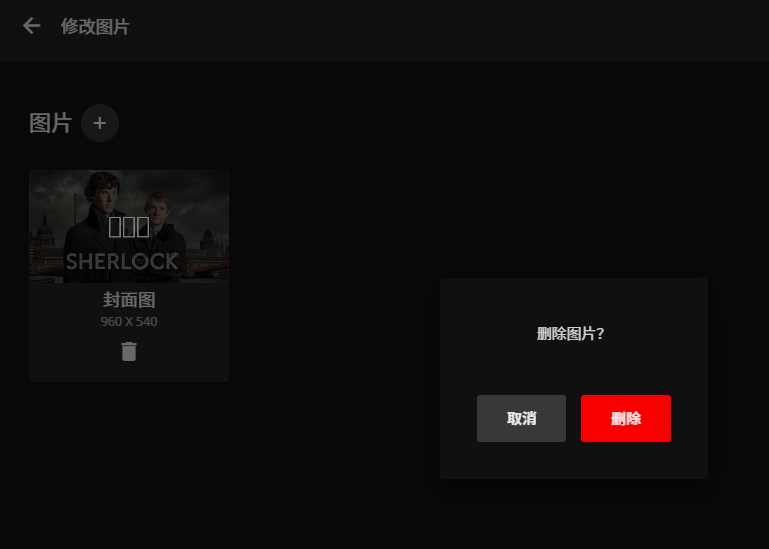
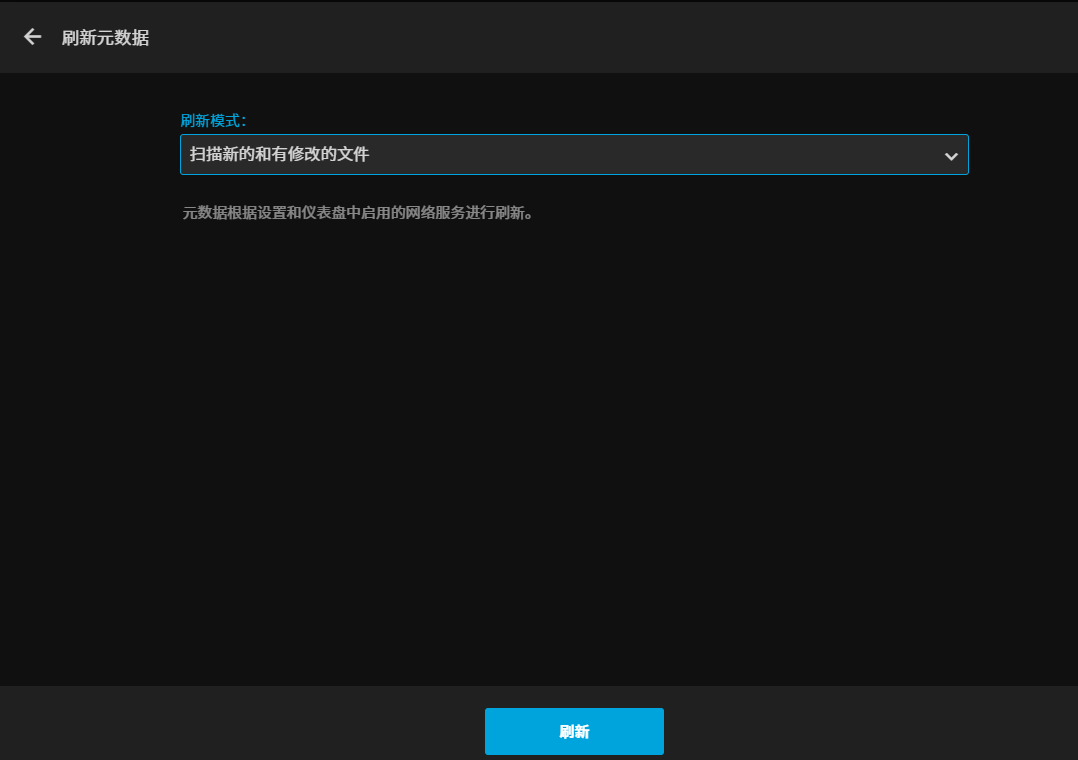
然后进入控制台-计划任务,触发 提取章节图片、扫描媒体库,重新生成封面图
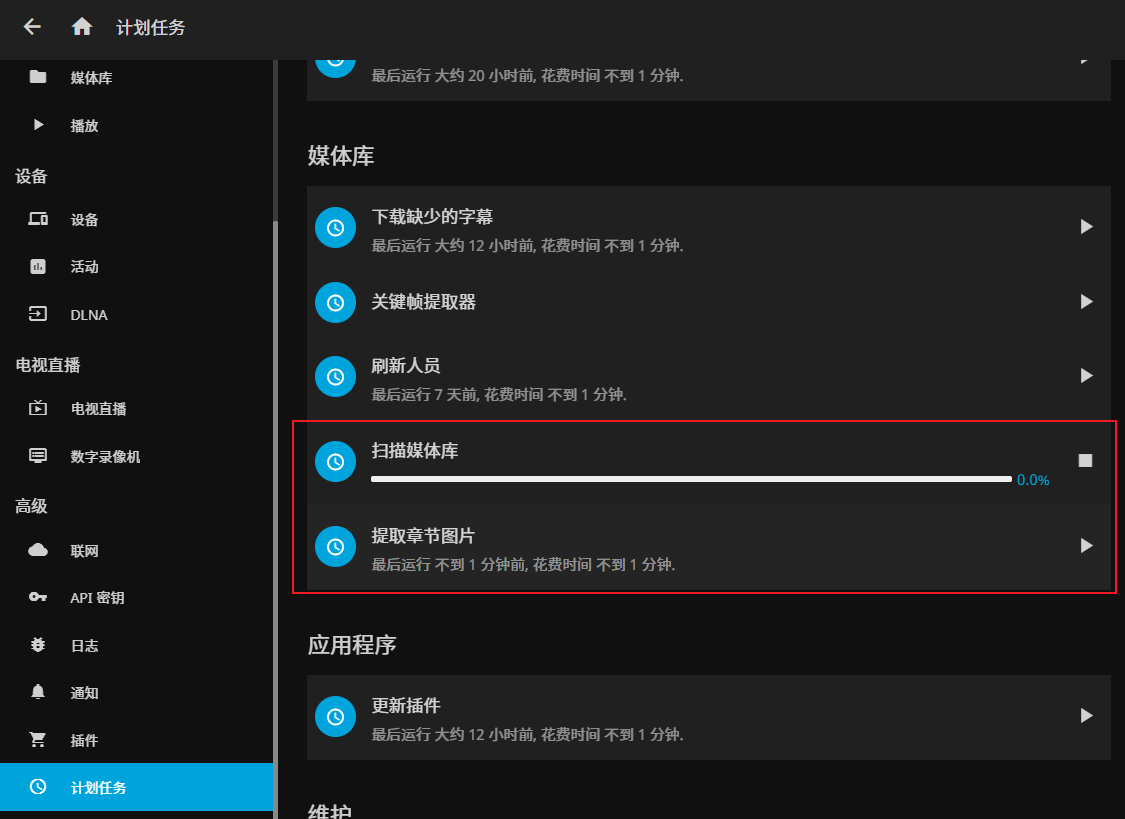
这样封面图和字幕就正常了。


0x06 小结
喵呜!终于把坑填完了。
在这篇博客中,喵喵介绍了如何在 PVE 环境中基于 LXC 安装 JellyFin 并配置 GPU 核显实现硬件加速。
希望这对您有所帮助!
欢迎点击下面的 赏 给喵喵打钱!(饿饿饭饭.gif
0xFF References
JellyFin 官方文档: Hardware Acceleration
Arch Wiki: Enable GuC / HuC firmware loading
LXC: Idmaps for user namespace
Proxmox VE(PVE) 7.x中,使用LXC安装Jellyfin,开启硬解码等
群晖 Docker 安装 Jellyfin 媒体服务器并开启 Intel Quick Sync 提升性能
(PVE教程)12代核显在LXC容器实现jellyfin硬解码
还有一些 GPU 共享的挺有意思:
(溜了溜了喵~
