引言 对表单、合同、收据等信息抽取、理解,单从NLP角度来做就丧失了一些比较重要的特征,比如排版、位置、字体大小、字体颜色等特征。
如何引入这些特征对于关键信息抽取(Key Information Extraction)就比较重要。
此篇文章围绕FUNSD数据集来进行,尝试在不同的layoutLM模型上实现,以及对比各自的效果。
FUNSD数据集 常见的数据集有FUNSD 和XFUND ,XFUND是一个融合了多语言的训练集,数据更为丰富。不过此处选择FUNSD来进行实验。
FUNSD全称为Form Understanding in Noisy Scanned Documents,直译过来就是嘈杂的扫描文档的表单理解,因为是扫描件,或多或少都会有些噪点的,也可看官网的描述。
数据集地址 。
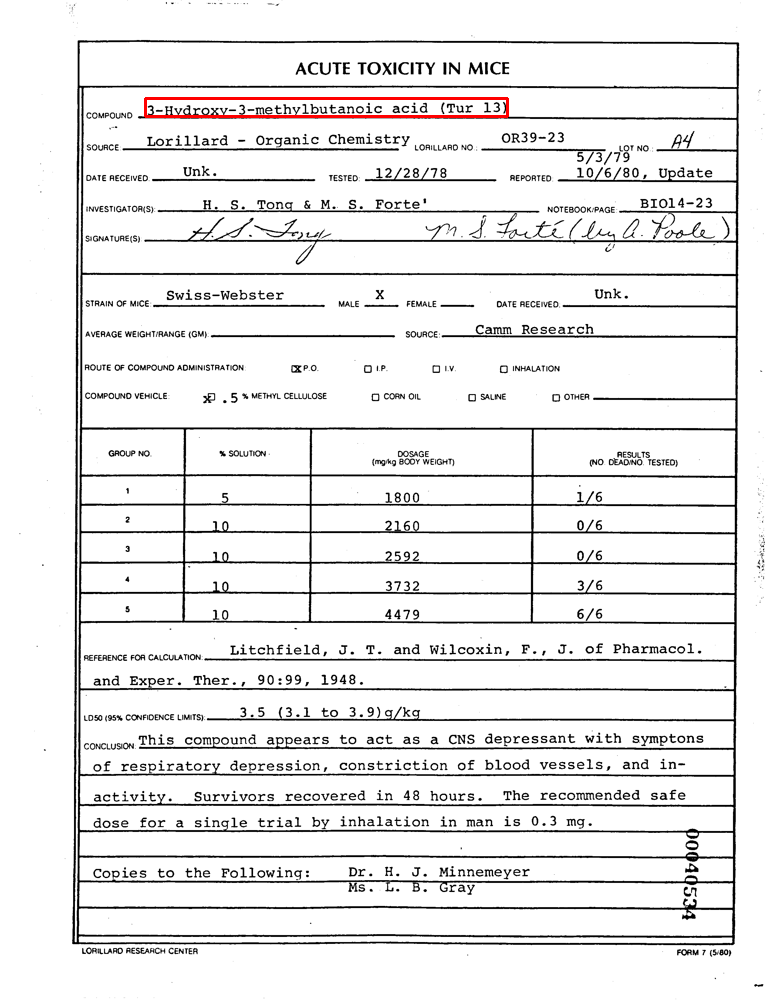
下载数据后,例如dataset/training_data/annotations/00040534.json中的3-Hydroxy-3-methylbutanoic acid (Tur 13)的文字(text),它对应的坐标(box)为[145, 98, 507, 116],即左上和右下, 标注的数据如下:
1
2
3
4
5
6
7
8
9
10
11
12
13
14
15
16
17
18
19
20
21
22
{ "text" : "3-Hydroxy-3-methylbutanoic acid (Tur 13)" , "box" : [145 , 98 , 507 , 116 ], "linking" : [ [0 , 37 ] ], "label" : "answer" , "words" : [{ "text" : "3-Hydroxy-3-methylbutanoic" , "box" : [145 , 98 , 384 , 116 ] }, { "text" : "acid" , "box" : [392 , 99 , 427 , 114 ] }, { "text" : "(Tur" , "box" : [439 , 99 , 474 , 116 ] }, { "text" : "13)" , "box" : [483 , 99 , 507 , 116 ] }], "id" : 37 }
用cv2画出来,示例如下(具体实现请看附录1):
标签(label)的话有question,header,answer和other四种,比如:甲方:江苏A公司,其中甲方为question,江苏A公司为answer,header对应文章的标题,other为其他的一些信息。
layoutLM 模型介绍 layoutLM是微软推出的一个通用文档智能预训练模型,它的模型结果如下:
1
2
3
4
5
6
7
8
9
10
11
12
13
14
15
16
17
18
19
20
21
22
23
24
25
26
27
28
29
30
31
32
33
34
35
36
37
38
39
40
41
42
43
44
45
46
LayoutLMModel( (embeddings): LayoutLMEmbeddings( (word_embeddings): Embedding(30522, 768, padding_idx=0) (position_embeddings): Embedding(512, 768) (x_position_embeddings): Embedding(1024, 768) (y_position_embeddings): Embedding(1024, 768) (h_position_embeddings): Embedding(1024, 768) (w_position_embeddings): Embedding(1024, 768) (token_type_embeddings): Embedding(2, 768) (LayerNorm): LayerNorm((768,), eps=1e-12, elementwise_affine=True) (dropout): Dropout(p=0.1, inplace=False) ) (encoder): LayoutLMEncoder( (layer): ModuleList( (0): LayoutLMLayer( (attention): LayoutLMAttention( (self): LayoutLMSelfAttention( (query): Linear(in_features=768, out_features=768, bias=True) (key): Linear(in_features=768, out_features=768, bias=True) (value): Linear(in_features=768, out_features=768, bias=True) (dropout): Dropout(p=0.1, inplace=False) ) (output): LayoutLMSelfOutput( (dense): Linear(in_features=768, out_features=768, bias=True) (LayerNorm): LayerNorm((768,), eps=1e-12, elementwise_affine=True) (dropout): Dropout(p=0.1, inplace=False) ) ) (intermediate): LayoutLMIntermediate( (dense): Linear(in_features=768, out_features=3072, bias=True) (intermediate_act_fn): GELUActivation() ) (output): LayoutLMOutput( (dense): Linear(in_features=3072, out_features=768, bias=True) (LayerNorm): LayerNorm((768,), eps=1e-12, elementwise_affine=True) (dropout): Dropout(p=0.1, inplace=False) ) ) (1) ~(11) ) ) (pooler): LayoutLMPooler( (dense): Linear(in_features=768, out_features=768, bias=True) (activation): Tanh() ) )
此模型训练参考了bert的[MASK]训练方式,通过预测掩码位置信息来进行预训练。
重点在x_position_embeddings,y_position_embeddings,h_position_embeddings, w_position_embeddings四个feature上,将字的坐标特征加入进来。
由此可以简单将其理解成它在bert的基础上融合了位置信息特征,模型结构比较简单直接😂😂😂,可参考transformers layoutlm overview ,更多信息也可自行搜索。
实现 本文示例参考transformers.LayoutLMForTokenClassification ,基于paddleNLP实现torch版本的。
1. 数据处理 参考上面示例(红框标识部分):
words
坐标
转换1
3-Hydroxy-3-methylbutanoic
186 98 494 116
B-ANSWER
acid
504 99 549 114
I-ANSWER
(Tur
564 99 610 116
I-ANSWER
13)
621 99 652 116
I-ANSWER (用E-ANSWER也可以)
这部分分成两部分:
坐标经过normalize,即官网描述的Note that one first needs to normalize the bounding boxes to be on a 0-1000 scale.
转换1为一个中间结果,对每个word分配一个初始label,后续还需对这个label再进行处理,获取最终训练的label。
2. label构造 拿到转换1的结果后,还是要对words再进行tokenizer才能输入到layoutLM:
1
2
3
4
5
6
[ '3', '-', 'hydro', '##xy', '-', '3', '-', 'methyl', '##bu', '##tan', '##oic', 'acid', '(', 'tu', '##r', '13', ')', ]
所以转换1对应的label也需要做最后调整。
怎么调整呢,答案为取首字,剩下为交叉熵的ignore_index(-100)。
比如南京A公司,假设words为:南京, A, 公司,B-ANSWER, I-ANSWER, I-ANSWERB-ANSWER, -100, I-ANSWER, I-ANSWER, -100
其他的比如bbox怎么构造[CLS]、[SEP]和padding位置值,可直接参考transformers文档或看代码。
时隔多日更新:怎么构造label也可自行尝试。
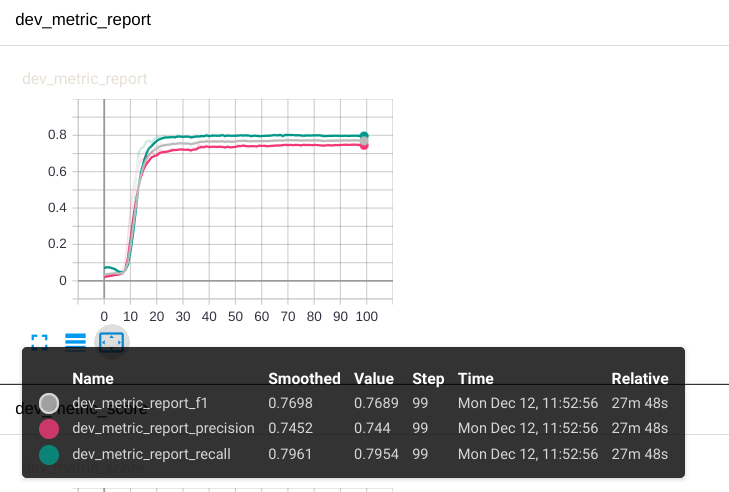
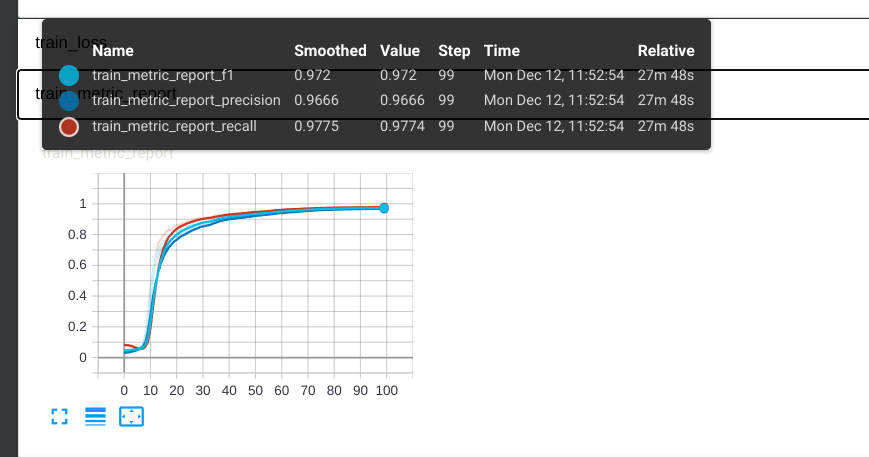
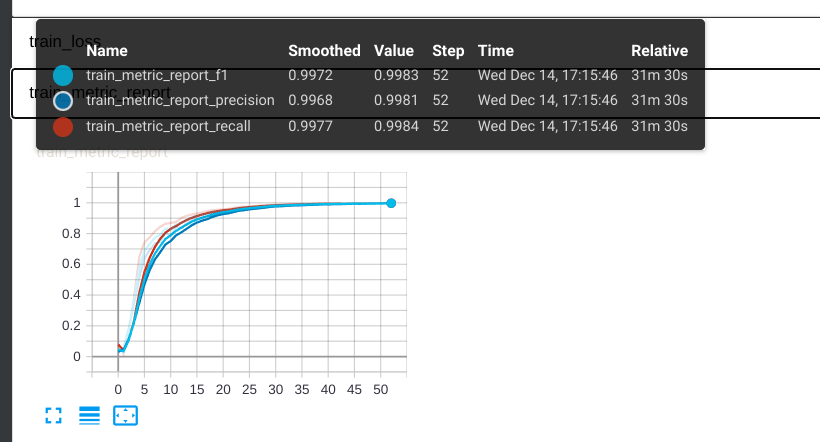
微调结果
dev
train
这地方就一个注意点,这里使用的是seqeval来进行评估,可自行选择。
layoutXLM 模型介绍 layoutXLM是在layoutLMv2 模型的基础上增加了对英文,中文,日文等多语言的一个预训练模型,用官方的话来说就是:It’s a multilingual extension of the LayoutLMv2 model trained on 53 languages. 。
此模型训练上新增了文本—图像对齐和文本—图像匹配任务,按照描述为:
文本—图像对齐(Text-Image Alignment)
遮罩式视觉语言模型更关注模型的语言能力,视觉和布局信息只提供隐式线索,为此一种细粒度的多模态对齐任务在 LayoutLM 2.0 中被提出,即文本—图像对齐。该方法在文档图像上随机按行遮盖一部分文本,利用模型的文本部分输出进行词级别二分类,预测每个词是否被覆盖。文本—图像对齐任务帮助模型对齐文本和图像的位置信息。
文本—图像匹配(Text-Image Match)
现有工作证明,粗粒度的文本—图像匹配任务有助于帮助模态信息对齐。对于预训练阶段的文档数据,随机地替换或舍弃一部分文档图像,会构造图文失配的负样本。LayoutLM 2.0 的模型以文档级二分类的方式预测图文是否匹配,以此来对齐文本和图像的内容信息。
使用上参考transformers layoutXLM overview 可得知,除了tokenizer,其他都可直接参考layoutLMv2 。
相比layoutLM,增加了一个image的处理,从layoutXLM模型结构上来看,改成了LayoutLMv2VisualBackbone,额,网络结构复杂的真多哇,其中image处理可直接参考resnet preprocess 。
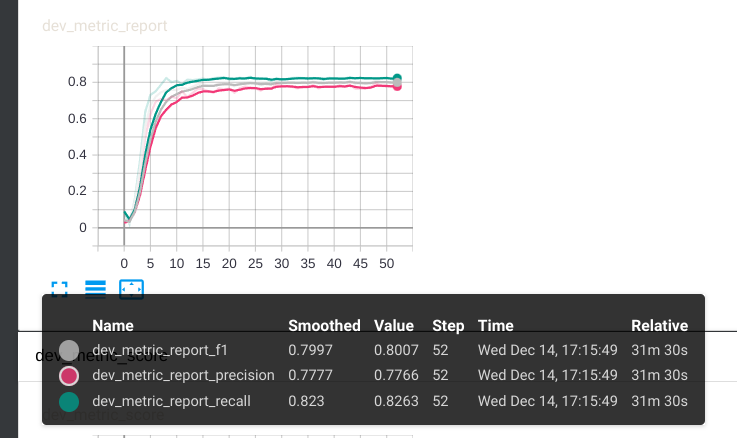
微调结果
dev
train
这还是在batch_size=3上微调的。。
总结 相比layoutLM,layoutXLM效果的确有增加几个点,不过网络结构复杂了许多,图像部分以后再看,此处埋个坑。
另外数据集太少了,如果想在下游任务直接拿来应用,或多或少还是会遇到效果的问题。
本文相关代码请参考layoutlm ,不同的分支对应不同的预训练模型。
附录 附录1:cv2画出坐标 1 2 3 4 5 6 7 8 9 10 11 12 13 14 15 16 import os.pathimport jsonimport cv2PATH = "/layoutlm/data/funsd-dataset/dataset/training_data" with open(os.path.join(PATH, 'annotations' , '00040534.json' )) as f: data = json.loads(f.read()) img_path = os.path.join(PATH, 'images' , '00040534.png' ) image = cv2.imread(img_path) draw_1 = cv2.rectangle(image, (145 , 98 ), (507 , 116 ), (0 , 0 , 255 ), 2 ) cv2.imshow('draw_0' , draw_1) cv2.waitKey(0 ) cv2.destroyWindow("draw_0" )
附录2:通过pymupdf来获取text的坐标 1 2 3 4 5 6 7 8 9 10 11 12 13 14 15 16 17 18 19 20 21 22 23 24 25 26 27 28 29 30 31 32 33 34 35 import osimport fitzpath = 'aaa.pdf' doc = fitz.open(path) pages = [doc[i] for i in range(doc.page_count)] page = pages[0 ] blocks = page.get_text("dict" )['blocks' ] text_blocks = [block for block in blocks if block['type' ] == 0 ] print('对第一张操作哦' ) def recalculate_bbox (span) : a = span["ascender" ] / 1000 * span["size" ] d = span["descender" ] / 1000 * span["size" ] o = fitz.Point(span["origin" ]) r = fitz.Rect(span["bbox" ]) r.y1 = o.y - span["size" ] * d / (a - d) r.y0 = r.y1 - span["size" ] return r for block in text_blocks: for lines in text_blocks: for line in lines['lines' ]: for span in line['spans' ]: page.draw_rect(recalculate_bbox(span), width=0.3 , color=(0 , 1 , 1 )) page.get_pixmap().save('1.png' )