LangGraph是什么? LangGraph 是LangChain团队推出的流程编排工具,它基于状态机的思想,结合LangChain的Agent与Tool架构,允许我们以图的形式组织多个AI组件、服务调用、条件判断与上下文流转。
在大模型Agent系统中,一些入门教程或框架(包括LangChain早期版本)会鼓励用户把各种工具注册给模型,然后说:
“你可以调用这些tools,自己决定该怎么完成任务。”
这听起来像是Agent的“智能体现”,但实际上它把复杂性全推给了语言模型本身,代价非常高。
低参数量模型在自主决策上效果不好。
流程逻辑是隐式的,决策都放到了prompt和模型权重中,而我们需要的是可靠、可复现、可维护的系统。从完全黑盒变成工程上可控的状态。
LangGraph——让模型专注智能,流程交给编排系统 LangGraph并不是用来替代语言模型的“思考能力”,而是让你把流程逻辑从模型里“解耦”出来 ,这样模型专注处理智能任务,复杂决策与状态控制则交由LangGraph管理——就像微服务和调度系统一样,各司其职。
组件职责
谁来做
工具调用决策
大模型
控制流程走向
LangGraph
状态管理
LangGraph
智能处理(理解/总结/生成)
大模型
并发、回退、异常处理
LangGraph
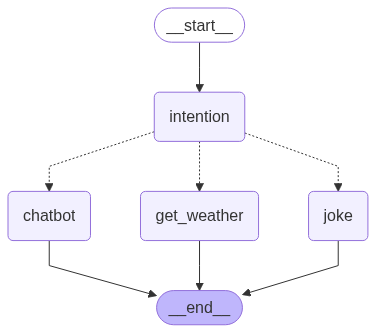
实现一个会讲笑话、查询天气、闲聊的机器人 整个流程如上图所示,下面我们来感受下langgraph的实现。
1
2
3
4
5
6
7
8
9
10
11
12
13
14
15
16
17
18
19
20
21
22
23
24
25
26
27
28
29
30
31
32
33
34
35
36
37
38
39
40
41
42
43
44
45
46
47
48
49
50
51
52
53
54
55
56
57
58
59
60
61
62
63
64
65
66
67
68
69
70
71
72
73
74
75
76
77
78
79
80
81
82
83
84
85
86
87
88
89
90
91
92
93
94
95
96
97
98
99
100
101
102
103
104
105
106
107
108
109
110
import osfrom langchain_core.messages import AIMessage, AnyMessagefrom langchain_deepseek import ChatDeepSeekfrom langgraph.constants import END, STARTfrom langgraph.graph import StateGraphfrom pydantic import BaseModel, Fieldfrom typing_extensions import TypedDictINTENTION_PROMPT = """根据下面用户对话信息判断用户意图,意图有:查询天气、讲笑话、闲聊。结果请以json格式输出。 例如: 对话信息: User: 今天天气怎么样? 输出: {"intention": "查询天气"} 真实对话信息: {{messages}} """ class IntentionOutput (BaseModel ): intention: str = Field(description='用户意图' ) llm = ChatDeepSeek( model="deepseek-chat" , api_key=os.getenv("DEEPSEEK_API_KEY" ), ) class State (TypedDict ): messages: list [AnyMessage] intention: str graph_builder = StateGraph(State) def chatbot (state: State ): """闲聊""" return {"messages" : AIMessage(content='哦吼,我也不知道聊啥子' )} def get_weather (state: State ): """查询天气""" return {"messages" : AIMessage(content='今天天气晴朗,23度,适合外出打羽毛球。' )} def joke (state: State ): """讲笑话""" history_msgs = "" for msg in state['messages' ]: history_msgs += f"{msg['role' ]} :{msg['content' ]} \n" prompt = '请根据用户最新的对话信息讲个笑话:\n' + history_msgs output = llm.invoke(prompt) return {"messages" : output} def user_intention (state: State ): """意图识别""" history_msgs = "" for msg in state['messages' ]: history_msgs += f"{msg['role' ]} :{msg['content' ]} \n" prompt = INTENTION_PROMPT.replace("{{messages}}" , history_msgs) print ('意图识别' .center(60 , '-' )) print (prompt) structure_llm = llm.with_structured_output(IntentionOutput) output = structure_llm.invoke(prompt) final_intention = output.intention if final_intention not in ("查询天气" , "讲笑话" , "闲聊" ): final_intention = '闲聊' return {"intention" : final_intention} def intention_conditional_edge (state: State ): if state['intention' ] == '查询天气' : return 'get_weather' elif state['intention' ] == '讲笑话' : return 'joke' else : return 'chatbot' graph_builder.add_node('user_intention' , user_intention) graph_builder.add_node("chatbot" , chatbot) graph_builder.add_node('get_weather' , get_weather) graph_builder.add_node('joke' , joke) graph_builder.add_edge(START, 'user_intention' ) graph_builder.add_conditional_edges('user_intention' , intention_conditional_edge, [ 'chatbot' , 'get_weather' , 'joke' ]) graph_builder.add_edge('chatbot' , END) graph_builder.add_edge('get_weather' , END) graph_builder.add_edge('joke' , END) graph = graph_builder.compile () if __name__ == "__main__" : round1 = graph.invoke( {"messages" : [{"role" : "user" , "content" : "我很开心,讲个好笑的事情吧" }]}) print (round1)
更多示例请参考官方文档 。
编排可视化 可通过LangGraph Studio 来进行可视化,操作步骤:
1. 安装必要包 1 2 3 pip install --upgrade "langgraph-cli[inmem]"
2. 创建langgraph.json 项目结构如下:
1 2 3 lg_demo/ - chat_demo.py(内容如上) - langgraph.json
langgraph.json内容:
1 2 3 4 5 6 7 8 9 { "dependencies" : [ "." ] , "graphs" : { "agent" : "./chat_demo.py:graph" } }
3. 运行 1 DEEPSEEK_API_KEY=<your key> langgraph dev
会得到如下信息:
1 2 3 4 5 6 7 8 9 10 11 12 13 14 15 INFO:langgraph_api.cli: Welcome to ╦ ┌─┐┌┐┌┌─┐╔═╗┬─┐┌─┐┌─┐┬ ┬ ║ ├─┤││││ ┬║ ╦├┬┘├─┤├─┘├─┤ ╩═╝┴ ┴┘└┘└─┘╚═╝┴└─┴ ┴┴ ┴ ┴ - 🚀 API: http://127.0.0.1:2024 - 🎨 Studio UI: https://smith.langchain.com/studio/?baseUrl=http://127.0.0.1:2024 - 📚 API Docs: http://127.0.0.1:2024/docs This in-memory server is designed for development and testing. For production use, please use LangGraph Cloud.
如果浏览器无法正常打开https://smith.langchain.com/studio/?baseUrl=http://127.0.0.1:2024, 可尝试使用Firefox浏览器。
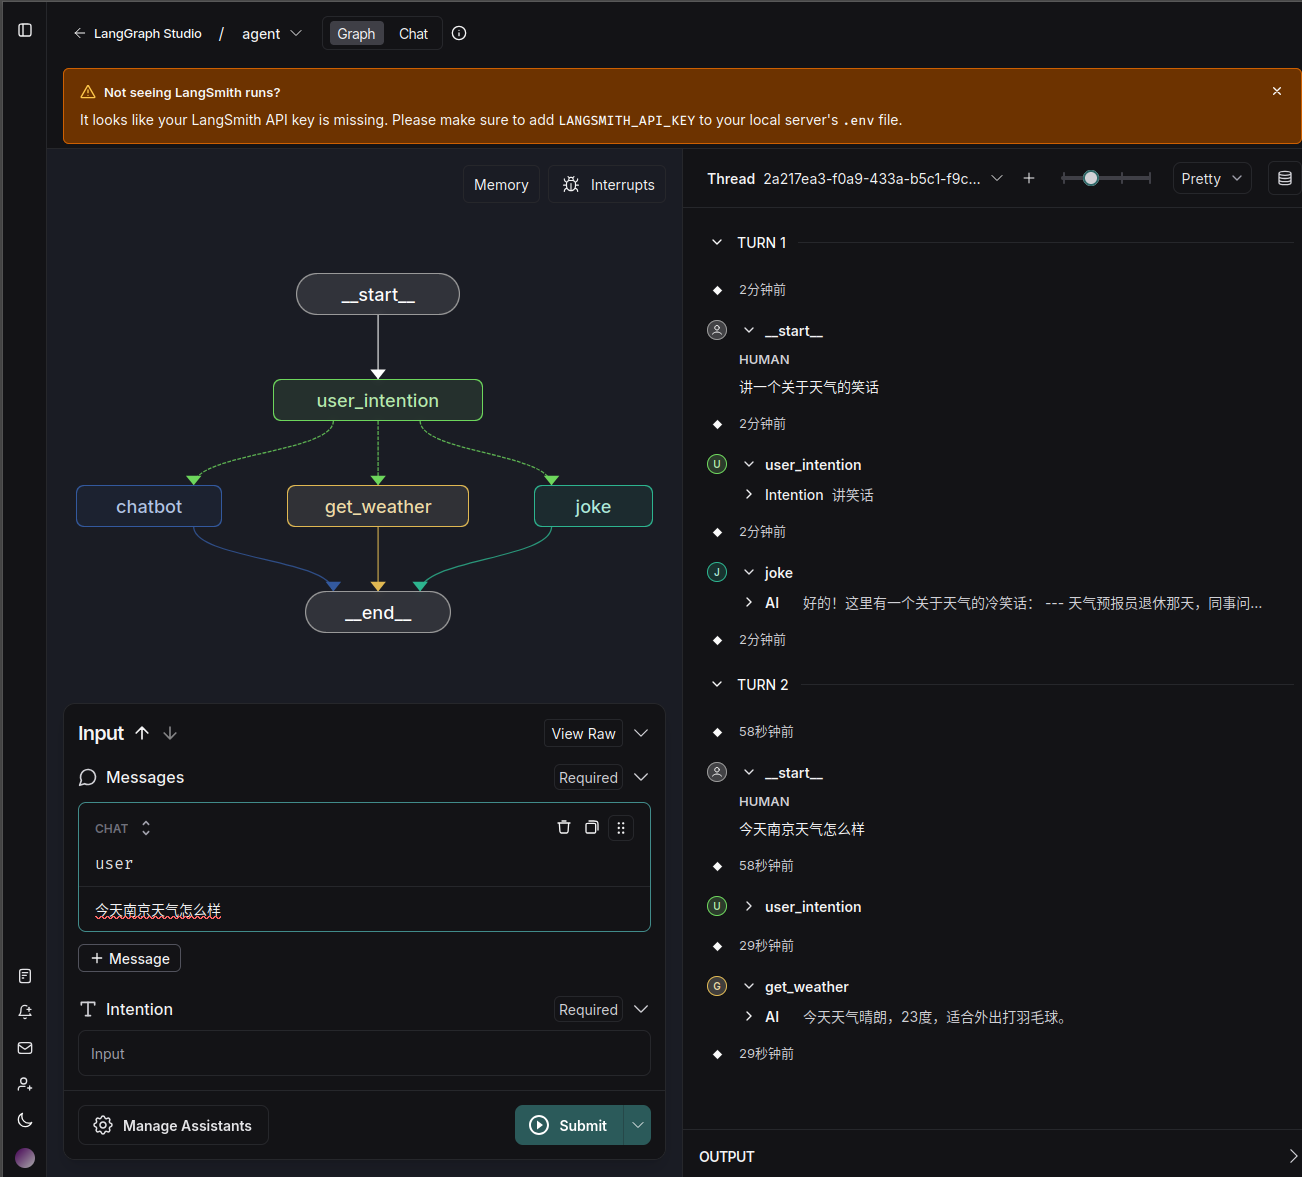
4. 示例 下图为最终可视化效果,包含每个节点及其流向(来自LangGraph Studio):
5. 客户端调用 你也可以通过python sdk进行调用,示例代码:
1 2 3 4 5 6 7 8 9 10 11 12 13 14 15 16 17 18 19 20 21 22 23 24 25 26 27 28 29 30 31 from langgraph_sdk import get_sync_clientclient = get_sync_client(url="http://localhost:2024" ) for chunk in client.runs.stream( None , "agent" , input ={ "messages" : [ { "role" : "user" , "content" : "今天南京天气好吗?适合外出吗?" , }, { "role" : "assistant" , "content" : "今天天气晴朗,23度,适合外出打羽毛球。" }, { "role" : "user" , "content" : "那你给我讲个天气相关的笑话吧" } ], }, stream_mode="messages" , ): print (f"Receiving new event of type: {chunk.event} ..." ) print (chunk.data) print ("\n\n" )
个人感受
如果为了演示,可以尝试上面可视化部分。
如果集成至已有服务,可单独使用LangGraph服务编排。